Table of Contents
Creating beautiful handmade flowers brings joy and satisfaction to any crocheter. The echinacea flower, also known as cone flower, is especially cherished for its distinctive appearance and vibrant colors. This comprehensive guide will walk you through creating realistic crocheted echinacea flowers that can brighten any space as decorative elements.
Understanding the Echinacea Flower Project
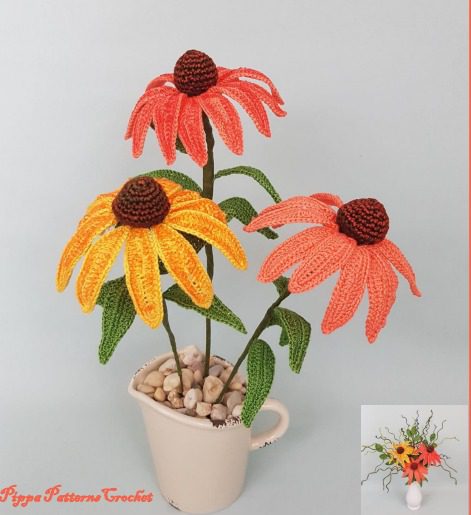
The echinacea flower pattern creates a realistic representation of this popular garden flower. When completed following the instructions, your flower will measure approximately 15cm in diameter. Each flower consists of 12 petals, a distinctive cone-shaped center, and several leaves. You can adjust the number of leaves according to your preference, with four leaves per flower being standard.
Echinacea Materials Needed
For this project, you’ll need:
- DMC Petra No.5 yarn in colors:
- 5608 (coral/orange for petals)
- 5742 (yellow for petals variation)
- 5905 (green for leaves)
- Brown yarn for the flower center
- 1.5mm crochet hook
- 18-gauge stem wire
- 28-gauge floral wire (0.46mm) for leaves
- Green floral tape
- Small amount of stuffing for the center
- Optional: Coloring materials for enhancement (gel wax crayons or acrylic paint)
You can substitute different yarn types, but be aware this may change the final size of your flower. Gauge isn’t critical as long as you follow the pattern instructions precisely.
Echinacea Crochet Abbreviations
Throughout the pattern, you’ll encounter these standard crochet terms:
- ch = chain stitch
- sc = single crochet
- inc = increase (two stitches in same stitch)
- dec = decrease (two stitches worked together)
- hdc = half double crochet
- inc hdc = half double crochet increase
- dec hdc = half double crochet decrease
- dc = double crochet
- inc dc = double crochet increase
- dec dc = double crochet decrease
- tr = treble crochet
- inc tr = treble crochet increase
- dec tr = treble crochet decrease
- dtr = double treble crochet
- inc dtr = double treble crochet increase
- dec dtr = double treble crochet decrease
- sl st = slip stitch
- fo = fasten off
Creating the Petals
Each echinacea flower requires 12 identical petals. For each petal:
- Chain 21, skip first chain.
- Work 4 sc, 3 hdc, 3 dc, 4 hdc, 4 sc into the center (3 sc).
- Continue on the opposite side with 4 sc, 4 hdc, 3 dc, 3 hdc, 4 sc.
- Join with a slip stitch to the first skipped chain.
Next, incorporate floral wire by cutting approximately 30cm of 28-gauge wire and threading it through the loop on your hook. Continue crocheting with the wire held alongside your yarn for added structure.
For the second round:
- Chain 1 and work sc stitches up to the middle of the petal.
- At the center point work: (1 sc, 1 hdc, 1 ch, 1 sc into the peak between sc and hdc, 1 sc).
- Work sc to the end, slip stitch, and fasten off.
- Leave the wire uncut as it will be needed during assembly.
Optional: For added dimension, you can color the upper surface of each petal with a slightly darker shade than your yarn. This subtle enhancement makes the petals appear more three-dimensional.
Creating the Cone Center
The distinctive cone center requires two parts:
Part 1:
- Work 4 sc into a magic ring.
- Round 1: (Inc) alternating with 1 sc = 6 stitches.
- Round 2: (Inc) around = 12 stitches.
- Round 3: (Inc, 1 sc) repeated = 18 stitches.
- Rounds 4-5: 18 sc.
- Round 6: (Inc, 2 sc) repeated = 24 stitches.
- Round 7: 24 sc.
- Round 8: 1 sc, (dec) alternating = 16 stitches.
- Leave a length of yarn for one more round of stitching later.
Part 2:
- Chain 5, join to form a ring.
- Chain 3, work 16 dc into the ring.
- Join with a slip stitch and fasten off.
Creating the Flower Base
- Chain 6, join to form a ring.
- Chain 3, work 12 dc, join with slip stitch.
- For each small leaf (work 6 total): into first stitch, work (3 ch, 1 tr, 1 ch and slip stitch at peak, 3 ch and dc), then slip stitch to next stitch and repeat pattern.
Echinacea Making the Leaves
For each leaf:
- Chain 21.
- Work 20 sc down the chain.
- Insert floral wire (about 30cm) through the loop on your hook.
- Continue with: ch 1, 1 sc, 1 hdc, 1 dc, 1 tr, 3 dtr, (inc dtr), 2 tr, 3 dc, 2 hdc, 3 sc.
- For the center point: (1 sc, 1 hdc, 2 ch, 1 sc into peak between sc and hdc, 1 sc).
- Work down the other side: 3 sc, 2 hdc, 3 dc, 2 tr, (inc dtr), 3 dtr, 1 tr, 1 dc, 1 hdc, 1 sc.
- Join with slip stitch to opposite side. Do not cut the wire.
- Leave a long tail of yarn, wrap it around the leaf wire to form the stem of the leaf.
Assembly Process
- Create a loop at the end of the thick stem wire.
- Insert a small ball of stuffing into this loop.
- Secure the stuffing by twisting the wire.
- Insert this into the cone center (part 1).
- Thread the second cone part onto the stem and connect both parts together using remaining yarn.
- Hide yarn ends inside the center.
For attaching petals:
- Twist the petal wires and trim them evenly.
- Form a loop at the end of each petal wire.
- Thread each petal wire through one of the stitches in the cone center.
- Pull the petal close to the center.
- Wrap the petal wire around the main stem as flat as possible.
- Attach all 12 petals, skipping every fourth stitch (arrange in groups of 4 petals, skip a stitch, add 4 more, etc.).
- Once all petals are attached, push them slightly upward.
- Wrap the stem with green floral tape.
- Slide the flower base up the stem to cover the wire connections. You can secure it with a drop of clear glue if desired.
To shape the petals, gently bend each one with two fingers to create a half-moon curve, giving your flower a more natural appearance.
Adding Leaves and Decorative Elements
Attach leaves to the stem using floral tape, starting about 5-7cm below the flower head. Position the second leaf slightly lower, and any additional leaves about 2.5cm apart down the stem.
For decorative tendrils:
- Cut six pieces of wire about 30-35cm long.
- Wrap five pieces with floral tape.
- Curl each wire around a pencil to create spiral shapes.
- Bind all five spirals together with floral tape and attach to the sixth straight wire piece.
Echinacea Finishing Touches
For a more realistic presentation, you can:
- Place your flower in a small pot with floral foam or styrofoam as a base.
- Insert the stem into the center of the foam for stability.
- Cover the surface with small decorative stones.
Your crocheted echinacea flower is now complete! This beautiful handcrafted flower will never fade and makes a wonderful decoration or gift. The pattern can be adapted to create flowers in different colors, including the traditional purple, orange, yellow, or pink varieties commonly found in gardens.
With practice, you can create an entire bouquet of these stunning flowers with varying heights and colors for a striking display that captures the beauty of echinacea without the need for watering or sunlight.Réessayer
Check this out :Crochet a Cute Sheep Keychain Free Amigurumi Pattern
Conclusion
Creating your own crocheted echinacea flowers is a rewarding craft that combines technical skill with artistic expression. These beautiful handmade blooms capture the distinctive character of real cone flowers while offering the permanence and versatility that live plants cannot provide. By following this detailed pattern, you’ve created a realistic botanical replica that can enhance your home decor year-round.
The beauty of this project lies in its customization possibilities – experiment with different color combinations, petal arrangements, and display options to create unique floral arrangements that reflect your personal style. Whether arranged in a decorative pot, incorporated into a seasonal wreath, or displayed as part of a mixed bouquet, your crocheted echinacea adds a touch of handcrafted charm to any space.
Remember that each flower you create will develop its own character, much like flowers in nature. Embrace these subtle variations as they contribute to the authentic, handmade quality of your work. Consider photographing your finished projects and sharing them with the pattern creator or on social media to inspire other crafters in the community.
With the skills you’ve developed through this pattern, you now have the foundation to explore other botanical crochet projects or even design your own flower patterns. Happy crocheting, and enjoy your beautiful, everlasting echinacea blooms!


Leave a Reply