Table of Contents
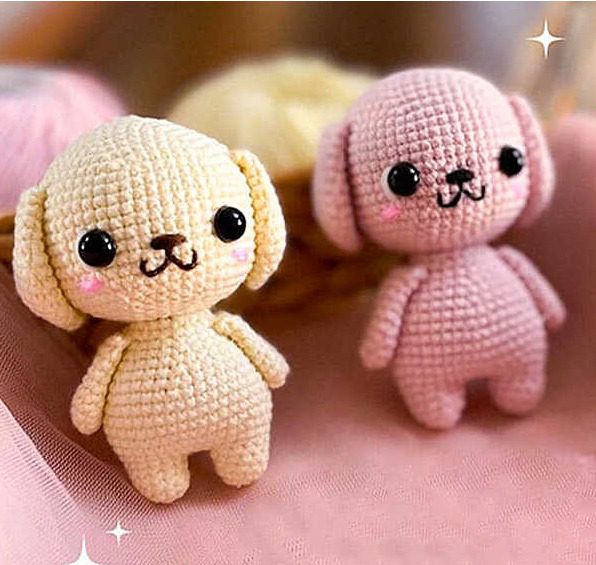
Looking to create Amigurumi Dog a charming canine companion from yarn? This comprehensive amigurumi dog pattern guides you through creating an irresistibly cute puppy with floppy ears and an adorable expression. Perfect for beginner to intermediate crocheters, this detailed pattern creates a lovable dog that makes a wonderful gift for dog lovers, children, or as a special addition to your own handmade collection.
Introduction to Dog Amigurumi
Amigurumi, the Japanese art of crocheting small stuffed creatures, is perfectly suited for creating this endearing puppy. The pattern features a well-proportioned dog with a round head, floppy ears, and a stocky body with short legs. What makes this design special is the attention to facial features and body proportions that capture the essence of a cute puppy in yarn form.
This adorable dog amigurumi was designed by the talented @firacrochets, who has generously shared this free pattern. The resulting plush toy has the perfect balance of realistic canine features and charming cartoon-like qualities that make amigurumi so appealing.
Amigurumi Dog Skill Level and Requirements
This pattern is suitable for beginner to intermediate crocheters who have mastered basic techniques. To successfully complete this dog amigurumi, you should be comfortable with:
- Creating a magic ring
- Working in continuous rounds
- Basic increases and decreases
- Simple assembly techniques
- Basic embroidery for facial features
Amigurumi Dog Materials Needed
Before beginning your dog amigurumi project, gather these supplies:
- Medium weight yarn in your chosen dog color (for the entire body)
- Contrasting yarn for details (optional)
- 2mm crochet hook
- Polyester fiberfill stuffing
- Sewing pins (for positioning parts before attachment)
- Yarn needle for assembly
- Black or brown embroidery thread (for facial features)
- Safety eyes (optional, or can be embroidered)
- Safety nose (optional, or can be embroidered)
- Stitch markers (optional, but helpful)
Amigurumi Dog Crochet Terminology
This pattern uses standard US crochet terminology:
- MR: Magic Ring – a technique for starting crochet in the round with no hole in the center
- Sc: Single crochet – the basic stitch used throughout the pattern
- Inc: Increase – working two single crochet stitches into one stitch
- Dec: Decrease – combining two stitches into one to reduce stitch count
- Rnd: Round – a complete circuit around the piece
- Ch: Chain – the foundation of crochet work
- Slst: Slip stitch – used for joining and creating flat seams
Amigurumi Dog Head Instructions
The head is worked in continuous rounds, starting from the top:
Round 1: Create a magic ring and work 6 single crochet into it. (6 stitches) Round 2: Increase in each stitch around. (12 stitches) Round 3: Work [1 single crochet, 1 increase] 6 times. (18 stitches) Round 4: Work [2 single crochet, 1 increase] 6 times. (24 stitches) Round 5: Work [3 single crochet, 1 increase] 6 times. (30 stitches) Round 6: Work [4 single crochet, 1 increase] 6 times. (36 stitches) Round 7: Work [5 single crochet, 1 increase] 6 times. (42 stitches) Round 8: Work [6 single crochet, 1 increase] 6 times. (48 stitches) Round 9: Work [7 single crochet, 1 increase] 6 times. (54 stitches) Rounds 10-19: Single crochet in each stitch around for 10 rounds. (54 stitches)
Now we’ll begin decreasing to shape the bottom of the head:
Round 20: Work [7 single crochet, 1 decrease] 6 times. (48 stitches) Round 21: Work [6 single crochet, 1 decrease] 6 times. (42 stitches) Round 22: Work [5 single crochet, 1 decrease] 6 times. (36 stitches) Round 23: Work [4 single crochet, 1 decrease] 6 times. (30 stitches) Round 24: Work [3 single crochet, 1 decrease] 6 times. (24 stitches) Round 25: Work [2 single crochet, 1 decrease] 6 times. (18 stitches)
Slip stitch to next stitch, fasten off, and weave in the end.
Stuff the head firmly before closing, making sure to create a rounded shape. Position and attach the safety eyes between rounds 15-16, spacing them 8 stitches apart. If you’re using a safety nose, position it between rounds 16-17, centered between the eyes and spanning approximately 2 stitches in width. Alternatively, you can embroider the eyes and nose using black or brown thread.
Amigurumi Dog Ear Instructions (Make 2)
The ears are worked in continuous rounds:
Round 1: Create a magic ring and work 6 single crochet into it. (6 stitches) Round 2: Increase in each stitch around. (12 stitches) Round 3: Work [1 single crochet, 1 increase] 6 times. (18 stitches) Round 4: Work [2 single crochet, 1 increase] 6 times. (24 stitches) Round 5: Work [3 single crochet, 1 increase] 6 times. (30 stitches) Rounds 6-7: Single crochet in each stitch around for 2 rounds. (30 stitches) Round 8: Single crochet in 13 stitches, decrease once, single crochet in 13 stitches, decrease once. (28 stitches) Round 9: Single crochet in each stitch around. (28 stitches) Round 10: Decrease once, single crochet in 10 stitches, decrease twice, single crochet in 10 stitches, decrease once. (24 stitches) Round 11: Single crochet in each stitch around. (24 stitches) Round 12: Decrease once, single crochet in 8 stitches, decrease twice, single crochet in 8 stitches, decrease once. (20 stitches) Round 13: Single crochet in each stitch around. (20 stitches)
Fold the ear in half and join the edges with 9 single crochet through both layers.
Fasten off, leaving a long tail for attaching to the head. Position the ears on the head between rounds 9-10, with approximately 22 stitches of space between them. The folded part should face toward the back of the head, creating the floppy ear effect.
Amigurumi Dog Legs (Make 2) and Body
The legs and body are worked as a continuous piece. First, make two legs, but only fasten off on the first leg:
For each leg: Round 1: Create a magic ring and work 6 single crochet into it. (6 stitches) Round 2: Increase in each stitch around. (12 stitches) Rounds 3-4: Single crochet in each stitch around for 2 rounds. (12 stitches)
For the first leg, fasten off and weave in the end. For the second leg, do not fasten off as you’ll continue to create the body.
Amigurumi Dog Body (continuing from second leg):
Round 1: Chain 3. Join to the first leg by working 12 single crochet around it. Work 3 single crochet along the chain. Work 12 single crochet around the second leg. Work 3 single crochet along the other side of the chain. (30 stitches) Round 2: Single crochet in each stitch around. (30 stitches) Round 3: Work [4 single crochet, 1 increase] 6 times. (36 stitches) Round 4: Work [5 single crochet, 1 increase] 6 times. (42 stitches) Rounds 5-8: Single crochet in each stitch around for 4 rounds. (42 stitches) Round 9: Work [5 single crochet, 1 decrease] 6 times. (36 stitches) Round 10: Single crochet in each stitch around. (36 stitches) Round 11: Work [4 single crochet, 1 decrease] 6 times. (30 stitches) Round 12: Single crochet in each stitch around. (30 stitches) Round 13: Work [3 single crochet, 1 decrease] 6 times. (24 stitches) Rounds 14-15: Single crochet in each stitch around for 2 rounds. (24 stitches) Round 16: Work [2 single crochet, 1 decrease] 6 times. (18 stitches)
Slip stitch to next stitch, fasten off, leaving a long tail for attaching the head.
Stuff the body firmly before closing the top. Make sure to add extra stuffing in the neck area to support the head. Attach the head to the body, sewing securely around the neck area.
Amigurumi Dog Arm Instructions (Make 2)
The arms are worked in continuous rounds:
Round 1: Create a magic ring and work 6 single crochet into it. (6 stitches) Round 2: Increase in each stitch around. (12 stitches) Rounds 3-8: Single crochet in each stitch around for 6 rounds. (12 stitches)
Flatten the top of the arm and join the edges with 5 single crochet through both layers.
Fasten off, leaving a long tail for attaching to the body. Position the arms on the sides of the body between rounds 2-3, with approximately 9 stitches of space between them. Stuff lightly before attaching.
Facial Details
Use black or brown embroidery thread to add facial features:
- Eyes: If not using safety eyes, embroider eyes using satin stitch or French knots. Position them between rounds 15-16, spacing them 8 stitches apart.
- Nose: If not using a safety nose, embroider a small triangle or oval shape between rounds 16-17, centered between the eyes. The nose should be approximately 2 stitches wide.
- Mouth: Create a small smile beneath the nose using a few straight stitches. You can also add small whisker dots if desired.
- Eyebrows: Optional – add small eyebrow details above the eyes for more expression.
Assembly Tips
- Use pins to position all parts before sewing to ensure proper placement.
- Stuff the head, body, and limbs firmly but not overly tight – the stuffing should fill out the shape without stretching the stitches.
- When attaching the head to the body, use a running stitch around the circumference of the neck, pulling gently to secure it in place.
- For the ears, position them symmetrically on either side of the head, with the folds facing toward the back.
- When attaching the arms, angle them slightly forward for a more natural look.
- Use small, neat stitches when sewing pieces together, working through both layers securely.
Customization Ideas
Make your dog amigurumi uniquely yours with these creative variations:
- Create a specific breed by changing the ear size, head shape, or adding breed-specific details
- Add a collar made from ribbon or a thin strip of crocheted fabric
- Create spots or patches using contrasting yarn or embroidery
- Use variegated or textured yarn for a unique coat effect
- Add a small tag or name badge to the collar
- Make a tiny leash from crocheted chain stitches
- Create a miniature bone or toy as an accessory
- Embroider additional details like paw pads on the feet
Troubleshooting Tips
- If the head seems too large for the body, check your tension and consider using a slightly smaller hook for the head or a larger one for the body
- For wobbly ears, ensure they’re sewn securely along the fold line
- If the dog won’t stand properly, check that the legs are evenly stuffed and properly attached
- For a more defined nose, consider using a safety nose or creating more pronounced embroidery
- If you struggle with the magic ring, you can substitute with a chain 2 and working your stitches into the first chain
Care Instructions
To keep your dog amigurumi looking its best:
- Spot clean with a damp cloth and mild detergent as needed
- Allow to air dry completely
- For dusty amigurumi, use a soft brush or compressed air to clean
- Store in a clean, dry place away from direct sunlight
- If giving to a small child, ensure all parts are securely attached and consider using embroidered features instead of safety eyes
Why Make an Amigurumi Dog?
Crocheting an amigurumi dog offers many benefits:
- Creates a personalized gift for dog lovers or children
- Provides a hypoallergenic alternative for those who can’t have real pets
- Serves as a lasting keepsake that won’t outgrow or age
- Offers a way to practice and improve your crochet skills
- Creates a comforting companion that can be customized to look like a beloved pet
- Makes a wonderful decoration for a child’s room or dog-themed space
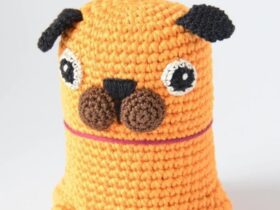
Check this out :Pug Dog Amigurumi Crochet Pattern Tutorial
Conclusion
Congratulations on completing your adorable dog amigurumi! This charming handcrafted puppy makes a wonderful addition to any collection or a thoughtful gift for dog enthusiasts of all ages. The techniques you’ve learned—from creating the perfectly shaped head to attaching the floppy ears—will serve you well in future amigurumi projects.
Remember that each handmade creation has its own unique personality, making your amigurumi dog one-of-a-kind. Whether displayed on a shelf, given as a gift, or serving as a child’s plush companion, your crocheted canine is sure to bring joy for years to come.
Special thanks to @firacrochets for designing and sharing this delightful pattern with the crochet community. Happy crocheting!


Leave a Reply