Table of Contents
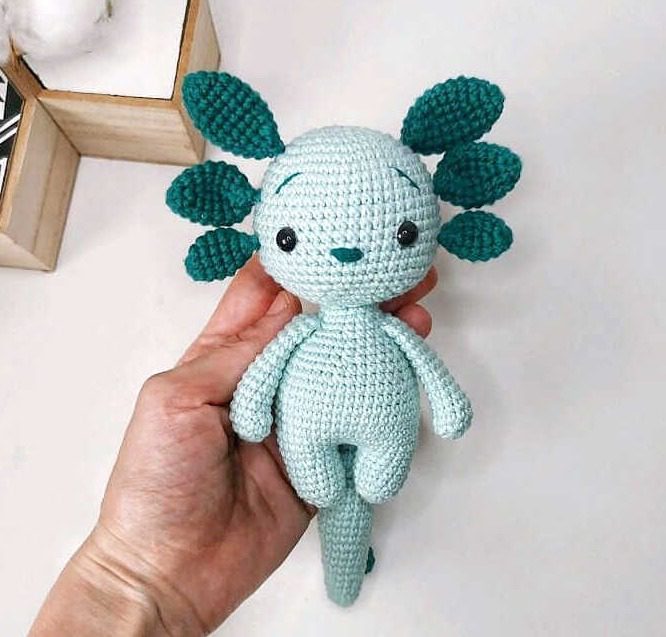
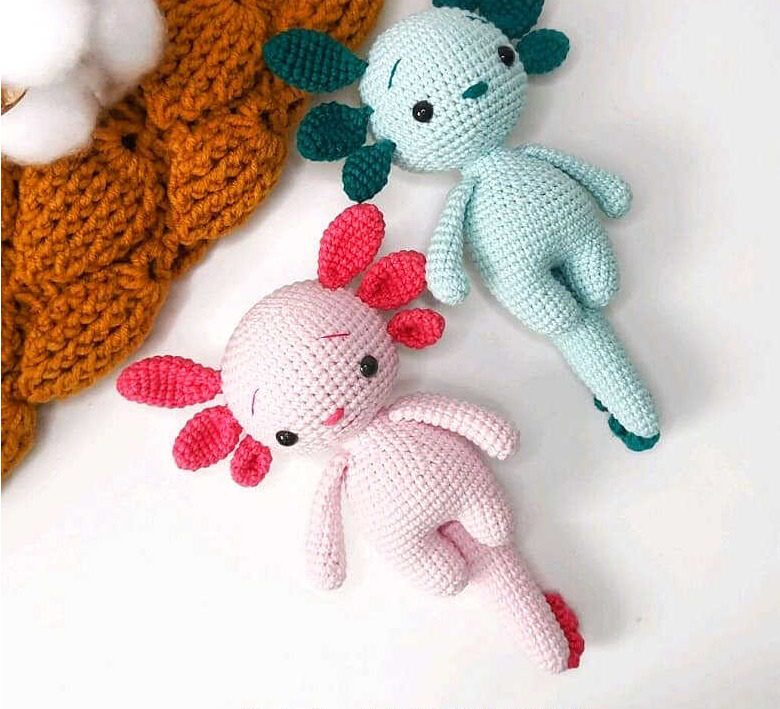
Are you looking for a unique and charming crochet project? This delightful amigurumi axolotl pattern creates an irresistibly cute salamander that Amigurumi Axolotl stands approximately 13 cm (5.1 inches) tall, with a total length of 19 cm (7.4 inches) including the tail. With its distinctive external gills and friendly face, this axolotl plushie will make a wonderful addition to your handmade collection or a perfect gift for animal lovers.
Essential Materials for Your Amigurumi Axolotl
Before beginning this project, gather these supplies:
- Yarn in two colors (recommended brands: YarnArt Jeans, Gazzal Baby Cotton, or Alize Cotton Gold)
- 2.0 mm crochet hook
- 8 mm safety eyes
- Embroidery floss for facial features (nose, mouth, and eyebrows)
- Sewing needle
- Scissors
- Sewing pins
- Fiberfill for stuffing
Understanding Amigurumi Axolotl Terminology
This pattern uses standard crochet abbreviations:
- R = round
- mc = magic circle
- ch = chain
- st = stitch
- sc = single crochet
- dc = double crochet
- inc = increase (2 single crochets in the same stitch)
- dec = decrease (single crochet 2 stitches together)
- F.o. = finish off
- (12) = total stitch count at the end of the round
- (…) * 7 = repeat instructions within parentheses 7 times
Detailed Amigurumi Axolotl Crochet Pattern
Head
Round 1: Create 7 single crochets in a magic circle [7 stitches] Round 2: Increase in each stitch around [14 stitches] Round 3: Single crochet 1, increase 1, repeat 7 times around [21 stitches] Round 4: Single crochet 2, increase 1, repeat 7 times around [28 stitches] Round 5: Single crochet 3, increase 1, repeat 7 times around [35 stitches] Round 6: Single crochet 4, increase 1, repeat 7 times around [42 stitches] Round 7: Single crochet 5, increase 1, repeat 7 times around [49 stitches]
Rounds 8-18: Work 49 single crochets for eleven complete rounds [49 stitches per round]
Place safety eyes between Rounds 15 and 16, positioning them 8 stitches apart from each other.
Round 19: Single crochet 5, decrease 1, repeat 7 times around [42 stitches] Round 20: Single crochet 4, decrease 1, repeat 7 times around [35 stitches] Round 21: Single crochet 3, decrease 1, repeat 7 times around [28 stitches] Round 22: Single crochet 2, decrease 1, repeat 7 times around [21 stitches] Round 23: Single crochet 5, decrease 1, repeat 3 times around [18 stitches]
Finish off and weave in the end.
Amigurumi Axolotl External Gills
Big Gill (Make 2)
Using darker yarn: Round 1: Create 6 single crochets in a magic circle [6 stitches] Round 2: Single crochet 1, increase 1, repeat 3 times around [9 stitches] Round 3: Single crochet 2, increase 1, repeat 3 times around [12 stitches] Round 4: Single crochet 3, increase 1, repeat 3 times around [15 stitches] Rounds 5-7: Work 15 single crochets for three complete rounds [15 stitches per round]
Round 8: Single crochet 3, decrease 1, repeat 3 times around [12 stitches] Round 9: Work 12 single crochets [12 stitches] Round 10: Single crochet 2, decrease 1, repeat 3 times around [9 stitches] Round 11: Work 9 single crochets [9 stitches]
Fold the top of the big gill flat and join both sides with single crochets across. Finish off, leaving a long tail for sewing to the head.
Amigurumi Axolotl Middle Gill (Make 2)
Using darker yarn: Round 1: Create 6 single crochets in a magic circle [6 stitches] Round 2: Single crochet 1, increase 1, repeat 3 times around [9 stitches] Round 3: Single crochet 2, increase 1, repeat 3 times around [12 stitches] Round 4: Single crochet 3, increase 1, repeat 3 times around [15 stitches] Rounds 5-6: Work 15 single crochets for two complete rounds [15 stitches per round] Round 7: Single crochet 3, decrease 1, repeat 3 times around [12 stitches] Round 8: Single crochet 2, decrease 1, repeat 3 times around [9 stitches] Round 9: Work 9 single crochets [9 stitches]
Fold the top of the middle gill flat and join both sides with single crochets across. Finish off, leaving a long tail for sewing to the head.
Small Gill (Make 2)
Using darker yarn: Round 1: Create 6 single crochets in a magic circle [6 stitches] Round 2: Single crochet 1, increase 1, repeat 3 times around [9 stitches] Round 3: Single crochet 2, increase 1, repeat 3 times around [12 stitches] Rounds 4-5: Work 12 single crochets for two complete rounds [12 stitches per round] Round 6: Single crochet 2, decrease 1, repeat 3 times around [9 stitches] Round 7: Work 9 single crochets [9 stitches]
Fold the top of the small gill flat and join both sides with single crochets across. Finish off, leaving a long tail for sewing to the head.
Amigurumi Axolotl Attaching the Gills
Sew the external gills to the head in the following positions:
- Big gills – between Rounds 6 and 7
- Middle gills – between Rounds 11 and 12
- Small gills – between Rounds 15 and 16
Use embroidery floss to create a nose, mouth, and eyebrows.
Tail
Attach the tail to the body between Rounds 4 and 5 by crocheting a single crochet of the body together with a single crochet of the tail.
Round 1: Create 6 single crochets in a magic circle [6 stitches] Round 2: Single crochet 1, increase 1, repeat 3 times around [9 stitches] Round 3: Single crochet 2, increase 1, repeat 3 times around [12 stitches] Rounds 4-5: Work 12 single crochets for two complete rounds [12 stitches per round] Round 6: Single crochet 3, increase 1, repeat 3 times around [15 stitches] Rounds 7-9: Work 15 single crochets for three complete rounds [15 stitches per round]
Round 10: Single crochet 4, increase 1, repeat 3 times around [18 stitches] Rounds 11-17: Work 18 single crochets for seven complete rounds [18 stitches per round] Round 18: Single crochet 5, increase 1, repeat 3 times around [21 stitches] Rounds 19-24: Work 21 single crochets for six complete rounds [21 stitches per round]
Stuff the tail with fiberfill. Fold the top of the tail and join both sides with single crochets across. Finish off.
Tail Fin
Using darker yarn: Make a chain of 20 stitches. Starting from the second chain from the hook: Work 2 double crochets in every stitch to the end of the row. Sew the tail fin to the end of the tail.
Arms (Make 2)
Round 1: Create 6 single crochets in a magic circle [6 stitches] Round 2: Increase in each stitch around [12 stitches] Rounds 3-4: Work 12 single crochets for two complete rounds [12 stitches per round] Round 5: Decrease twice, then work 8 single crochets [10 stitches] Rounds 6-14: Work 10 single crochets for nine complete rounds [10 stitches per round]
Stuff the arm halfway. Fold the top of the arm and join both sides with 4 single crochets across. Finish off.
Legs and Body
Legs (Make 2)
Round 1: Create 6 single crochets in a magic circle [6 stitches] Round 2: Increase in each stitch around [12 stitches] Round 3: Single crochet 1, increase 1, repeat 3 times, then work 6 single crochets [15 stitches] Rounds 4-7: Work 15 single crochets for four complete rounds [15 stitches per round]
Finish off the first leg, but when completing the second leg, do not cut the yarn!
Connecting Legs and Creating the Body
From the second leg: Chain 4, then join with the first leg [38 stitches total]
Continue crocheting the body in the round: Round 1: Work 4 single crochets, increase 1, work 2 single crochets, increase 1, work 16 single crochets, increase 1, work 2 single crochets, increase 1, work 10 single crochets [42 stitches] Rounds 2-7: Work 42 single crochets for six complete rounds [42 stitches per round] Round 8: Single crochet 5, decrease 1, repeat 6 times around [36 stitches] Round 9: Work 36 single crochets [36 stitches]
Stuff the body with fiberfill.
Round 10: Single crochet 4, decrease 1, repeat 6 times around [30 stitches] Rounds 11-12: Work 30 single crochets for two complete rounds [30 stitches per round] Round 13: Single crochet 3, decrease 1, repeat 6 times around [24 stitches] Round 14: Work 24 single crochets [24 stitches] Round 15: Single crochet 2, decrease 1, repeat 6 times around [18 stitches] Round 16: Attach the arms to the sides of the body by crocheting a single crochet of the body together with a single crochet of the arm [18 stitches] Round 17: Work 18 single crochets [18 stitches]
Finish off, leaving a long tail for sewing the body to the head.
Assembling Your Amigurumi Axolotl
Once all the pieces are complete, follow these assembly steps:
- Sew the head to the body, making sure it’s positioned securely
- Verify that all external gills are firmly attached in their correct positions
- Check that the arms are properly connected to the body
- Ensure the tail and tail fin are securely attached
- Double-check all facial features (eyes, nose, mouth, and eyebrows)
Why Create an Amigurumi Axolotl?
Axolotls have become increasingly popular as both pets and adorable characters in various media. Their unique appearance with external gill structures and perpetually smiling faces makes them perfect subjects for amigurumi projects. This crochet axolotl captures the charming essence of these aquatic creatures while creating a huggable plush toy that appeals to crafters of all skill levels.
Whether you’re an experienced crocheter or building your amigurumi skills, this axolotl pattern provides a satisfying project that combines straightforward techniques with distinctive details. The result is a one-of-a-kind creation that showcases your crochet talents while bringing a touch of underwater whimsy to your home.

Check this out :Amigurumi Angel Crochet Pattern
Conclusion: Your Handcrafted Axolotl Journey
Completing this amigurumi axolotl brings together multiple crochet techniques that develop and showcase your skills. From creating the distinctive external gills to crafting the expressive face, each step offers an opportunity to improve your precision and attention to detail. The pattern’s clear instructions make it accessible even to those who are relatively new to amigurumi, while the finished product has enough complexity to satisfy experienced crafters.
These adorable creatures make wonderful gifts for children, perfect desk companions, or charming additions to your plush collection. Their unique appearance is instantly recognizable, making them conversation starters and treasured handmade items. The size is just right – substantial enough to display proudly but small enough to be portable and easy to handle.
The color combinations you choose can dramatically change the character of your axolotl. While the pattern suggests contrasting colors for the body and gills, you might experiment with variegated yarns, sparkly accents, or even glow-in-the-dark yarn for a truly magical creation. Each axolotl you make can have its own personality through slight variations in facial expressions or positioning of the limbs.
As you complete your axolotl amigurumi, take a moment to appreciate not just the finished product but the journey of creating something unique with your own hands. From the first magic circle to the final stitch, you’ve brought this charming creature to life through your patience and craftsmanship.
Happy crocheting, and may your axolotl bring joy to you and anyone lucky enough to receive it as a gift!


Leave a Reply