Table of Contents
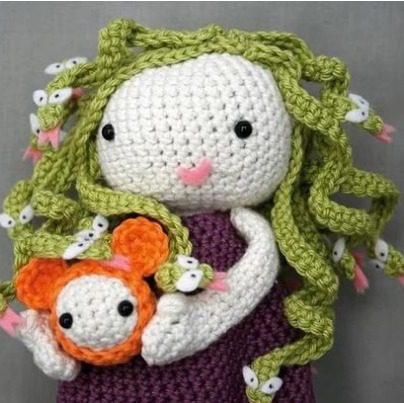
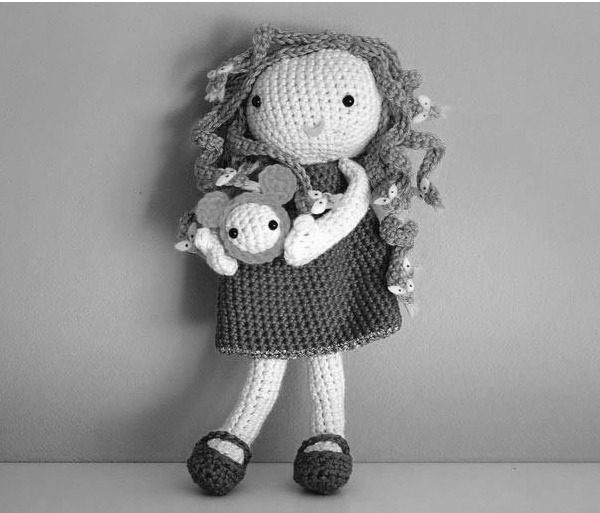
Looking for an enchanting crochet project that stands out from typical amigurumi patterns? This Medusa amigurumi doll offers a Medusa Amigurumi whimsical take on the mythological figure with her snake-like hair and adorable style. Perfect for intermediate crocheters, this detailed guide will walk you through creating your own magical Medusa doll that’s both charming and unique—an excellent display piece or gift for mythology enthusiasts.
Essential Materials for Your Medusa Amigurumi Doll
Before beginning this magical Medusa Amigurumi project, gather these materials:
- Yarn:
- Schachenmayr Catania (100% cotton, 125m/137yds per 50g) in Natural/Creme (105), Mandarin (209), Violet (113), and Apple Green (205)
- Alternative: Rowan Cotton Glacé in similar colors
- Small quantity of gold lurex yarn for accent
- Tools:
- 3mm crochet hook (UK 10, US D/3)
- Stitch marker
- Light pink and white felt
- 4 black safety eyes (5mm)
- Polyester fiberfill stuffing
- Fabric glue
- Black marker
- Tapestry needle
- Crochet Terms Used (UK terminology):
- BLO: work in back loop of stitches only
- ch: chain
- dc: double crochet
- dc2tog: double crochet 2 stitches together (decrease)
- MR: magic ring
- tr: treble
- st: stitch
- bobble: (insert hook, yarn round hook and pull through) 4 times (9 loops on hook), yarn round hook and pull through 8 loops (2 loops on hook), yarn round hook and pull through both remaining loops
Step-by-Step Medusa Amigurumi Pattern Instructions
Medusa Amigurumi Creating the Head (Natural/Creme Yarn)
Round 1: 6 dc into MR (6) Round 2: 2 dc in each st around (12) Round 3: (1 dc in next st, 2 dc in next st) 6 times (18) Round 4: (1 dc in each of next 2 sts, 2 dc in next st) 6 times (24) Round 5: (1 dc in each of next 3 sts, 2 dc in next st) 6 times (30) Round 6: (1 dc in each of next 4 sts, 2 dc in next st) 6 times (36) Round 7: 1 dc in each st around (36) Round 8: (1 dc in each of next 5 sts, 2 dc in next st) 6 times (42) Rounds 9-15: 1 dc in each st around (42) – Place safety eyes in Round 12, 10 sts apart Round 16: (1 dc in each of next 5 sts, dc2tog) 6 times (36) Round 17: 1 dc in each st around (36) Round 18: (1 dc in each of next 4 sts, dc2tog) 6 times (30) Round 19: (1 dc in each of next 3 sts, dc2tog) 6 times (24) Round 20: (1 dc in each of next 2 sts, dc2tog) 6 times (18) – Begin stuffing firmly Round 21: dc2tog 6 times (12)
Fasten off, leaving a long thread for attaching to the body later.
Medusa Amigurumi Forming the Legs (Make 2 – Natural/Creme Yarn)
Round 1: Ch 4, 3 dc in 2nd ch from hook, 1 dc in next ch, 3 dc in last ch; turn and work in free loops of back of beginning ch, 1 dc in each of next 2 ch (9) Round 2: 2 dc in each of next 2 sts, 1 dc in each of next 2 sts, 3 tr in each of next 3 sts, 1 dc in each of next 2 sts (17) Round 3: (1 dc in next st, 2 dc in next st) twice, 1 dc in each of next 3 sts, (1 dc in next st, 2 dc in next st) 4 times, 1 dc in each of next 2 sts (23) Round 4: Working in BLO for this round only – 1 dc in each of next 9 sts, dc2tog 6 times, 1 dc in each of next 2 sts (17) Round 5: 1 dc in each of next 9 sts, dc2tog 3 times, 1 dc in each of next 2 sts (14) Round 6: (1 dc in each of next 2 sts, dc2tog) 3 times, dc2tog (10) – Begin stuffing foot firmly Rounds 7-26: 1 dc in each st around (10) – Continue stuffing as you work Rounds 27-29: Switch to Mandarin yarn and work 1 dc in each st around (10)
For the first leg: Fasten off after Round 29 and set aside. For the second leg: After Round 29, join the legs by putting your hook through the next stitch on second leg, then through any stitch on first leg, and make 1 dc. Continue working on both legs:
Rounds 30-32: 1 dc in each st around (20) Rounds 33-38: Change to Natural/Creme yarn and work 1 dc in each st around (20) Round 39: (dc2tog, 1 dc in each of next 8 sts) twice (18)
Medusa Amigurumi Creating the Dress (Violet Yarn)
The dress attaches directly to the body. Work it inside-out, then pull it down when finished.
Round 1: Attach violet yarn at Round 40 of body, 1 dc in each st around (18) Round 2: (1 dc in next st, 2 dc in next st) 6 times (24) Round 3: (2 dc in next st, 1 dc in each of next 8 sts) twice (26) Round 4: (2 dc in next st, 1 dc in each of next 4 sts) 4 times (30) Round 5: (2 dc in next st, 1 dc in each of next 5 sts) 4 times (34) Round 6: (2 dc in next st, 1 dc in each of next 6 sts) 4 times (38) Round 7: (2 dc in next st, 1 dc in each of next 7 sts) 4 times (42) Rounds 8-9: 1 dc in each st around (42) Round 10: (2 dc in next st, 1 dc in each of next 8 sts) 4 times (46) Rounds 11-13: 1 dc in each st around (46) Round 14: (2 dc in next st, 1 dc in each of next 9 sts) 4 times (50) Rounds 15-17: 1 dc in each st around (50) Round 18: (2 dc in next st, 1 dc in each of next 10 sts) 4 times (54) Rounds 19-25: 1 dc in each st around (54) Round 26: Change to gold lurex yarn, 1 dc in each st around (54)
Fasten off.
Medusa Amigurumi Crafting the Arms (Make 2 – Natural/Creme Yarn)
Round 1: 5 dc into MR (5) Round 2: 2 dc in each st around (10) Rounds 3-4: 1 dc in each st around (10) Round 5: Bobble (thumb), 1 dc in each of next 9 sts (10) Round 6: 1 dc in each st around (10) Round 7: (dc2tog, 1 dc in each of next 3 sts) twice (8) Rounds 8-18: 1 dc in each st around (8)
Fasten off, leaving long tail for sewing. Note: You may stuff the arms if desired, but do so as you work.
Medusa Amigurumi Creating the Snake Hair (Apple Green Yarn)
Make 21 strands total: 7 each of short, medium, and long lengths.
Short Length: Round 1: ch 21 Round 2: 1 dc in 2nd ch from hook, 1 dc in each ch along (20) Fasten off, leaving long tail for sewing.
Medium Length: Round 1: ch 31 Round 2: 1 dc in 2nd ch from hook, 1 dc in each ch along (30) Fasten off, leaving long tail for sewing.
Long Length: Round 1: ch 41 Round 2: 1 dc in 2nd ch from hook, 1 dc in each ch along (40) Fasten off, leaving long tail for sewing.
Medusa Amigurumi Making the Sandals (Make 2 – Violet Yarn)
Rounds 1-5: Same as Rounds 1-5 of legs Round 6: 1 dc in each of next 8 sts, ch 8, attach chain across sandal to beginning of round to form strap
Fasten off and weave in ends.
Medusa Amigurumi Creating the Little Monster Companion
Monster Head (Natural/Creme Yarn): Round 1: 6 dc into MR (6) Round 2: 2 dc in each st around (12) Round 3: (1 dc in next st, 2 dc in next st) 6 times (18) Rounds 4-6: 1 dc in each st around (18) – Place eyes in Round 5, 4-5 sts apart Round 7: (1 dc in next st, dc2tog) 6 times (12) Round 8: dc2tog 6 times (6) – Begin stuffing Round 9: dc2tog 3 times (3) Round 10: Slipstitch to close hole
Fasten off and weave in ends.
Monster Hood (Mandarin Yarn): Rounds 1-6: Same as Rounds 1-6 of monster head Round 7: 1 dc in each st around (18) Round 8: (1 dc in each of next 4 sts, dc2tog) 3 times (15)
Fasten off and weave in ends.
Monster Ears (Mandarin Yarn – Make 2): Round 1: 6 dc into MR (6) Round 2: 2 dc in each st around (12)
Fasten off, leaving length for sewing to hood.
Medusa Amigurumi Final Assembly Instructions
- Attach the Arms: Sew arms to sides of body at Round 2 of dress.
- Connect Head and Body: Sew head to top of body, matching 12 stitches at bottom of head with 12 stitches at top of body.
- Position Sandals: Place on feet without sewing, or sew if preferred.
- Attach the Snake Hair:
- Begin with long lengths, sewing randomly around head
- Add medium lengths, then short lengths
- Create snakeheads: Cut small tongues from pink felt and eyes from white felt
- Mark pupils with black marker
- Attach to hair ends with fabric glue
- Create Medusa’s Expression: Cut small mouth from pink felt and glue to head.
- Finish Little Monster:
- Attach monster ears to hood at Round 6, about 6-7 stitches apart
- Slip monster head into hood (sew if preferred)
- Optionally sew monster to Medusa’s hands
Customization Options for Your Medusa Doll
- Create a seasonal Medusa with different colored snakes
- Add small accessories like a mirror or shield
- Experiment with metallic threads for added shimmer
- Adjust color scheme for a more traditional or modern look
- Create different facial expressions with various embroidery styles

Check this out :Woodland Amigurumi Deer Pattern
Caring for Your Crochet Medusa Doll
- Spot clean only with gentle soap if needed
- Air dry completely away from direct heat
- Store in dust-free environment
- Avoid excessive handling of delicate parts
- Keep away from direct sunlight to prevent fading
Completing this Medusa amigurumi doll showcases both your crochet skills and appreciation for creative character design. The combination of the charming doll with her unique snake hair and cute monster companion creates a display piece that’s sure to spark conversations. Whether made for yourself or as a gift, this mythological creation brings a touch of whimsy to any collection.
Happy crocheting!


Leave a Reply