Table of Contents
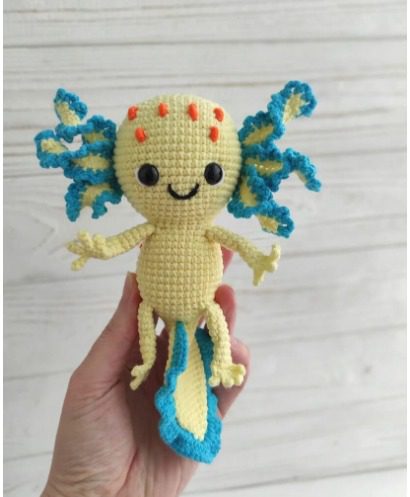
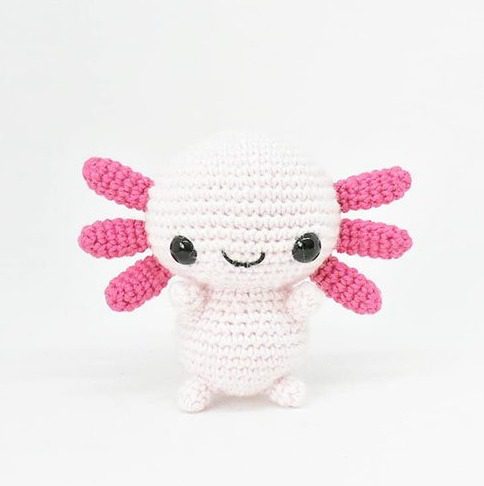
Looking for an adorable underwater creature to add to your amigurumi collection? This kawaii axolotl amigurumi pattern Axolotl Amigurumi creates an irresistibly cute stuffed salamander with distinctive frilly gills that perfectly capture the charm of these fascinating creatures. Suitable for intermediate beginners, this detailed guide walks you through creating a huggable axolotl friend that’s sure to delight both children and adults alike.
Essential Materials for Your Axolotl Amigurumi
Before diving into this delightful project, gather these materials:
- Yarn:
- DK weight yarn in light purple (for body and head)
- DK weight yarn in white or off-white (for ears/gills and tail)
- Hook: 2.5mm crochet hook
- Notions:
- 8mm safety eyes
- Black embroidery thread (for facial features)
- Polyester fiberfill stuffing
- Yarn needle
- Scissors
- Stitch markers
Crochet Terminology Used (US Terms)
- MR: Magic ring – starting ring that can be tightened
- CH: Chain stitch
- X: Single crochet (sc)
- T: Half double crochet (hdc)
- F: Double crochet (dc)
- E: Triple crochet (tr)
- V: Increase (inc) – make 2 stitches in 1 stitch
- W: Make 3 stitches in same stitch
- A: Decrease (dec) – make 1 stitch from 2 stitches
- M: Make 1 stitch from 3 stitches
- TV, FV, EV: Increases with half double crochet, double crochet, and triple crochet
- TA, FA, EA: Decreases with half double crochet, double crochet, and triple crochet
- BLO: Back loop only
- FLO: Front loop only
- SS: Slip stitch
- FO: Fasten off
- St/Sts: Stitch/Stitches
Step-by-Step Axolotl Amigurumi Pattern Instructions
Creating the Head (Light Purple Yarn)
Round 1: 6 sc into magic ring (6) Round 2: inc in each st around (12) Round 3: (sc, inc) 6 times (18) Round 4: (2 sc, inc) 6 times (24) Round 5: (3 sc, inc) 6 times (30) Round 6: (4 sc, inc) 6 times (36) Round 7: (5 sc, inc) 6 times (42) Rounds 8-14: sc in each st around (42) Round 15: (5 sc, dec) 6 times (36) Round 16: (4 sc, dec) 6 times (30) Round 17: (3 sc, dec) 6 times (24) Round 18: (2 sc, dec) 6 times (18)
Fasten off, leaving a long tail for sewing. Stuff the head firmly.
Forming the Body (Light Purple Yarn)
Round 1: 6 sc into magic ring (6) Round 2: inc in each st around (12) Round 3: sc in each st around (12) Round 4: (sc, inc) 6 times (18) Round 5: sc in each st around (18) Round 6: (2 sc, inc) 6 times (24) Round 7: sc in each st around (24) Round 8: (3 sc, inc) 6 times (30) Round 9: sc in each st around (30) Round 10: (4 sc, inc) 6 times (36) Rounds 11-13: sc in each st around (36) Round 14: dec, 34 sc (35) Round 15: 16 sc, dec, 17 sc (34) Round 16: dec, 32 sc (33) Round 17: 15 sc, dec, 16 sc (32) Round 18: (2 sc, dec) 8 times (24) Round 19: (2 sc, dec) 6 times (18)
Fasten off. Stuff the body firmly.
Creating the Legs (Make 4 – Light Purple Yarn)
Round 1: 6 sc into magic ring (6) Rounds 2-4: sc in each st around (6) Round 5: Fold in half and crochet through 2 opposite stitches, 2 sc (2)
Fasten off. Do not stuff. Leave a yarn tail for sewing.
Crafting the Ears/Gills (Make 6 – White or Off-White Yarn)
Round 1: 6 sc into magic ring (6) Round 2: sc in each st around (6) Round 3: inc in each st around (12) Round 4: sc in each st around (12) Round 5: (sc, inc) 6 times (18) Rounds 6-7: sc in each st around (18) Round 8: (sc, dec) 6 times (12) Rounds 9-10: sc in each st around (12)
Fasten off. Leave a yarn tail for sewing.
Making the Tail (White or Off-White Yarn)
For the tail, you’ll use a surface crochet technique:
- Start crocheting from the left side at row 10 of the body
- Go over the magic ring
- Continue to the right side of the body
- End at row 10
Round 1: 21 slip stitches on the surface, turn (21) Round 2: (hdc inc, dc inc, 2 tr inc, dc inc, hdc inc, slip stitch) 3 times (39)
Fasten off and hide yarn tail.
Assembly Instructions for Your Axolotl Amigurumi
- Creating the Face:
- Use black embroidery thread or thin cotton yarn to embroider facial features
- Position eyebrows at round 9, keeping 5 stitches between them
- Add eyelashes at the same level as the eyes
- Create rosy cheeks between rounds 13-14, keeping 7 stitches apart and 1 stitch in width
- Attaching the Ears/Gills:
- Sew the first two ears/gills opposite each other across the magic ring of the head
- Start at round 4 of the head
- Sew the remaining ears/gills next to the first ones
- All ears/gills should extend from round 4 to round 15 of the head
- Joining Head and Body:
- Sew the head to the body securely
- Ensure proper alignment for a balanced appearance
- Attaching the Legs:
- Sew the first two legs at rounds 4-5 from the neck
- Sew the remaining two legs at rounds 12-13 from the neck
- Position legs symmetrically for best appearance
Customization Ideas for Your Axolotl Amigurumi
- Color Variations: Create axolotls in different natural colors like pink, gold, or albino white
- Size Adjustments: Use thicker yarn and larger hook for a bigger axolotl
- Accessorize: Add tiny bubbles made from clear beads or small water plants from felt
- Expression Changes: Vary the embroidery to create different facial expressions
- Textured Gills: Use fuzzy or eyelash yarn for the gills to create more texture
Care Instructions for Your Crocheted Axolotl
- Spot clean with mild soap and water as needed
- Air dry thoroughly away from direct heat
- Avoid submersion in water (despite being a water creature!)
- Display away from direct sunlight to prevent color fading
- Gently brush gills occasionally to maintain their fluffy appearance

Check this out :Crochet a Magical Medusa Amigurumi Doll
Why Axolotls Make Perfect Amigurumi Projects
Axolotls are not only adorable with their permanent smiles and feathery external gills, but they’re also fascinating creatures known for their regenerative abilities. As critically endangered animals native to Mexico, creating an axolotl amigurumi is a wonderful way to appreciate these unique salamanders without impacting wild populations.
Your finished axolotl amigurumi makes a wonderful gift for anyone interested in unusual animals, marine biology, or simply cute stuffed creatures. The distinctive gills and sweet expression ensure this project stands out from typical animal amigurumi patterns.
Happy crocheting!


Leave a Reply