Table of Contents
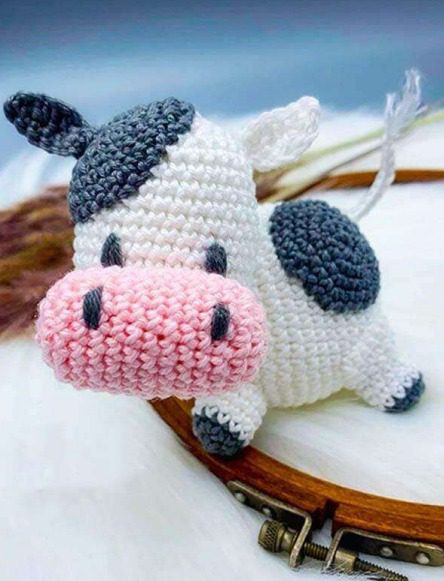
Cow amigurumi patterns have become increasingly popular among crochet enthusiasts looking to create charming decorative pieces or gifts for loved ones. This detailed cow amigurumi pattern creates an irresistibly cute farm animal with its distinctive black and white coloring, pink snout, and adorable proportions. Perfect for beginners and experienced crocheters alike, this free pattern will guide you through creating your own cuddly cow companion.
Why Make a Cow Amigurumi?
Cow amigurumis are versatile decorative items that can brighten up any space. They make excellent gifts for children, charming office decorations, or unique holiday ornaments. The pattern’s simplicity allows for customization with different color combinations—try light brown or purple for a fun twist on the traditional cow colors.
This amigurumi cow pattern is particularly beginner-friendly. Its straightforward construction starts with the head and continues to the body without cutting the yarn, creating a seamless design. The distinctive spots, pink snout, and expressive facial features give this cow its endearing character.
Materials You’ll Need
Before beginning your cow amigurumi project, gather these essential materials:
- Yarn in three colors:
- White (for the body and head)
- Gray or black (for spots and ears)
- Pink (for the snout)
- Crochet hook appropriate for your yarn weight
- Polyester fiberfill for stuffing
- Scissors
- Yarn needle for assembly
- Black embroidery thread for facial details (or safety eyes)
Understanding the Pattern Terminology
This pattern uses standard crochet abbreviations:
- SC – Single Crochet
- HDC – Half Double Crochet
- DC – Double Crochet
- INC – Increase (2 single crochets in the same stitch)
- DEC – Decrease (invisible decrease technique)
- SL ST – Slip Stitch
- CH – Chain
- MR – Magic Ring
Creating the Cow’s Head
Let’s begin with the head, which forms the character of your amigurumi:
Head (using white yarn)
- Round 1: 6 SC in magic ring (6)
- Round 2: [INC] 6 times (12)
- Round 3: [1 SC, INC] 6 times (18)
- Round 4: [2 SC, INC] 6 times (24)
- Round 5: [3 SC, INC] 6 times (30)
- Rounds 6-17: SC in each stitch around (30) for 12 rounds
- Round 18: [3 SC, DEC] 6 times (24)
- Begin stuffing the head firmly
- Round 19: [2 SC, DEC] 6 times (18)
- Round 20: [1 SC, DEC] 6 times (12)
- Round 21: [DEC] 6 times (6)
- Fasten off and weave in end
Crafting the Snout
The pink snout adds character and charm to your cow:
Snout (using pink yarn)
- Round 1: 6 SC in magic ring (6)
- Round 2: [INC] 6 times (12)
- Round 3: [1 SC, INC] 6 times (18)
- Rounds 4-13: SC in each stitch around (18) for 10 rounds
- Begin stuffing the snout
- Round 14: [1 SC, DEC] 6 times (12)
- Round 15: [1 SC, DEC] 6 times (8)
- Round 16: [DEC] 4 times (4)
- Fasten off, leaving a tail for sewing
Forming the Ears
The ears use two different colors for added visual interest:
Ears (make 2: one in gray/black, one in white)
- Row 1: Chain 7
- Row 2: SC in second chain from hook, HDC, DC, DC, HDC, slip stitch, chain 2, turn
- Row 3: 6 SC
- Fasten off, leaving a tail for sewing
Building the Body
The body connects seamlessly to create your cow’s structure:
Body (using white yarn)
- Round 1: 6 SC in magic ring (6)
- Round 2: [INC] 6 times (12)
- Round 3: [1 SC, INC] 6 times (18)
- Round 4: [2 SC, INC] 6 times (24)
- Round 5: [3 SC, INC] 6 times (30)
- Round 6: [4 SC, INC] 6 times (36)
- Round 7: [5 SC, INC] 6 times (42)
- Rounds 8-16: SC in each stitch around (42)
- Round 17: [5 SC, DEC] 6 times (36)
- Round 18: [4 SC, DEC] 6 times (30)
- Begin stuffing the body firmly
- Round 19: [3 SC, DEC] 6 times (24)
- Round 20: [2 SC, DEC] 6 times (18)
- Round 21: [1 SC, DEC] 6 times (12)
- Round 22: [DEC] 6 times (6)
- Fasten off and weave in end
Creating the Legs
The legs provide stability and complete your cow’s appearance:
Front Legs (make 2)
- Round 1: Start with gray/black yarn: 6 SC in magic ring (6)
- Round 2: [INC] 6 times (12)
- Round 3: Change to white yarn: SC in each stitch around (12)
- Rounds 4-6: SC in each stitch around (12)
- Fasten off, leaving a tail for sewing
Back Legs (make 2)
- Follow steps 1-6 of front legs but DO NOT fasten off
- Row 7: Chain 1, turn, 6 SC (6)
- Row 8: Chain 1, turn, 6 SC (6)
- Row 9: Chain 1, turn, 6 SC (6)
- Fasten off, leaving a tail for sewing
Adding the Spots
The distinctive spots complete your cow’s classic appearance:
Spots (make 2 in gray/black)
- Round 1: 6 SC in magic ring (6)
- Round 2: [INC] 6 times (12)
- Round 3: [1 SC, INC] 6 times (18)
- Round 4: [2 SC, INC] 6 times (24)
- Round 5: [3 SC, INC] 6 times (30)
- Fasten off, leaving a tail for sewing
Finishing with the Tail
The tail adds a final touch of authenticity:
Tail (make 1) Either:
- Braid three strands of white yarn to create a 3-4 cm tail, or
- Make a basic crochet cord using this technique: Create a slip knot on the hook, leaving a long tail. Wrap working yarn around your index finger and the tail yarn around your thumb so that both sides of the yarn make a V-shape. Hold the bottom of the slip knot with your right hand to ensure it stays straight. Wind the tail yarn from your thumb around the hook from front to back so you have two loops on your hook. Yarn over with the working yarn from your index finger and pull the working yarn through both loops on the hook. Repeat until desired length. Fasten off and fray the yarn ends for a realistic tail appearance.
Assembly Instructions
To bring your cow amigurumi to life:
- Sew the legs to the bottom of the body, positioning them slightly outward for stability.
- Use pins to secure the legs to the body and test the best placement before sewing.
- Attach the snout to the head.
- Sew one spot to the side of the head and the other to the top of the body.
- Attach the ears to the head.
- Embroider eyes on the head (or use oval safety eyes) and nostrils on the snout.
- Attach the tail to the body.
Customization Ideas
While this pattern creates a classic black and white cow, you can customize your amigurumi by:
- Using brown yarn instead of black/gray for a different cow variety
- Adding a bell around the neck for a farm-themed touch
- Making the cow larger or smaller by changing yarn weight and hook size
- Creating a family of cows in different sizes
This adorable cow amigurumi makes a wonderful handmade gift or a charming addition to your own collection. Its simple yet expressive design captures the essence of these beloved farm animals in a huggable form that will delight crafters and recipients of all ages.Réessayer
Check this out : Crochet a Beautiful Rose Pillow
Conclusion
Creating your own cow amigurumi is a delightful project that combines simple crochet techniques with creative expression. This charming farm animal design is perfect for crocheters of all skill levels, offering an approachable pattern that produces impressive results. The finished cow, with its distinctive spots, expressive face, and adorable proportions, becomes a captivating handmade treasure.
The versatility of this pattern allows for endless possibilities. By changing colors, adjusting sizes, or adding personal touches, you can create a unique interpretation that reflects your individual style. Whether displayed as a decorative accent, given as a thoughtful gift, or used as a child’s toy, your handcrafted cow amigurumi brings warmth and character to any setting.
Beyond the finished product, the process of creating this amigurumi offers its own rewards. The methodical nature of crochet provides a calming, meditative experience, while the satisfaction of watching your cow take shape stitch by stitch brings genuine joy. Each section—from the expressive head to the distinctive spots—builds upon your skills and confidence as a crafter.
As you complete your cow amigurumi, take a moment to appreciate both the charming creation and the crafting journey that brought it to life. This project represents not just a cute decoration, but also the time, creativity, and care you’ve invested in making something truly special by hand. Whether this is your first amigurumi or your fiftieth, each one carries the unique imprint of its maker and becomes a small work of art worthy of display and admiration.


Leave a Reply