Table of Contents
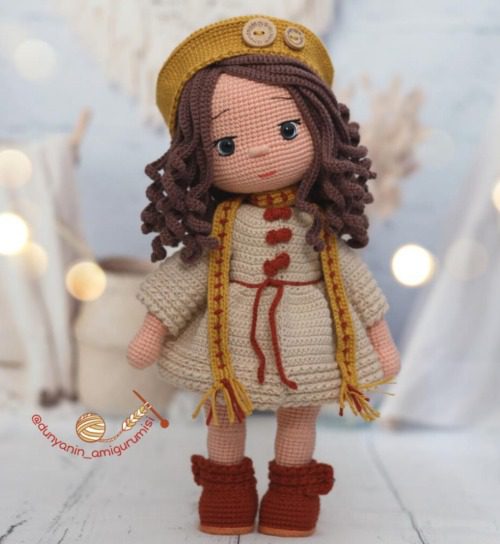
Amigurumi Autumn dolls have captured the hearts of crochet enthusiasts worldwide for their charm, personality, and endless customization options. In this comprehensive guide, I’ll walk you through creating a beautiful autumn-themed amigurumi doll with distinctive curly hair, a cozy outfit, and charming accessories. This detailed pattern is perfect for intermediate crocheters looking to enhance their skills and create a truly special handmade treasure.
Autumn Materials Needed
For the Doll
- Skin-colored cotton yarn (light to medium tone)
- Dark brown yarn for hair
- Black embroidery thread for eyes and eyebrows
- Pink embroidery thread for cheeks and lips
- Polyester fiberfill for stuffing
- 2.5mm crochet hook for main body parts
- 2.0mm crochet hook for detailed areas
- 1.25mm crochet hook for facial features
- Yarn needle
- Stitch markers
- Wire for internal structure (optional)
- Small scissors
For the Outfit and Accessories
- Beige/cream yarn for the dress
- Mustard yellow yarn for beret and trim
- Brown yarn for boots
- Red or burgundy yarn for decorative ties
- Small wooden buttons (2) for beret decoration
- Sewing needle and thread
Autumn Understanding the Techniques
Before we begin, let’s review some essential amigurumi techniques that will help ensure your doll turns out beautifully:
Autumn Invisible Increase and Decrease
For professional-looking results, use invisible increases and decreases instead of standard ones. These create a smoother appearance without obvious holes.
Autumn Tension Control
Maintain consistent tension throughout your work. Amigurumi should be worked tightly enough that stuffing doesn’t show through, but not so tight that it’s difficult to insert your hook.
Autumn Yarn Position for Hair
The curly hair technique requires careful placement of yarn loops to create that beautiful cascading effect.
Autumn Color Changes
Clean color transitions, especially for outfit details, will elevate your finished doll.
Autumn Doll Head and Face Construction
Detailed Head Rounds
Round 1: Magic ring with 6 SC (6) Round 2: INC in each stitch around (12) Round 3: (SC, INC) repeat 6 times (18) Round 4: (2 SC, INC) repeat 6 times (24) Round 5: (3 SC, INC) repeat 6 times (30) Round 6: (4 SC, INC) repeat 6 times (36) Round 7: (5 SC, INC) repeat 6 times (42) Round 8: (6 SC, INC) repeat 6 times (48) Round 9: (7 SC, INC) repeat 6 times (54) Rounds 10-18: SC in each stitch around (54) – This creates the cylindrical portion of the head Round 19: (7 SC, DEC) repeat 6 times (48) Round 20: (6 SC, DEC) repeat 6 times (42) Round 21: (5 SC, DEC) repeat 6 times (36) Round 22: (4 SC, DEC) repeat 6 times (30) Round 23: (3 SC, DEC) repeat 6 times (24) Round 24: (2 SC, DEC) repeat 6 times (18) Round 25: (SC, DEC) repeat 6 times (12) Round 26: DEC around (6)
Fasten off, leaving a tail for closing the opening.
Autumn Facial Features
Eyes
Mark the eye placement with pins, approximately between rounds 12-14, with 10-12 stitches between them.
For embroidered eyes:
- Using black embroidery thread, create a small horizontal oval shape for each eye
- Add a small white highlight stitch in each eye
- Add upper eyelashes with small diagonal stitches
- Embroider thin eyebrows above the eyes in a gentle arch
Cheeks and Mouth
- With pink embroidery thread, create small circular blush spots on each cheek
- For the mouth, create a simple small curved line centered below the eyes
- Add small dimples at the corners if desired
Body Construction
Detailed Body Rounds
Round 1: Magic ring with 6 SC (6) Round 2: INC in each stitch around (12) Round 3: (SC, INC) repeat 6 times (18) Round 4: (2 SC, INC) repeat 6 times (24) Round 5: (3 SC, INC) repeat 6 times (30) Round 6: (4 SC, INC) repeat 6 times (36) Round 7: SC in each stitch around (36) Round 8: (5 SC, INC) repeat 6 times (42) Rounds 9-16: SC in each stitch around (42)
Waist Shaping: Round 17: (5 SC, DEC) repeat 6 times (36) Round 18: SC in each stitch around (36)
Hip and Leg Area: Round 19: (5 SC, INC) repeat 6 times (42) Rounds 20-26: SC in each stitch around (42)
Leg Division: Round 27: SC 21, place marker, SC 21 (42)
Creating the Legs
Now work each leg separately:
First Leg
Round 1: SC in the 21 stitches for the first leg (21) Round 2: SC 8, DEC, SC 9, DEC (19) Round 3: SC in each stitch around (19) Round 4: SC 7, DEC, SC 8, DEC (17) Round 5: SC in each stitch around (17) Round 6: SC 7, DEC, SC 7, DEC (15) Rounds 7-16: SC in each stitch around (15) Fasten off with a long tail for sewing.
Second Leg
Reattach yarn to the remaining 21 stitches and repeat the same pattern as the first leg.
Arms Construction
Detailed Arm Rounds (Make 2)
Round 1: Magic ring with 6 SC (6) Round 2: INC in each stitch around (12) Round 3: SC in each stitch around (12) Round 4: (3 SC, DEC) repeat 2 times (10) Rounds 5-14: SC in each stitch around (10)
Stuff the arms lightly, more firmly at the hands. Fasten off, leaving a long tail for sewing to the body.
Creating Curly Hair
The curly hair technique requires patience but creates beautiful results:
- Prepare dark brown yarn strands, each about 8-10 inches long (you’ll need approximately 120-150 strands)
- Create a base cap for the hair:
- Attach brown yarn to the back of the head at round 8
- Crochet SC around the head covering rounds 8-18
- End with a round of SC in back loops only to create a ridge for attaching hair
- For each curl:
- Fold a strand of yarn in half to create a loop
- Insert your crochet hook through a stitch in the cap from back to front
- Pull the loop through
- Thread the ends through the loop and pull tight
- Repeat this process, working in rows from the bottom up
- For defined curls:
- Take each strand and wrap it around a pencil or small dowel
- Dip in hot (not boiling) water for 10-15 seconds
- Allow to dry completely while still wrapped
- Gently remove and fluff the curls
- Trim the hair to the desired length and style
Mustard Beret Construction
Detailed Beret Rounds
Round 1: With mustard yarn, magic ring with 6 SC (6) Round 2: INC in each stitch around (12) Round 3: (SC, INC) repeat 6 times (18) Round 4: (2 SC, INC) repeat 6 times (24) Round 5: (3 SC, INC) repeat 6 times (30) Round 6: (4 SC, INC) repeat 6 times (36) Round 7: (5 SC, INC) repeat 6 times (42) Round 8: (6 SC, INC) repeat 6 times (48) Round 9: (7 SC, INC) repeat 6 times (54)
For the band: Round 10: In BLO, SC in each stitch around (54) Rounds 11-14: SC in each stitch around (54) Fasten off and weave in ends.
Sew the two small wooden buttons on the side of the beret as shown in the image.
Dress Construction
Beige Dress with Trim
Round 1: With beige yarn, chain 42, join with slip stitch to form a ring Round 2: CH 1, SC in each chain around (42) Rounds 3-5: SC in each stitch around (42)
For the empire waist: Round 6: (5 SC, DEC) repeat 6 times (36) Round 7: SC in each stitch around (36)
For the bodice: Round 8: (4 SC, DEC) repeat 6 times (30) Rounds 9-12: SC in each stitch around (30)
For the yoke and sleeves: Round 13: SC 8, chain 8 (skip 7 stitches), SC 8, chain 8 (skip 7 stitches), SC 7 (30 including chains)
For the collar: Round 14: SC in each stitch and chain (30) Round 15: With mustard yarn, SC in each stitch around (30) Fasten off and weave in ends.
Decorative Front Ties
With red yarn, create two strands of chain stitches, each about 6 inches long. Thread them through the front of the dress as shown, creating a criss-cross pattern. Secure with small knots.
Mustard Trim
Along the bottom edge of the dress: Attach mustard yarn and work a round of SC followed by a round of picot stitch (SC, CH 3, slip stitch in same stitch).
Brown Boots Construction
Detailed Boot Rounds (Make 2)
Sole: Round 1: With brown yarn, magic ring with 6 SC (6) Round 2: INC in each stitch around (12) Round 3: (SC, INC) repeat 6 times (18) Round 4: SC in each stitch around (18)
Upper: Round 5: In BLO, SC in each stitch around (18) Rounds 6-8: SC in each stitch around (18)
Ankle: Round 9: (7 SC, DEC) repeat 2 times (16) Rounds 10-12: SC in each stitch around (16)
Cuff: Round 13: (SC, INC) repeat 8 times (24) Round 14: SC in each stitch around (24) Round 15: SC in each stitch around (24) Fasten off, leaving a small opening to insert the doll’s foot.
Final Assembly
- Stuff the head firmly, especially in the facial area
- Attach the head to the body with strong stitches
- Sew the arms to the body at shoulder height
- Dress the doll in the completed outfit
- Place the beret on the head and secure with a few stitches if needed
- Insert the legs into the boots and sew in place if necessary
Customization Options
This base pattern can be easily modified to create different looks:
- Change the yarn colors for different seasons or styles
- Vary the hair length or color
- Create additional outfits for different occasions
- Add accessories like a small purse or backpack
- Embroider unique facial features for a personalized expression
Display and Care Tips
To keep your amigurumi doll looking its best:
- Display away from direct sunlight to prevent color fading
- Dust gently with a soft brush or compressed air
- For deeper cleaning, spot clean with mild soap and water
- When not on display, store in a cool, dry place
- Handle curly hair gently to maintain its shape
Check this out :Crocheting Lavinya Fashion Doll with Outfit and Accessories
Conclusion
Creating this autumn-themed amigurumi doll with curly hair is a rewarding project that combines various crochet techniques with artistic expression. With patience and attention to detail, you’ll create a unique handcrafted doll that showcases your skills and creativity. Whether made as a special gift or for your personal collection, this charming doll will bring joy for years to come.
Remember that each amigurumi has its own personality and character that emerges during the creation process. Embrace any small variations as part of what makes your doll uniquely yours!
Happy crocheting!




Leave a Reply