Table of Contents
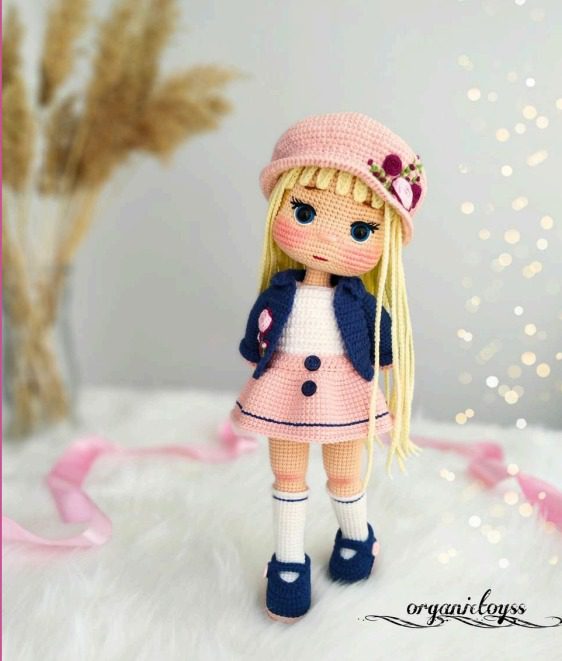
Amigurumi Fashion Doll have captured the hearts of crafters worldwide with their adorable features and detailed designs. These handcrafted dolls offer a creative outlet that combines the art of crochet with the joy of customization. In this comprehensive guide, we’ll walk through the process of creating a fashion-forward amigurumi doll complete with stylish outfit and accessories, perfect for gift-giving or personal collections.
The Allure of Handcrafted Fashion Doll
Handmade dolls have a special charm that mass-produced toys simply can’t match. Each stitch represents the care and attention of its creator, resulting in a one-of-a-kind piece that often becomes a cherished keepsake. Amigurumi dolls in particular have risen in popularity due to their customizable nature and the satisfaction that comes from seeing a character emerge from simple yarn and hook.
The fashion doll we’ll be exploring features:
- Delicate facial features with embroidered details
- Removable clothing pieces for mix-and-match styling
- Realistic proportions with posable limbs
- Stylish accessories including a hat and shoes
- Long blonde hair that can be styled
Essential Materials for Your Fashion Doll
To create a high-quality amigurumi fashion doll, you’ll need the following materials:
For the Doll Base
- Cotton yarn in skin tone (recommend Gazzal Baby Cotton or similar)
- Yarn in colors for clothing (white, pink, navy blue)
- Crochet hooks: sizes 2.0mm and 1.25mm
- Polyester fiberfill for stuffing
- Safety eyes (6mm) or embroidery thread for eyes
- Embroidery thread in various colors for facial features
- Yarn needle
- Stitch markers
- Wire for internal structure (optional for posability)
- Synthetic yarn for hair (blonde)
For the Outfit and Accessories
- Cotton yarn in white, pink, and navy blue
- Small buttons for decorative elements
- Embroidery thread for detail work
- Thin ribbon for embellishments
- Felt for small details
Understanding Fashion Doll Techniques
Before diving into the doll creation, it’s important to understand key amigurumi techniques that will ensure professional-looking results:
Fashion Doll Working in Continuous Rounds
Unlike traditional crochet that works in joined rounds, amigurumi typically uses continuous spiral rounds. This creates a seamless appearance but requires using stitch markers to track your progress.
Fashion Doll Tension Control
Maintaining consistent tension is crucial for amigurumi. Your stitches should be tight enough to prevent stuffing from showing through but not so tight that they’re difficult to work into.
Fashion Doll Invisible Decreases
Using proper decreasing techniques creates a smoother appearance without obvious holes or gaps in your work.
Fashion Doll Color Changes
Clean color transitions make a significant difference in the final appearance, especially for clothing details.
Creating the Doll’s Body and Features
Fashion Doll Head Construction
The doll’s head requires careful attention to detail for achieving that adorable amigurumi face:
Detailed Head Rounds
Round 1: Magic ring with 6 SC (6) Round 2: INC in each stitch around (12) Round 3: (SC, INC) repeat 6 times (18) Round 4: (2 SC, INC) repeat 6 times (24) Round 5: (3 SC, INC) repeat 6 times (30) Round 6: (4 SC, INC) repeat 6 times (36) Round 7: (5 SC, INC) repeat 6 times (42) Rounds 8-14: SC in each stitch around (42) – This creates the cylindrical portion of the head Round 15: (5 SC, DEC) repeat 6 times (36) Round 16: (4 SC, DEC) repeat 6 times (30) Round 17: (3 SC, DEC) repeat 6 times (24) Round 18: (2 SC, DEC) repeat 6 times (18) Round 19: (SC, DEC) repeat 6 times (12) Round 20: DEC around (6)
Insert safety eyes between rounds 9-10, approximately 8-10 stitches apart. Stuff the head firmly as you work, ensuring a smooth, rounded shape. Fasten off, leaving a tail for closing the opening and attaching to the body later. Embroider the facial features: small nose, blushed cheeks, and a delicate mouth.
Facial Embroidery Tips
The doll’s expression brings her to life:
- Use French knots or satin stitch for a small, centered nose
- Create simple curved line for the mouth
- Add small horizontal stitches at the corners of the eyes for eyelashes
- Use pink or peach thread to add blush to the cheeks
- Create thin eyebrows with light brown thread
Fashion Doll Body Construction
For a properly proportioned doll, follow these detailed rounds:
Detailed Body Rounds
Round 1: Magic ring with 6 SC (6) Round 2: INC in each stitch around (12) Round 3: (SC, INC) repeat 6 times (18) Round 4: (2 SC, INC) repeat 6 times (24) Round 5: (3 SC, INC) repeat 6 times (30) Round 6: (4 SC, INC) repeat 6 times (36) Round 7: (5 SC, INC) repeat 6 times (42) Round 8: (6 SC, INC) repeat 6 times (48) Rounds 9-12: SC in each stitch around (48) – This creates the chest area
Waist Shaping: Round 13: (6 SC, DEC) repeat 6 times (42) Round 14: (5 SC, DEC) repeat 6 times (36) Round 15: SC in each stitch around (36)
Hip Shaping: Round 16: (5 SC, INC) repeat 6 times (42) Round 17: (6 SC, INC) repeat 6 times (48) Rounds 18-23: SC in each stitch around (48) – This creates the hip area
Closing the Body: Round 24: (6 SC, DEC) repeat 6 times (42) Round 25: (5 SC, DEC) repeat 6 times (36) Round 26: (4 SC, DEC) repeat 6 times (30) Round 27: (3 SC, DEC) repeat 6 times (24) Round 28: (2 SC, DEC) repeat 6 times (18) Round 29: (SC, DEC) repeat 6 times (12) Round 30: DEC around (6)
Remember to stuff the body firmly but not too tightly before completing the final decreases. Fasten off and weave in the end.
Fashion Doll Arms and Legs
Creating limbs with the right proportions requires careful attention to stitch counts. Here are detailed round instructions for both:
Arm Rounds (Make 2)
Round 1: Magic ring with 6 SC (6) Round 2: INC in each stitch around (12) Round 3: (SC, INC) repeat 6 times (18) – This creates the hand Round 4: Working in BLO, SC in each stitch around (18) Round 5: (7 SC, DEC) repeat 2 times (16) Round 6: (6 SC, DEC) repeat 2 times (14) Round 7: (5 SC, DEC) repeat 2 times (12) Rounds 8-20: SC in each stitch around (12) – This creates the arm length
For the elbow bend (optional): Round 21: In BLO, SC in each stitch around (12) Rounds 22-25: SC in each stitch around (12)
Insert wire if desired before stuffing. Stuff the arms lightly, more firmly at the hands. Fasten off, leaving a long tail for sewing to the body.
Leg Rounds (Make 2)
Round 1: Magic ring with 6 SC (6) Round 2: INC in each stitch around (12) Round 3: (SC, INC) repeat 6 times (18) Round 4: (2 SC, INC) repeat 6 times (24) – This creates the foot base
Foot Shaping: Round 5: SC 9, INC 3, SC 9, INC 3 (30) – This creates a foot oval Rounds 6-8: SC in each stitch around (30) Round 9: SC 9, (SC2TOG) 3 times, SC 9, (SC2TOG) 3 times (24) Round 10: SC in each stitch around (24)
Ankle Shaping: Round 11: (2 SC, DEC) repeat 6 times (18) Round 12: (SC, DEC) repeat 6 times (12) Rounds 13-14: SC in each stitch around (12)
Calf Shaping: Round 15: (SC, INC) repeat 6 times (18) Round 16: (2 SC, INC) repeat 6 times (24) Rounds 17-35: SC in each stitch around (24) – This creates the leg length
For knee detail (optional): Round 25: In BLO, SC in each stitch around (24)
Stuff the legs firmly, particularly in the foot area. Insert wire before stuffing if you want posable legs. Fasten off, leaving a long tail for attaching to the body.
Fashion Doll Hair Application
The doll’s long blonde hair is a defining feature:
- Create a base cap by crocheting over the head
- Cut strands of blonde yarn twice the desired length
- Fold each strand in half to create a loop
- Pull the loop through a stitch in the cap
- Thread the ends through the loop and pull tight
- Repeat this process, working in concentric circles from the center of the head
- Add more strands for a fuller appearance
- Trim and style the hair as desired
Fashion Doll Creating the Fashion Outfit
Pink Skirt
The doll’s cute pink skirt with navy trim requires careful stitch planning:
Detailed Skirt Rounds
Waistband: Round 1: With pink yarn, chain 36, join with slip stitch to form a ring Round 2: CH 1, SC in each chain around (36) Round 3: CH 1, SC in each stitch around (36) Round 4: CH 1, SC in each stitch around (36)
Skirt Fullness: Round 5: CH 1, (5 SC, INC) repeat 6 times (42) Round 6: CH 1, (6 SC, INC) repeat 6 times (48) Round 7: CH 1, (7 SC, INC) repeat 6 times (54) Round 8: CH 1, (8 SC, INC) repeat 6 times (60) Round 9: CH 1, (9 SC, INC) repeat 6 times (66)
Skirt Length: Rounds 10-15: CH 1, SC in each stitch around (66)
For a pleated effect (optional): Round 16: CH 1, SC 2, (SC2TOG, SC) 3 times, SC 2 repeat from * to * around (54) Rounds 17-20: CH 1, SC in each stitch around (54)
Navy Trim: Round 21: With navy yarn, CH 1, SC in each stitch around (54) Round 22: CH 1, SC 4, (SC, CH 1, skip 1 stitch) 2 times, SC 4 repeat from * to * around (54 including chains)
Fasten off and weave in ends. Add a small button or snap at the back for closure.
Fashion Doll White Top
The simple white top with decorative elements requires precise stitching:
Detailed Top Rounds
Neckline: Round 1: With white yarn, chain 30, join with slip stitch to form a ring Round 2: CH 1, SC in each chain around (30)
Shoulder Shaping: Round 3: CH 1, SC 7, INC, SC 14, INC, SC 7 (32) Round 4: CH 1, SC 8, INC, SC 14, INC, SC 8 (34) Round 5: CH 1, SC 9, INC, SC 14, INC, SC 9 (36)
Creating Arm Openings: Round 6: CH 1, SC 8, chain 4 (skip 4 stitches), SC 12, chain 4 (skip 4 stitches), SC 8 (36 including chain spaces)
Body of Top: Round 7: CH 1, SC in each stitch and chain around (36) Round 8: CH 1, SC in each stitch around (36) Round 9: CH 1, SC in each stitch around (36) Round 10: CH 1, SC in each stitch around (36)
Bottom Trim (optional): Round 11: CH 1, SC 4, picot (CH 3, slip stitch in first chain), SC 4 repeat from * to * around (36 plus picots)
For Back Closure: After fastening off, leave the back seam open (approximately 5-6 stitches). Add two small buttons and create button loops with chains of 3-4 stitches.
Optional Decorative Elements:
- For a small floral embellishment: Chain 5, join with slip stitch to form a ring. Work 10 SC into the ring. Join and fasten off. Sew to the front of the top.
- For collar detail: Work a round of reverse SC (crab stitch) around the neckline.
Navy Jacket
The fashionable navy cardigan/jacket requires working in panels:
Back Panel
Row 1: With navy yarn, chain 20 Row 2: SC in 2nd chain from hook and in each chain across (19) Rows 3-15: CH 1, turn, SC in each stitch across (19)
Armhole Shaping: Row 16: CH 1, turn, skip first stitch, SC in next 17 stitches, skip last stitch (17) Rows 17-24: CH 1, turn, SC in each stitch across (17)
Left Front Panel
Row 1: With navy yarn, chain 10 Row 2: SC in 2nd chain from hook and in each chain across (9) Rows 3-15: CH 1, turn, SC in each stitch across (9)
Armhole Shaping: Row 16: CH 1, turn, skip first stitch, SC in next 8 stitches (8) Rows 17-20: CH 1, turn, SC in each stitch across (8)
Neck Shaping: Row 21: CH 1, turn, SC in first 6 stitches (6) Row 22: CH 1, turn, SC in first 5 stitches (5) Rows 23-24: CH 1, turn, SC in each stitch across (5)
Right Front Panel
Work same as left front panel, but in reverse order for neck shaping.
Assembly
- Sew shoulder seams together (5 stitches on each side)
- Sew side seams, leaving armhole openings
- For collar: work SC evenly around the neck opening, increasing at corners
Sleeves (Make 2)
Round 1: Attach navy yarn to armhole, work 24 SC evenly around the opening Rounds 2-3: SC in each stitch around (24) Round 4: (6 SC, DEC) repeat 3 times (21) Rounds 5-7: SC in each stitch around (21) Round 8: (5 SC, DEC) repeat 3 times (18) Rounds 9-11: SC in each stitch around (18) Round 12: (4 SC, DEC) repeat 3 times (15) Rounds 13-15: SC in each stitch around (15)
Cuff (optional): Rounds 16-17: In BLO, SC in each stitch around (15)
Fasten off and weave in all ends. Add small buttons or snaps to front closure if desired.
Pink Hat
The stylish pink beret with flower detail requires precise increasing:
Detailed Hat Rounds
Round 1: With pink yarn, magic ring with 6 SC (6) Round 2: INC in each stitch around (12) Round 3: (SC, INC) repeat 6 times (18) Round 4: (2 SC, INC) repeat 6 times (24) Round 5: (3 SC, INC) repeat 6 times (30) Round 6: (4 SC, INC) repeat 6 times (36) Round 7: (5 SC, INC) repeat 6 times (42) Round 8: (6 SC, INC) repeat 6 times (48) Round 9: (7 SC, INC) repeat 6 times (54) Round 10: (8 SC, INC) repeat 6 times (60) Round 11: (9 SC, INC) repeat 6 times (66) Round 12: (10 SC, INC) repeat 6 times (72)
Creating the Band: Rounds 13-14: SC in each stitch around (72)
For the Brim: Round 15: In BLO, SC in each stitch around (72) Rounds 16-17: SC in each stitch around (72)
Rim Fitting: Round 18: (10 SC, DEC) repeat 6 times (66) Round 19: SC in each stitch around (66) Fasten off and weave in end.
Flower Appliqué
Round 1: With contrasting yarn (dark pink or burgundy), magic ring with 5 SC (5) Round 2: (SC, INC) in each stitch around (10) Round 3: SC in next stitch, (3 DC, slip stitch) in next stitch repeat from * to * around to create 5 petals
For Flower Center: With yellow or white yarn, magic ring with 6 SC. Fasten off.
Sew the flower center to the flower, then sew the completed flower to the side of the hat.
White Socks and Navy Shoes
Complete the outfit with these accessories:
White Socks (Make 2)
Round 1: With white yarn, chain 14, join with slip stitch to form a ring Round 2: CH 1, SC in each chain around (14) Rounds 3-8: SC in each stitch around (14)
For Ribbed Cuff: Rounds 9-12: (FLO SC 1, BLO SC 1) repeat around (14) Fasten off and weave in ends.
Navy Shoes (Make 2)
Sole: Round 1: With navy yarn, magic ring with 6 SC (6) Round 2: INC in each stitch around (12) Round 3: (SC, INC) repeat 6 times (18) Round 4: SC in each stitch around (18)
Upper Part: Round 5: In BLO, SC in each stitch around (18) Round 6: SC 5, (SC2TOG) 4 times, SC 5 (14) Round 7: SC in each stitch around (14) Round 8: SC 4, (SC2TOG) 3 times, SC 4 (11) Round 9: SC in each stitch around (11)
For Mary Jane Style: Strap 1: Chain 6, skip 6 stitches of round 9, slip stitch to join Round 10: SC in each stitch and chain around (11) Fasten off.
For “Buckle” Detail: With white or silver yarn, chain 3. Slip stitch into a circle. Sew onto the shoe strap.
Alternative T-strap Style: After Round 9: SC 3, chain 4, skip 5 stitches, SC 3 (11 including chain) Round 10: SC in each stitch and chain around (11) Next, create vertical strap: Chain 4, attach to center front of foot. Fasten off and weave in all ends.
Assembly and Finishing Touches
Bringing all the components together:
- Attach the head to the body securely
- Join the arms and legs to the body, ensuring symmetrical placement
- Dress the doll in the completed outfit pieces
- Add final touches like the floral detail on the hat
- Style the hair as desired
- Add any additional accessories like the small bag or other decorative elements
Customization Ideas
One of the joys of creating amigurumi dolls is the ability to customize:
- Change hair color or style for different looks
- Create additional outfit pieces for a complete wardrobe
- Add seasonal accessories like scarves or umbrellas
- Create themed outfits for holidays or special occasions
- Make matching mini friends or pets as companions
Care Instructions for Your Amigurumi Fashion Doll
To ensure your creation stays beautiful for years to come:
- Spot clean with mild soap and water as needed
- Allow to air dry completely
- Avoid direct sunlight for extended periods to prevent color fading
- Gently brush or comb hair periodically
- Store in a clean, dry place when not being displayed
Beyond the Basic Pattern
As you become more comfortable with amigurumi techniques, consider these advanced options:
- Jointed limbs using buttons or discs for movement
- Removable hair using a special cap system
- Wire armature throughout the body for full posability
- LED lights incorporated into accessories for special effects
- Magnetic hands to hold small accessories
Showcasing Your Creation
Your completed fashion doll deserves to be showcased:
- Create a special display shelf or case
- Photograph your creation in different settings or outfits
- Share on social media using hashtags like #amigurumi or #crochetdoll
- Consider creating a series of dolls with different styles
- Document your process to inspire other crafters
Check this out :Crocheting an Adorable Koala Amigurumi with Yellow Outfit
Conclusion
Creating an amigurumi fashion doll is a rewarding project that combines various crochet techniques with artistic expression. The result is not just a toy but a work of art that showcases your skills and creativity. Whether you’re making it as a gift or for your personal collection, this fashion-forward doll will surely bring joy with its charming presence and detailed design.
Remember that each doll takes on a personality of its own through your unique stitching and creative choices. Enjoy the process and don’t be afraid to add personal touches that make your creation truly one-of-a-kind.
Happy crocheting!


Leave a Reply