Table of Contents
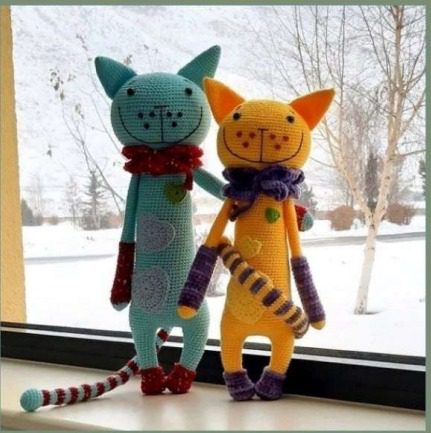
Creating handmade toys brings joy not only to children but also to adults who appreciate unique craftsmanship. In this comprehensive guide, I’ll walk you through creating an adorable crochet cat amigurumi that will become a cherished keepsake or gift. This Cat pattern follows the traditional amigurumi technique, resulting in a charming cat Amigurumi with distinctive features and colorful accents.
Materials You’ll Need
Before starting your crochet journey, gather these essential supplies:
- Cotton yarn in your main color (teal/turquoise as shown)
- Contrasting yarn for decorative elements (red, purple, yellow, or your preference)
- Crochet hook appropriate for your yarn weight (usually 2.5-3.5mm for amigurumi)
- Polyester fiberfill for stuffing
- Yarn needle for sewing pieces together
- Safety eyes or black yarn for embroidering eyes
- Small buttons for the nose and whiskers
- Scissors
Understanding the Cat Amigurumi Terminology
For those new to amigurumi Cat Amigurumi patterns, here’s what the abbreviations mean:
- SC: Single crochet
- INC: Increase (2 single crochets in one stitch)
- DEC: Decrease (join two stitches with one single crochet)
- MR: Magic ring
- CH: Chain stitch
- SL ST: Slip stitch
- ( ): Repeat instructions inside parentheses
- [ ]: Number of stitches at the end of the round
Step-by-Step Cat Amigurumi Cat Pattern
Legs (Make 2)
Begin with dark gray or your chosen accent color:
- Create 6 stitches in magic ring
- Round 1: 6 SC in magic ring [6]
- Round 2: 6 INC [12]
- Round 3: (SC, INC) repeat 6 times [18]
- Rounds 4-7: Change to main color, SC around [18]
- Round 8: (SC, DEC) repeat 6 times [12]
- Rounds 9-10: SC around [12]
- Round 11: (SC, DEC, SC) repeat 4 times [14]
- Rounds 12-13: SC around [14]
- Stuff lightly as you go
Body
- Round 23: (7 SC, join leg) SC across 19 stitches, (7 SC, join second leg) SC across 19 stitches [52]
- Round 24: (SC, INC) repeat 13 times [65]
- Rounds 25-29: SC around [65]
- Round 30: (SC, DEC) repeat 5 times, SC around [60]
- Rounds 31-36: SC around [60]
- Round 37: (SC, DEC) repeat 5 times, SC around [55]
- Rounds 38-43: SC around [55]
- Round 44: (SC, DEC) repeat 5 times, SC around [50]
- Rounds 45-54: SC around [50]
- Round 55: (SC, DEC) repeat 5 times, SC around [45]
- Rounds 56-65: SC around [45]
- Round 66: (SC, DEC) repeat 5 times, SC around [40]
- Rounds 67-76: SC around [40]
- Round 77: (SC, DEC) repeat 5 times, SC around [35]
- Round 78: Insert arms at the sides, SC around [35]
- Rounds 79-83: SC around [35]
Note: The starting point of each round is at the back of the toy.
Arms (Make 2)
Work without stuffing in main color:
- Round 1: 6 SC in magic ring [6]
- Round 2: 6 INC [12]
- Round 3: (SC, INC) repeat 4 times [16]
- Round 4: SC around [16]
- Change to decorative color (red as shown)
- Rounds 5-10: SC around [16]
- Round 11: DEC, SC around [15]
- Rounds 12-16: SC around [15]
- Round 17: DEC, SC around [14]
- Rounds 18-22: SC around [14]
- Round 23: Change to main color, SC, DEC, SC around [13]
- Rounds 24-48: SC around [13]
- Fold in half and stitch closed
Head
- Round 84: 35 INC [70]
- Round 85: SC, (INC, SC) repeat 7 times, SC, (SC, INC) repeat 7 times, SC [84]
- Rounds 86-100: SC around [84]
- Round 101: (DEC, SC) repeat 7 times [77]
- Round 102: SC, (DEC, SC) repeat 6 times, SC [70]
- Round 103: (DEC, SC) repeat 7 times [63]
- Round 104: SC around [63]
- Round 105: SC, (DEC, SC) repeat 6 times, SC [56]
- Round 106: SC around [56]
- Round 107: (DEC, SC) repeat 7 times [49]
- Round 108: SC around [49]
Insert safety eyes between rounds 101 and 102, with approximately 17 stitches between eyes.
- Round 109: SC, (DEC, SC) repeat 6 times, SC [42]
- Round 110: (DEC, SC) repeat 7 times [35]
- Round 111: SC, (DEC, SC) repeat 6 times, SC [28]
- Round 112: (DEC, SC) repeat 7 times [21]
- Round 113: (DEC, SC) repeat 7 times [14]
- Round 114: 7 DEC [7]
- Pull tight to close opening
Tail
- Round 1: 6 SC in magic ring [6]
- Round 2: 6 INC [12]
- Round 3: (SC, INC) repeat 6 times [18]
- Rounds 4-6: SC around [18]
- Round 7: (DEC, SC) repeat 6 times [12]
- Round 8: SC around [12]
- Rounds 9-10: Change to decorative color, SC around [12]
- Rounds 11-13: Change to main color, SC around [12]
Repeat the Repeat the Cat Amigurumi pattern of 2 rows decorative color and 3 rows main color for 14 repetitions. Add 3 stitches to close the opening by folding in half.
Cat Amigurumi pattern of 2 rows decorative color and 3 rows main color for 14 repetitions. Add 3 stitches to close the opening by folding in half.
Ears (Make 2)
- Round 1: 6 SC in magic ring [6]
- Round 2: (INC, SC) repeat 2 times [8]
- Round 3: (INC, SC) repeat 2 times [10]
- Round 4: (INC, SC) repeat 2 times [12]
- Round 5: (INC, SC) repeat 2 times [14]
- Round 6: SC around [14]
- Round 7: (INC, SC) repeat 2 times [16]
- Round 8: SC around [16]
- Round 9: (INC, SC) repeat 2 times [18]
- Round 10: SC around [18]
- Round 11: (INC, SC) repeat 2 times [20]
- Round 12: SC around [20]
- Round 13: (INC, SC) repeat 2 times [22]
- Round 14: SC around [22]
- Round 15: (INC, SC) repeat 2 times [24]
- Round 16: SC around [24], close opening
Heart Appliqués
Follow the heart chart shown in the Cat pattern, or:
- Create a magic ring with 6 SC
- Increase in specific places to form the heart shape
- SC around the edges to define the shape
Finishing Touches
Cat Face Details
- Nose: Place between rows 3-4 from the eyes, width of 3 stitches
- Mouth: Embroider a line down 10 rows from the nose
- Whiskers: Attach buttons or embroider with black yarn
Ear Placement
- Attach ears by counting 12 stitches from eyes, one row below eyes
Final Assembly
- Embroider eyebrows
- Attach all pieces securely
- Add any decorative elements like the scarf shown in the images
- Give your cat toy a final shape adjustment
Cat Amigurumi Scarf (Optional)
- Chain 30 stitches plus 2 turning chains
- Work rows of SC with decorative stitch variations
- Add fringe or tassels at the ends
- Wrap around the cat’s neck and secure
Cat Amigurumi Shoes (Optional)
- Round 1: 6 SC in magic ring [6]
- Round 2: 6 INC [12]
- Round 3: (SC, INC) repeat 6 times [18]
- Rounds 4-5: SC around [18]
- Round 6: SC, DEC, SC, DEC, SC [14]
- Rounds 7-9: SC around [14]
This adorable crochet cat Amigurumi will brighten any room and make a perfect gift for children or cat lovers. The beauty of this pattern is its flexibility—you can adjust colors, add details, or modify the size to create a truly unique handmade treasure.
Whether you’re a beginner looking to improve your skills or an experienced crocheter wanting to try something new, this amigurumi cat Amigurumi project offers a rewarding crafting experience. Remember to take your time, especially with the assembly, to ensure all parts are securely attached.
Happy crocheting, and enjoy creating your new feline friend!
Check this out :Izuku Midoriya Crochet Pattern
Conclusion
Creating your own amigurumi cat toy is more than just following a pattern—it’s about bringing a unique character to life with your own hands. This project combines basic crochet techniques with creative details to produce a charming companion that stands out from mass-produced toys.
The beauty of handmade amigurumi lies in the personal touches you add—from selecting your favorite color combinations to adding special details that make each creation one-of-a-kind. As you complete this project, you’ll not only have a delightful toy but also the satisfaction of having mastered various crochet techniques.
This cat pattern is versatile enough to become a foundation for future creations. Once you’re comfortable with the basic structure, experiment with different yarn types, sizes, and embellishments to create an entire family of crocheted companions.
Whether you’re making this amigurumi cat as a gift or keeping it for yourself, the time and love invested in each stitch transforms simple yarn into a treasured keepsake that will bring joy for years to come. The skills you develop through this project will serve as building blocks for more advanced crochet challenges in the future.
So gather your supplies, follow the steps at your own pace, and watch as your cat amigurumi takes shape—stitch by stitch, round by round—until you’re holding a finished creation that showcases your crafting abilities and creative spirit.


Leave a Reply