Table of Contents
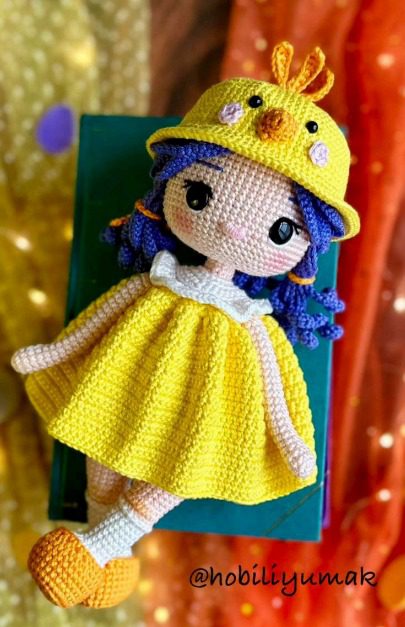
Are you looking for a charming amigurumi project that combines cuteness with character? The Aiko crochet doll pattern offers an adorable challenge for intermediate crocheters with its distinctive features, including vibrant purple hair, a sunny yellow dress, and an endearing chick-themed hat. This comprehensive guide will walk you through creating your own Aiko doll, standing approximately 25 cm tall when completed.
What Makes the Aiko Doll Special
The Aiko doll stands out among amigurumi patterns with its thoughtful design elements and playful accessories:
- Distinctive Styling: Featuring bright purple hair, a cheerful yellow dress with a white collar, and orange shoes
- Chick-Themed Hat: The adorable yellow hat resembles a baby chick with eyes, beak, and feather details
- Movable Parts: Wire-reinforced body allows for posing and movement
- Detailed Facial Features: Carefully crafted eyes, embroidered details, and rosy cheeks
- Accessories: Includes a miniature pull wagon with Easter egg decorations
Materials Needed for Your Aiko Doll
Yarn Requirements
For the best results, use Schachenmayr Catania yarn (sport/baby weight, 100% mercerized cotton, 50g/125m per ball) in the following colors:
- Soft skin (Tr 263): 1 ball for body
- Cream/nature (105): 1/2 ball for underpants, socks, and dress trim
- Purple (very peri) (02022): 1 ball for hair
- Yellow (dandelion) (280): 1 ball for dress and hat
- Orange (mango) (411): 1/2 ball for hat details and shoes
- Pink (baby pink) (08414): 1/2 ball for hat details
Additional Materials
- Crochet hook: 2.20 mm
- Safety eyes: 10 mm black (for head) and 5 mm black (for hat)
- Copper wire: 2.5 mm / 30 cm for neck and arms
- Buttons: 1 yellow button for dress and 4 wooden buttons for pull wagon
- Fiberfill: Approximately 150g for stuffing
- Tools: Tapestry needle, pins (about 15), textile glue, and hard plastic for foot soles
- Embroidery supplies: White and thin black yarn for eye details, pastel powder for cheeks
Understanding the Pattern Abbreviations
This pattern uses US crochet terms. The key abbreviations include:
- MR: Magic ring
- sc: Single crochet
- inc: Increase (2 single crochet in one stitch)
- dec: Decrease (2 stitches crocheted together)
- hdc: Half double crochet
- dc: Double crochet
- w: 3 single crochet in one stitch
- m: Decrease 3 single crochet together
- blo: Back loop only
- flo: Front loop only
Step-by-Step Aiko Doll Construction
Creating the Arms
Begin with the arms using skin-tone yarn:
- Start with 6 sc in a magic ring
- Increase to 12 stitches
- Work straight for 3 rounds
- Decrease to 10 stitches
- Continue straight for 19 rounds
- Do not stuff the arms
Making the Legs and Feet
The legs are worked in two parts – cream yarn for the socks and skin tone for the upper legs:
- Start with cream yarn, forming an oval base for the foot
- Create increases to form the rounded foot shape
- Add a plastic sole for stability
- Work upward to form the ankle and calf
- Switch to skin tone yarn for the upper leg
- Shape the leg with increases and decreases to create anatomical contours
- Create a second leg following the same pattern
Creating the Body and Attaching the Limbs
- Join the legs with chain stitches to form the crotch
- Work upward in rounds, increasing gradually to shape the torso
- Insert and shape copper wire for limb posability
- Attach the arms while continuing to work the body rounds
- Decrease for the neck area
- Stuff firmly throughout the process
Crafting the Head and Face
- Create a rounded head shape using increase and decrease rounds
- Insert safety eyes at the marked positions
- Shape the head with decreases toward the neck
- Form a channel at the neck for the copper wire
- Embroider facial features including eyelashes and eyebrows
- Add a nose detail and rosy cheeks
Creating the Purple Hair
- Crochet a base cap with 32 stitches
- Add hair strands of varying lengths in specific positions:
- 11 shorter strands (20 sc each) at the back
- 12 medium strands (40 sc each) at the sides
- 10 front strands (25 sc each)
- Secure the hair to the head, leaving some front strands free
- Add orange hair ties for the side ponytails
Making the Yellow Dress
- Begin with cream yarn for the collar and upper portion
- Create buttonhole and add contrasting trim
- Switch to yellow yarn for the main dress
- Work in rounds to create a full, A-line shape
- Add trim and finishing details
- Sew a button closure at the back
Crafting the Chick Hat
- Create a rounded hat base using yellow yarn
- Form a wide brim with front loop stitches
- Add orange nose/beak detail
- Create small pink cheeks
- Attach safety eyes
- Add small orange feather details at the top
- Sew all elements securely to complete the hat
Creating the Orange Shoes
- Form an oval base for each shoe
- Work around to create the shoe shape
- Add details and finishing stitches
Making the Pull Wagon and Easter Eggs (Optional Accessories)
- Create rectangular panels for the base and sides of the wagon
- Join all pieces with single crochet
- Add wooden button wheels
- Create small Easter eggs in various colors
- Place eggs in the wagon for a decorative display
Assembly and Finishing Touches
- Insert the neck support wire and attach the head securely
- Dress the doll in her yellow dress and secure the closure
- Place the chick hat on the head
- Add shoes to the feet
- Apply any final embellishments or details
Tips for Success
- Wire Placement: Follow the wire placement guide carefully to ensure proper posability
- Tension: Maintain consistent tension throughout for uniform appearance
- Stuffing: Fill the body firmly but evenly to prevent lumps or distortion
- Facial Features: Take your time with the facial embroidery for the best expression
- Hair Attachment: Secure hair strands methodically for a neat appearance
Customization Options
While the original Aiko doll features a specific color scheme, you can personalize your creation:
- Alternative Colors: Change the dress, hair, or hat colors to suit your preference
- Seasonal Variations: Create different outfits for holidays or seasons
- Accessory Options: Add additional props or modify the pull wagon contents
- Facial Expression: Alter the embroidery to create different emotions
Check this out :Nevil the Sailor Seal Amigurumi Pattern
Conclusion
The Aiko crochet doll pattern creates a delightful character full of personality and charm. With careful attention to detail and the step-by-step instructions provided, you’ll be able to create your own adorable Aiko doll that will bring joy as a display piece or a cherished gift.
Remember that factors like yarn choice, hook size, and personal crocheting tension may affect the final size and appearance of your doll. Take your time with each step, especially the facial features and hair attachment, to achieve the best results.
When sharing your completed Aiko doll on social media, be sure to tag @hobiliyumak and use the hashtag #hobiliyumak so the designer can see and potentially share your wonderful creation.
Happy crocheting!
This article is based on the Aiko Doll pattern by @hobiliyumak. Please respect copyright by purchasing the original pattern for personal use and not redistributing the pattern itself.
#AikoCrochetDoll #AmigurumiPattern #CrochetDoll #AmigurumiDoll #CrochetTutorial #HandmadeDolls #CrochetCharacter #ChickHat #EasterCrochet #YellowDress


Leave a Reply