Table of Contents
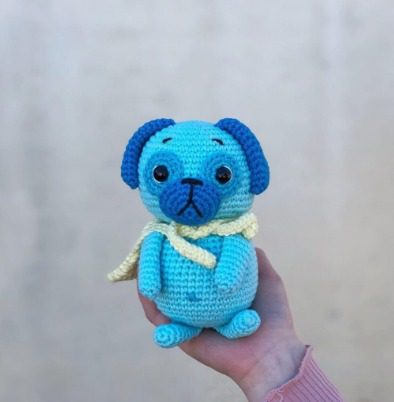
Are you looking to create an adorable pug dog amigurumi that captures all the charm of this beloved breed? This comprehensive crochet pattern will guide you through making a cute, huggable pug with the characteristic wrinkly face, curly tail, and Dog Amigurumi expressive eyes that make these dogs so endearing. Perfect for dog lovers, this beginner-friendly pattern creates a delightful handmade toy that makes a wonderful gift or personal keepsake.
Introduction to Dog Amigurumi
Amigurumi, the Japanese art of crocheting small stuffed toys, is the perfect technique for creating this charming pug dog. The pattern is designed to capture the distinctive features that make pugs so recognizable—from their compact body shape to their expressive face. Using simple crochet techniques and readily available materials, you’ll create a delightful pug companion that’s approximately 6 inches tall when completed.
Dog Amigurumi Skill Level and Requirements
This pattern is rated as beginner-friendly. To successfully complete this pug amigurumi, you should be familiar with:
- Crocheting in the round
- Basic crochet stitches (single crochet, half double crochet)
- Working in back loops only
- Increasing and decreasing
- Sewing pieces together
- Basic embroidery for facial features
Dog Amigurumi Materials Needed
Before beginning your pug amigurumi project, gather these supplies:
- Medium weight cotton yarn (size 4) in:
- Yellow (for body and legs)
- Bordeaux/burgundy (for collar)
- Aunt Lydia Classic Cotton Thread (size 10) in:
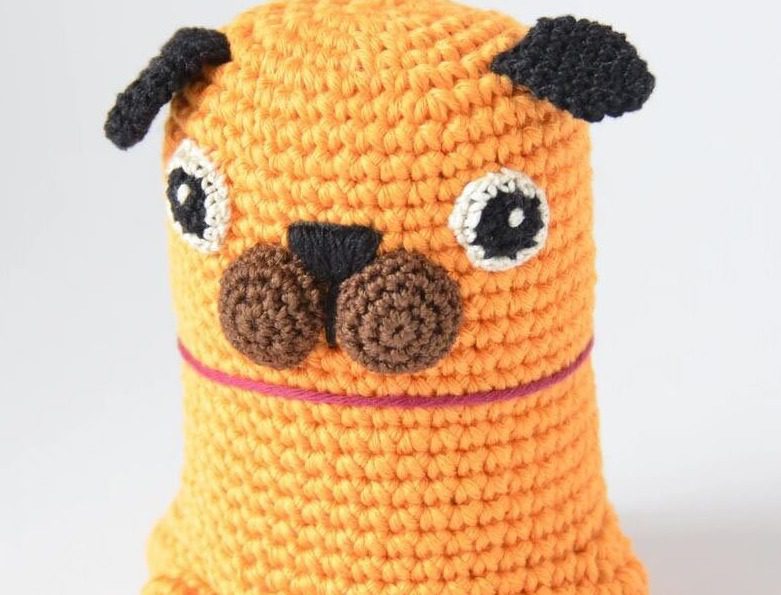
- Black (for ears and eyes)
- Brown (for muzzle)
- White (for eye details)
- Crochet hooks:
- Size E/3.25mm (for body parts)
- Size 2.75mm (for smaller details)
- Polyester fiberfill stuffing
- Yarn needle
- Scissors
- Stitch markers (optional, but helpful)
Understanding Dog Amigurumi Terminology
This pattern uses standard US crochet terminology:
- MR: Magic Ring – creates a tight center for crocheting in rounds
- Ch: Chain – the foundation of crochet work
- Sl st: Slip stitch – used to join rounds
- Sc: Single crochet – the main stitch used for most of the pug
- Hdc: Half double crochet – used for creating shape in the body
- BLO: Back loop only – creates a visible ridge in the design
- Inc: Increase – making two stitches in the same stitch
- Dec: Decrease – combining two stitches into one
- F/O: Fasten off – securing and ending your work
Dog Amigurumi Working Method
Unless otherwise specified, this pattern is worked in joined rounds. At the end of each round, join with a slip stitch and chain 1 before beginning the next round.
Dog Amigurumi Body Instructions
Using yellow yarn and your 3.25mm hook:
Round 1: Create a magic ring and work 7 single crochet into it. (7 stitches) Round 2: Increase in each stitch around. (14 stitches) Round 3: Work [1 single crochet, 1 increase] 7 times. (21 stitches) Round 4: Work [2 single crochet, 1 increase] 7 times. (28 stitches) Round 5: Work [3 single crochet, 1 increase] 7 times. (35 stitches) Round 6: Work [4 single crochet, 1 increase] 7 times. (42 stitches) Rounds 7-24: Single crochet in each stitch around. (42 stitches)
Now we’ll create the characteristic pug shape by adding fullness to the sides: Round 25: 9 single crochet, 2 half double crochet increases, 18 single crochet, 2 half double crochet increases, 11 single crochet. (46 stitches) Round 26: 9 single crochet, 4 half double crochet increases, 18 single crochet, 4 half double crochet increases, 11 single crochet. (54 stitches) Round 27: Single crochet in each stitch around. (54 stitches) Round 28: 9 single crochet, 4 half double crochet decreases, 18 single crochet, 4 half double crochet decreases, 11 single crochet. (46 stitches)
Now we’ll create the neck definition and begin decreasing for the bottom closure: Round 29: Working in back loops only, single crochet in each stitch around. (46 stitches)
Begin stuffing the body at this point.
Round 30: Work [5 single crochet, 1 decrease] 6 times, then 4 single crochet. (40 stitches) Round 31: Work [3 single crochet, 1 decrease] 8 times. (32 stitches) Round 32: Work [2 single crochet, 1 decrease] 8 times. (24 stitches) Round 33: Work [1 single crochet, 1 decrease] 8 times. (16 stitches)
Finish stuffing the body firmly.
Round 34: Decrease around. (8 stitches) Round 35: Decrease around. (4 stitches)
Fasten off, weave in the tail, and close the hole securely.
Dog Amigurumi Ear Instructions (Make 2)
Using black cotton thread and your 2.75mm hook:
Round 1: Create a magic ring and work 6 single crochet into it. (6 stitches) Round 2: Work [2 single crochet, 1 increase] 2 times. (8 stitches) Round 3: Work [1 single crochet, 1 increase] 4 times. (12 stitches) Round 4: Work [5 single crochet, 1 increase] 2 times. (14 stitches) Rounds 5-6: Single crochet in each stitch around. (14 stitches) Round 7: Work [5 single crochet, 1 decrease] 2 times. (12 stitches) Round 8: Flatten the ear and crochet through both layers, work 6 single crochet. (6 stitches) Round 9: Decrease once, 2 single crochet, decrease once. (4 stitches)
Fasten off, leaving a long tail for sewing to the head between rounds 5-6 of the body.
Dog Amigurumi Eye Instructions (Make 2)
Using black cotton thread and your 2.75mm hook:
Round 1: Create a magic ring and work 6 single crochet into it. (6 stitches) Round 2: Work [1 single crochet, 1 increase] 3 times. (9 stitches)
Switch to white cotton thread:
Round 3: Work [2 single crochet, 1 increase] 3 times. (12 stitches)
Fasten off, leaving a long tail for sewing to the face. Position the eyes between rounds 9-12 of the body, approximately 8 stitches apart.
Muzzle Instructions (Make 2)
Using brown cotton thread and your 2.75mm hook:
Round 1: Create a magic ring and work 8 single crochet into it. (8 stitches) Round 2: Work [1 single crochet, 1 increase] 4 times. (12 stitches) Round 3: Work [1 single crochet, 1 increase] 6 times. (18 stitches)
Fasten off, leaving a long tail for sewing to the face. Position the muzzle between rounds 11-14 of the body. Stuff lightly as you attach it.
Leg Instructions (Make 4)
Using yellow yarn and your 3.25mm hook:
Round 1: Create a magic ring and work 6 single crochet into it. (6 stitches) Round 2: Work [2 single crochet, 1 increase] 2 times. (8 stitches)
Fasten off, leaving a long tail for sewing to the body. Position the legs evenly around the bottom portion of the body.
Tail Instructions
Using yellow yarn and your 3.25mm hook:
Chain 4. Work 3 single crochet in the 2nd chain from hook, then 3 single crochet increases in the next 2 stitches. (9 stitches)
Fasten off, leaving a long tail for sewing to the back of the pug. Curve the tail slightly to create the characteristic pug curl.
Collar Instructions
Using bordeaux/burgundy yarn:
Cut a long strand of yarn and wrap it around the pug’s neck area between rounds 17-18 of the body. Secure with a neat knot and trim the ends.
Facial Details
Using black cotton thread, embroider a small nose between rounds 10-12 of the body, positioned at the center of where the two muzzle pieces meet.
Assembly Instructions
- Begin by attaching the facial features. Sew both eyes to the front of the body between rounds 9-12, spaced approximately 8 stitches apart.
- Attach both muzzle pieces below the eyes, positioning them between rounds 11-14. Stuff each muzzle piece lightly before completing the attachment.
- Embroider the nose using black thread, placing it at the junction where the muzzle pieces meet.
- Sew the ears to the top sides of the head between rounds 5-6, angling them slightly forward for that classic pug look.
- Attach all four legs to the bottom of the body, spacing them evenly for balance.
- Sew the curled tail to the back of the body, positioning it high enough to achieve the characteristic pug tail curl.
- Finish by adding the collar: wrap the bordeaux/burgundy yarn around the neck area between rounds 17-18 and secure with a knot.
- Check all connections and trim any remaining yarn ends.
Customization Options
Make your pug amigurumi uniquely yours with these creative variations:
- Create a fawn-colored pug by using light tan or beige yarn instead of yellow
- Add a decorative tag to the collar with a name or heart charm
- Make a tiny bow tie or ribbon for a dressed-up look
- Create wrinkle lines on the forehead with a few stitches of dark thread
- Adjust the size by using different weight yarn and appropriate hook sizes
- Create a family of pugs in different sizes
- Add a small tongue made from pink yarn or felt
Troubleshooting Common Issues
- If your pug won’t sit properly, try adjusting the leg placement or adding a bit more stuffing to the bottom
- For more defined wrinkles, add a few strategic embroidery stitches in brown or black
- If the eyes seem too large or small, adjust them before final attachment
- To achieve a balanced look, use pins to position all pieces before sewing them permanently
- For a firmer body, use more stuffing and pack it densely, especially in the head area
Care Instructions
Keep your pug amigurumi looking its best with these care tips:
- Spot clean with a damp cloth and mild soap as needed
- Allow to air dry completely
- Brush gently with a soft toothbrush to restore fluffiness if the yarn becomes matted
- Store in a clean, dry place away from direct sunlight
- If necessary to wash, place in a mesh laundry bag and hand wash gently

Check this out :Crochet a Festive Ornament Bear
Conclusion
Congratulations on completing your pug amigurumi! This adorable crochet pug captures all the charm and personality of the beloved breed in a huggable handmade form. With its expressive face, curly tail, and compact body, your crocheted pug makes a wonderful gift for dog lovers or a cute addition to your own collection.
The skills you’ve developed creating this project will serve you well for future amigurumi adventures. Remember that each handmade item has its own unique character, making your pug one-of-a-kind. Happy crocheting!


Leave a Reply