Table of Contents
Looking for the perfect handmade holiday decoration that combines cuteness with festive charm? This Ornament Bear amigurumi pattern allows you to create an adorable teddy bear sitting atop a colorful Christmas ornament. Whether you’re crocheting for yourself or making a thoughtful gift, this Ornament Bear detailed guide will walk you through every step of creating this delightful seasonal character.
Introduction to the Ornament Bear Amigurumi
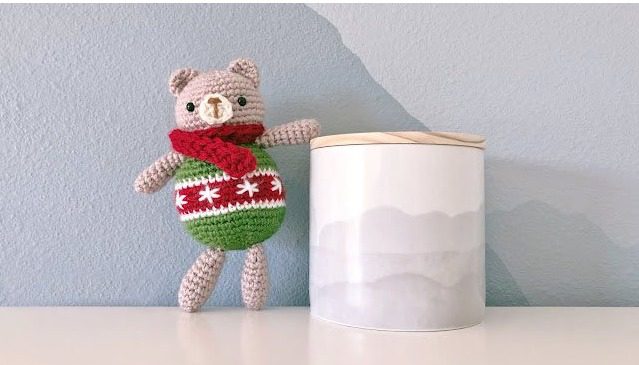
This charming Ornament Bear design combines two beloved elements: a sweet teddy bear and a traditional Christmas ball ornament. Standing at approximately 6.5 inches (16.5 cm) tall, this festive creation makes an excellent holiday decoration that can be displayed on a tree, shelf, or mantel. The pattern features a brown bear with a cozy red scarf, perched atop a colorful striped ornament in traditional holiday colors.
Ornament Bear Skill Level and Prerequisites
This pattern is rated as easy/familiar beginner level. To successfully complete this project, you should be comfortable with:
- Working in continuous rounds
- Basic crochet techniques (single crochet, increases, and decreases)
- Changing yarn colors
- Sewing pieces together
- Creating a magic ring
Ornament Bear Materials List
Before starting your Ornament Bear project, gather these materials:
- Worsted weight (medium weight 4) yarn in the following colors:
- Brown (for bear head, ears, arms, and legs)
- Off-white (for bear muzzle)
- Green (for ornament)
- Red (for ornament stripes and scarf)
- White (for ornament stripes)
- Small amount of dark brown yarn (for nose and mouth embroidery)
- Two crochet hooks:
- 3.25mm hook (for all bear and ornament parts)
- 6.00mm hook (exclusively for the scarf)
- 6mm plastic safety eyes (one pair)
- Fiberfill stuffing
- Yarn needle
- Scissors
- Optional: yarn or ribbon for hanging loop
Ornament Bear Crochet Terminology
This pattern uses standard US crochet terminology:
- MR: Magic Ring – a technique for starting crochet in the round
- Sc: Single crochet – the basic stitch used throughout most of the pattern
- Inc: Increase – working two stitches into one stitch
- Dec: Decrease – combining two stitches into one
- Fhdc: Foundation half double crochet – creates a foundation and first row simultaneously
- Ch: Chain stitch – the foundation of crochet work
Ornament Bear Color Key Reference
For ease of following the pattern, these color codes will be used:
- C1: Brown (bear head, ears, arms, legs)
- C2: Off-white (bear muzzle)
- C3: Green (ornament)
- C4: Red (ornament stripes, scarf)
- C5: White (ornament stripes)
Bear Head Instructions
Using C1 (brown) yarn and the 3.25mm hook:
Round 1: Create a magic ring and work 6 single crochet into it. (6 stitches) Round 2: Increase in each stitch around. (12 stitches) Round 3: Work [1 single crochet, 1 increase] 6 times. (18 stitches) Round 4: Work [2 single crochet, 1 increase] 6 times. (24 stitches) Round 5: Work [3 single crochet, 1 increase] 6 times. (30 stitches) Round 6: Work [4 single crochet, 1 increase] 6 times. (36 stitches) Rounds 7-12: Single crochet in each stitch around. (36 stitches) Round 13: Work [4 single crochet, 1 decrease] 6 times. (30 stitches) Round 14: Work [3 single crochet, 1 decrease] 6 times. (24 stitches) Round 15: Work [2 single crochet, 1 decrease] 6 times. (18 stitches)
Fasten off and weave in the ends.
Bear Ears Instructions (Make 2)
Using C1 (brown) yarn and the 3.25mm hook:
Round 1: Create a magic ring and work 6 single crochet into it. (6 stitches) Round 2: Work [1 single crochet, 1 increase] 3 times. (9 stitches) Round 3: Work [2 single crochet, 1 increase] 3 times. (12 stitches)
Fasten off, leaving a long tail for sewing to the head later.
Ornament Bear Muzzle Instructions
Using C2 (off-white) yarn and the 3.25mm hook:
Round 1: Create a magic ring and work 6 single crochet into it. (6 stitches) Round 2: Work [1 single crochet, 1 increase] 3 times. (9 stitches)
Fasten off and weave in the ends.
Ornament Bear Arms Instructions (Make 2)
Using C1 (brown) yarn and the 3.25mm hook:
Round 1: Create a magic ring and work 6 single crochet into it. (6 stitches) Round 2: Work [1 single crochet, 1 increase] 3 times. (9 stitches) Rounds 3-4: Single crochet in each stitch around. (9 stitches) Round 5: Single crochet in 7 stitches, decrease once. (8 stitches) Round 6: Single crochet in each stitch around. (8 stitches) Round 7: Single crochet in 6 stitches, decrease once. (7 stitches) Round 8: Single crochet in each stitch around. (7 stitches) Round 9: Single crochet in 5 stitches, decrease once. (6 stitches) Round 10: Single crochet in each stitch around. (6 stitches)
Fasten off, leaving a long tail for sewing to the ornament body later. Stuff lightly as you crochet.
Legs Instructions (Make 2)
Using C1 (brown) yarn and the 3.25mm hook:
Round 1: Create a magic ring and work 6 single crochet into it. (6 stitches) Round 2: Work [1 single crochet, 1 increase] 3 times. (9 stitches) Round 3: Work [2 single crochet, 1 increase] 3 times. (12 stitches) Rounds 4-5: Single crochet in each stitch around. (12 stitches) Round 6: Work [4 single crochet, 1 decrease] 2 times. (10 stitches) Rounds 7-8: Single crochet in each stitch around. (10 stitches) Round 9: Work [3 single crochet, 1 decrease] 2 times. (8 stitches)
Fasten off, leaving a long tail for sewing to the ornament body later. Stuff lightly as you crochet.
Ornament Body Instructions
Using C3 (green) yarn and the 3.25mm hook:
Round 1: Create a magic ring and work 6 single crochet into it. (6 stitches) Round 2: Increase in each stitch around. (12 stitches) Round 3: Work [1 single crochet, 1 increase] 6 times. (18 stitches) Round 4: Work [2 single crochet, 1 increase] 6 times. (24 stitches) Round 5: Work [3 single crochet, 1 increase] 6 times. (30 stitches) Round 6: Work [4 single crochet, 1 increase] 6 times. (36 stitches) Round 7: Work [5 single crochet, 1 increase] 6 times. (42 stitches) Rounds 8-9: Single crochet in each stitch around. (42 stitches)
Change to C5 (white) yarn: Round 10: Single crochet in each stitch around. (42 stitches)
Change to C4 (red) yarn: Rounds 11-14: Single crochet in each stitch around. (42 stitches)
Change to C5 (white) yarn: Round 15: Single crochet in each stitch around. (42 stitches)
Change to C3 (green) yarn: Rounds 16-17: Single crochet in each stitch around. (42 stitches) Round 18: Work [5 single crochet, 1 decrease] 6 times. (36 stitches) Round 19: Work [4 single crochet, 1 decrease] 6 times. (30 stitches) Round 20: Work [3 single crochet, 1 decrease] 6 times. (24 stitches) Round 21: Work [2 single crochet, 1 decrease] 6 times. (18 stitches)
Fasten off, leaving a long tail for sewing to the head later. Stuff the ornament firmly but carefully to avoid stretching the stitches.
Scarf Instructions
Using C4 (red) yarn and the 6mm hook:
Chain 3, then work foundation half double crochet until the scarf reaches your desired length. A 9-inch scarf (approximately 34 foundation half double crochet stitches) will wrap twice around the bear’s neck.
Fasten off and weave in the ends.
Assembly and Finishing
Completing the Bear’s Head
- Insert the 6mm safety eyes between rounds 9-10 of the head, positioning them approximately 7 stitches apart.
- Using dark brown yarn and a yarn needle, embroider a horizontal line for the nose and a vertical line for the mouth on the muzzle piece.
- Position the muzzle between the eyes and sew it securely to the head.
- Attach the ears to the top of the head, spacing them evenly.
Finishing the Ornament Body
- Using white yarn, embroider a decorative design (such as a snowflake) across the center of the ornament body.
- Sew the legs to the bottom of the ornament, making sure they’re positioned evenly.
- Attach the arms to both sides of the ornament near the top opening.
Final Assembly
- Sew the bear’s head to the ornament body using the long yarn tail you left on the ornament. Add additional stuffing if needed before closing the opening completely.
- Wrap the scarf around the bear’s neck and secure it with a few stitches if desired.
- Optional: Create a hanging loop by sewing a piece of yarn or ribbon to the top of the bear’s head, allowing your creation to be displayed as an actual Christmas tree ornament.
Creative Variations
Once you’ve mastered the basic pattern, try these creative variations:
- Create a family of bears in different sizes by adjusting your hook size
- Use different color combinations for seasonal variations (pastels for spring, orange and black for Halloween)
- Add embellishments like tiny buttons, bows, or miniature gifts
- Customize the scarf with fringe or different stitch patterns
- Embroider the bear’s name or a special date on the ornament
Troubleshooting Tips
- If your bear’s head seems too large for the ornament body, try using a slightly smaller hook for the head
- For a sturdier finished piece, consider adding a small weight to the bottom of the ornament
- If the scarf seems too bulky, try using a lighter weight yarn or fewer wraps around the neck
- To keep the bear’s head from wobbling, ensure it’s securely attached with multiple anchor points
Care Instructions
To keep your Ornament Bear looking its best:
- Dust gently with a soft brush or cloth
- For light cleaning, spot clean with a damp cloth and mild soap
- Allow to air dry completely before storing
- Store in a cool, dry place away from direct sunlight
- For year-round protection, place in a plastic container with a lid when not on display

Check this out : Crochet a Cuddly Plush Monkey Amigurumi
Conclusion
Congratulations on completing your Ornament Bear amigurumi! This charming creation combines the warmth of handmade crafts with holiday cheer, making it perfect for seasonal decorating or gifting. The skills you’ve developed while making this project will serve you well in future amigurumi adventures.
Whether displayed on your Christmas tree, given as a heartfelt gift, or added to your growing collection of handmade treasures, this Ornament Bear is sure to bring joy for many holiday seasons to come. Happy crocheting!


Leave a Reply