Table of Contents
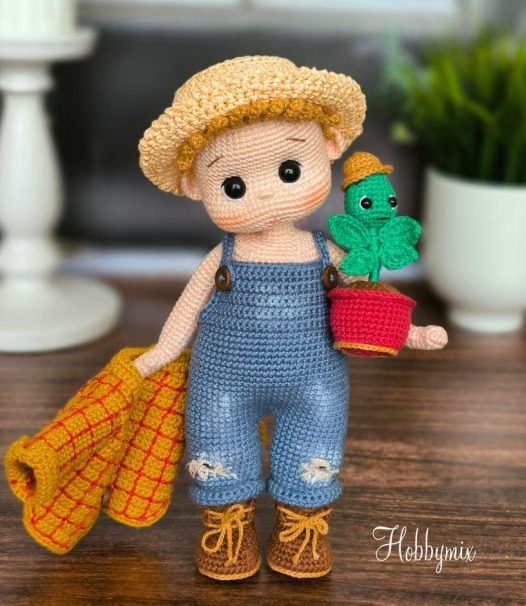
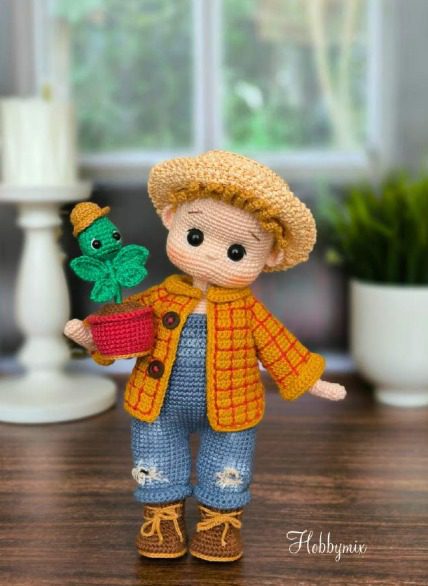
Creating handmade amigurumi dolls brings joy to both crafters and recipients. This comprehensive guide will walk you through making a charming farm boy amigurumi doll with detailed overalls, a checkered shirt, straw hat, and even a little plant friend. The finished doll stands approximately 9 inches tall and features a wire armature for posability, making it an ideal gift or keepsake.
Farm Boy Materials Needed
To create this adorable farm boy , gather the following supplies:
- Yarn Colors:
- Skin color: Catania 263 (2 skeins)
- Yellow (for shirt): Catania 249 (1 skein)
- Red: Catania 00424 (1 skein)
- Light brown/beige (for hair/hat): Catania 179 (1 skein)
- Dark brown: Catania 00157 (1 skein)
- Blue (for overalls): Catania 00421 (1 skein)
- Green (for plant): Catania 430 (1 skein)
- Paper yarn (optional for texture)
- Other Materials:
- 10mm black safety eyes (for doll)
- 6mm black safety eyes (for plant)
- 4 buttons (2 for shirt, 2 for overalls)
- 2.00mm crochet hook (for head and body)
- 2.20mm crochet hook (for clothes)
- 2mm electric wire for internal structure
- Polyester fiberfill
- Yarn needle
- Scissors
- Silicone glue
- White acrylic paint (for denim effect)
Understanding Farm Boy Pattern Terminology
Before beginning, familiarize yourself with these common crochet terms:
- MR: Magic ring
- SC: Single crochet
- DEC: Decrease
- INC: Increase
- BLO: Back loop only
- FLO: Front loop only
- SLST: Slip stitch
- HDC: Half double crochet
- DC: Double crochet
- TR: Treble crochet
- CH: Chain
- W: 3 single crochets in same stitch
- M: Decrease 3 single crochets together
Creating the Doll’s Head
The head forms the foundation of your amigurumi’s character. We’ll be using a 2.00mm hook and skin-colored yarn.
- Create 6 SC in magic ring
- Round 2: (INC) x 6 [12 SC]
- Round 3: (SC, INC) x 6 [18 SC]
- Round 4: (2 SC, INC) x 6 [24 SC]
- Round 5: (3 SC, INC) x 6 [30 SC]
- Round 6: (4 SC, INC) x 6 [36 SC]
- Round 7: (5 SC, INC) x 6 [42 SC]
- Round 8: (6 SC, INC) x 6 [48 SC]
- Round 9: (7 SC, INC) x 6 [54 SC]
- Round 10: (8 SC, INC) x 6 [60 SC]
- Rounds 11-21: 60 SC [11 rows of 60 SC]
- Round 22: 10 SC, crochet next SC loosely, 8 SC, crochet next SC loosely, 40 SC [60 SC]
Note: The loosely crocheted stitches mark where you’ll place the eyes later.
- Rounds 23-24: 60 SC [2 rows of 60 SC]
- Round 25: 5 SC, (INC) x 6, 8 SC, (INC) x 6, 35 SC [72 SC]
- Rounds 26-28: 72 SC [3 rows of 72 SC]
At this point, attach the 10mm safety eyes to the loosely crocheted stitches from round 22.
- Round 29: (10 SC, DEC) x 6 [66 SC]
- Round 30: (9 SC, DEC) x 6 [60 SC]
- Round 31: (8 SC, DEC) x 6 [54 SC]
- Round 32: (7 SC, DEC) x 6 [48 SC]
- Round 33: (6 SC, DEC) x 6 [42 SC]
- Round 34: (5 SC, DEC) x 6 [36 SC]
- Round 35: (4 SC, DEC) x 6 [30 SC]
- Round 36: (3 SC, DEC) x 6 [24 SC]
- Round 37: (2 SC, DEC) x 6, SLST, CH 1, cut yarn [18 SC]
Face Shaping Techniques
Proper face shaping gives your amigurumi character and personality:
- Initial Stuffing: When first shaping the face, stuff lightly to allow room for adjustment.
- Nose Placement: Create the nose one row below the eyes using yarn wrapping technique, spanning two stitches in width.
- Eye Details: Use Alize cotton gold yarn for white portions of the eyes. For the black line above the eyes, use split yarn (2 strands). Keep the yarn whole for the white parts.
- Eyebrows: Using only 2 strands of yarn, embroider eyebrows 3 rows above the eyes, with a length of 3 SC.
- Lips: Create the mouth 5 rows below the nose, spanning 3 SC, using 2 strands of yarn.
- Strategic Stuffing: Ensure the area between the eyes is slightly concave, while the forehead and cheeks are more plump.
- Final Stuffing: After completing face details, finish stuffing the head firmly.
Creating the Ears
The ears add dimension to your doll’s face:
- 6 SC into magic ring
- Turn back with 1 CH, (SC, INC) x 2, 2 SC [8 SC]
- Turn back with 1 CH, 8 SC, CH 1, cut yarn
Sew the ears 4 rows below the eyebrows, leaving 7 SC distance between them.
The Hair/Wig
The hair gives your doll its distinctive look:
- 6 SC into magic ring
- Round 2: (INC) x 6 [12 SC]
- Round 3: (SC, INC) x 6 [18 SC]
- Round 4: (2 SC, INC) x 6 [24 SC]
- Round 5: (3 SC, INC) x 6 [30 SC]
- Round 6: (4 SC, INC) x 6 [36 SC]
- Round 7: (5 SC, INC) x 6 [42 SC]
- Round 8: (6 SC, INC) x 6 [48 SC]
- Round 9: (7 SC, INC) x 6 [54 SC]
Now create hair strands using chains:
- Make 13 chains, 12 SC on the chain, SLST to next SC, SLST to next SC
- Make 11 chains, 10 SC on the chain, SLST to next SC, SLST to next SC
- Make 9 chains, 8 SC on the chain, SLST to next SC, SLST to next SC (Repeat this 8 more times)
- Make 11 chains, 10 SC on the chain, SLST to next SC, SLST to next SC
- Make 13 chains, 12 SC on the chain, SLST to next SC, SLST to next SC
- Make 20 chains, 19 SC on the chain, SLST to next SC, SLST to next SC (Continue in this pattern to end of row)
Secure the wig to the head with glue first, then sew it for stability.
Farm Boy Legs and Feet
The legs require careful attention to detail:
- Make 6 CH
- On chain, 4 SC, W, 3 SC, INC [12 SC]
- INC, 3 SC, (INC) x 3, 3 SC, (INC) x 2 [18 SC]
- Rounds 4-7: 18 SC [4 rows of 18 SC]
Now create the foot shape:
- Turn back with 1 CH, skip SC, 7 SC
- Turn back with 1 CH, skip SC, 6 SC
- Turn back with 1 CH, skip SC, 5 SC
- Turn back with 1 CH, skip SC, 4 SC
- Turn back with 1 CH, skip SC, 3 SC
- Turn back with 1 CH, skip SC, SC (new starting point)
- SC, 5 SC from side, 10 SLST (front of foot), 5 SC from side, SC [22 SC]
- INC, 4 SC, (DEC) x 2, 4 SC, (DEC) x 2, 4 SC, INC [20 SC]
- 6 SC, DEC, 4 SC, DEC, 6 SC [18 SC]
- DEC, 14 SC, DEC [16 SC]
- Rounds 18-19: 16 SC [2 rows]
- Round 20: INC, 14 SC, INC [18 SC]
- Rounds 21-22: 18 SC [2 rows]
- Round 23: SC, INC, 15 SC, INC [20 SC]
- Rounds 24-25: 20 SC [2 rows]
- Round 26: 2 SC, INC, 16 SC, INC [22 SC]
- Rounds 27-29: 22 SC [3 rows]
- Round 30: 3 SC, INC, 17 SC, INC [24 SC]
- Rounds 31-33: 24 SC [3 rows]
- Round 34: 4 SC, INC, 18 SC, INC [26 SC]
- Rounds 35-37: 26 SC [3 rows]
- Round 38: For right leg, 10 SC, CH 1, cut yarn For left leg, 23 SC (continue to body)
Note: Remember to stuff the legs with fiberfill every 7-8 rows to prevent bulging.
Farm Boy Creating the Body
Starting from where you left off on the left leg:
- Make 3 CH, SC to the last SC of right leg, 26 SC around right leg, 3 SC on chain, SC to last SC of left leg, 26 SC around left leg, 3 SC on chain [60 SC total]
- Rounds 2-14: 60 SC [13 rows]
- Round 15: 4 SC, DEC, (8 SC, DEC) x 5, 4 SC [54 SC]
- Rounds 16-17: 54 SC [2 rows]
- Round 18: (7 SC, DEC) x 6 [48 SC]
- Rounds 19-27: 48 SC [9 rows]
Now continue to arm assembly without cutting the yarn.
Farm Boy Arms and Hands
The arms give your doll the ability to hold items:
- Make 5 CH
- On chain, 3 SC, W, 2 SC, INC [10 SC]
- Rounds 3-6: 10 SC [4 rows]
- Round 7: 5 SC, 3 TR in same SC, 4 SC [12 SC]
- Round 8: 5 SC, M, 4 SC [10 SC]
- Round 9: DEC, 2 SC, DEC, 4 SC [8 SC]
- Round 10: 8 SC
- Round 11: INC, (2 SC, INC) x 2, SC [11 SC]
- Round 12: INC, 4 SC, INC, 5 SC [13 SC]
- Rounds 13-32: 13 SC [20 rows]
- Round 33: For right arm: 7 SC, CH 1, cut yarn For left arm: 2 SC, CH 1, cut yarn
Farm Boy Assembling the Arms to Body
- Continue from the body: 13 SC, 3 SC joining arm and body, 20 SC, 3 SC joining other arm and body, 9 SC [48 SC]
- Round 2: 12 SC, DEC joining arm and body, 8 SC on arm, DEC joining arm and body, 18 SC, DEC joining arm and body, 8 SC on arm, DEC joining arm and body, 8 SC [58 SC]
- Round 3: 5 SC, DEC, 18 SC, DEC, 7 SC, DEC, 18 SC, DEC, 2 SC [54 SC]
- Round 4: (7 SC, DEC) x 6 [48 SC]
- Round 5: (6 SC, DEC) x 6 [42 SC]
- Round 6: (5 SC, DEC) x 6 [36 SC]
- Round 7: (4 SC, DEC) x 6 [30 SC]
- Round 8: (3 SC, DEC) x 6 [24 SC]
- Round 9: (2 SC, DEC) x 6 [18 SC]
Note: If you didn’t place the wire initially, you can insert it into the body at this point.
- Rounds 10-14: 18 SC [5 rows]
- Round 15: 10 SC, SLST, CH 1, cut yarn
Creating the Overalls
Right Cuff
Using a 2.20mm hook:
- Crochet 28 CH
- Join the chain ends with SC, creating 28 SC around
- Rounds 3-6: 28 SC [4 rows]
- Round 7: SC, INC, 13 SC, INC, 12 SC [30 SC]
- Rounds 8-10: 30 SC [3 rows]
- Round 11: 7 SC, Make 4 CH, skip 4 SC, SC to 5th SC, 18 SC [30 SC]
- Rounds 12-16: 30 SC, CH 1, cut yarn [5 rows]
Left Cuff
Crochet the same as right cuff until round 17, but don’t cut yarn.
Assembling the Overalls
- Make 2 CH, SC to last SC of right cuff, 30 SC around right cuff, 2 SC on chain, SC to last SC of left cuff, 30 SC around left cuff, 2 SC on chain [66 SC]
- Rounds 2-13: 66 SC [12 rows]
- Round 14: 17 SC, DEC, 25 SC, DEC, 20 SC [64 SC]
- Round 15: 64 SC
- Round 16: 14 SC, DEC, 28 SC, DEC, 18 SC [62 SC]
- Round 17: 9 SC, DEC, 11 SC, DEC, 14 SC, DEC, 11 SC, DEC, 9 SC [58 SC]
- Round 18: 58 SC
Now create the bib front: 8. Round 19: 14 SC (starting point no longer matters) 9. Round 20: Turn back with 1 CH, skip SC, 28 SC 10. Continue decreasing by one stitch per row through round 29 11. After round 29, go around the piece with SC, SLST, CH 1, cut yarn
- Secure yarn from back for straps, chain 28, make 20 SC from 20th CH, SLST into next stitch, CH 1, cut yarn
- Sew 2 buttons on front of overalls
- Create distressed look with cream yarn on chains
- Add denim effect with white acrylic paint
Farm Boy Creating the Shirt
- Make 33 CH
- On chain 5 SC, W, 4 SC, W, 10 SC, W, 4 SC, W, 5 SC [40 SC]
- Round 3: Turn back with 1 CH, 40 SC
- Round 4: Turn back with 1 CH, (6 SC, W) x 2, 12 SC, W, 6 SC, W, 6 SC [48 SC]
- Round 5: Turn back with 1 CH, 48 SC
- Round 6: 8 SC, W, 7 SC, W, 14 SC, W, 8 SC, W, 7 SC [56 SC]
- Round 7: Turn back with 1 CH, 9 SC, 10 CH, skip 10 SC, SC to 11th SC, 17 SC, 10 CH, skip 10 SC, SC to 11th SC, 8 SC [56 SC]
- Rounds 8-19: Turn back with 1 CH, 56 SC [12 rows]
Now create the shirt front pieces:
- Right front: Rows 20-26, working decreases
- Center piece: Rows 27-33, working decreases
- Left front piece: Rows 34-40, working decreases
Farm Boy Collar
- Begin at point shown in photos, 5 SC, W, 4 SC, W, 10 SC, W, 4 SC, W, 5 SC [40 SC]
- Round 2: Turn back with 1 CH, INC, 39 SC [41 SC]
- Round 3: Turn back with 1 CH, INC, 40 SC [42 SC]
- Round 4: Turn back with 1 CH, 42 SC, then SC around entire shirt, SLST, CH 1, cut yarn
Farm Boy Sleeves
- Make 24 SC around arm hole
- Rounds 2-18: 24 SC [17 rows]
- Round 19: For right sleeve 7 SC, for left sleeve 20 SC
- Round 20: Turn back with 1 CH, work in BLO, 23 SC
- Rounds 21-22: Turn back with 1 CH, 23 SC [2 rows]
- Round 23: SC around wrist, CH 1, cut yarn
- Embroider shirt with red yarn using sewing machine technique for checkered pattern
Farm Boy Creating the Hat
- Make 6 CH
- On chain 4 SC, W, 3 SC, INC [12 SC]
- Round 3: INC, 3 SC, (INC) x 3, 3 SC, (INC) x 2 [18 SC]
- Round 4: SC, INC, 3 SC, (SC, INC) x 3, 3 SC, (SC, INC) x 2 [24 SC]
- Round 5: 2 SC, INC, 3 SC, (2 SC, INC) x 3, 3 SC, (2 SC, INC) x 2 [30 SC]
- Round 6: 3 SC, INC, 3 SC, (3 SC, INC) x 3, 3 SC, (3 SC, INC) x 2 [36 SC]
- Round 7: 4 SC, INC, 3 SC, (4 SC, INC) x 3, 3 SC, (4 SC, INC) x 2 [42 SC]
- Round 8: Work in BLO 42 SC
- Round 9: 5 SC, INC, 3 SC, (5 SC, INC) x 3, 3 SC, (5 SC, INC) x 2 [48 SC]
- Round 10: 48 SC
- Round 11: 6 SC, INC, 3 SC, (6 SC, INC) x 3, 3 SC, (6 SC, INC) x 2 [54 SC]
- Rounds 12-13: 54 SC [2 rows]
- Round 14: Work in FLO (8 SC, INC) x 6 [60 SC]
- Round 15: (9 SC, INC) x 6 [66 SC]
- Round 16: 66 SC
- Round 17: Create brim edge as shown in references
Farm Boy Creating the Boots
- Make 6 CH
- On chain, 4 SC, W, 3 SC, INC [12 SC]
- Round 3: SLST, CH 1, INC, 3 SC, (INC) x 3, 3 SC, (INC) x 2 [18 SC]
- Round 4: SLST, CH 1, SC, INC, 3 SC, (SC, INC) x 3, 3 SC, (SC, INC) x 2 [24 SC]
- Round 5: SLST, CH 1, 2 SC, INC, 3 SC, (2 SC, INC) x 3, 3 SC, (2 SC, INC) x 2 [30 SC]
- Round 6: SLST, CH 1, 3 SC, INC, 3 SC, (3 SC, INC) x 3, 3 SC, (3 SC, INC) x 2 [36 SC]
- Round 7: SLST, CH 1, crochet pulling out SC between stitches, 36 SC
- Rounds.8-9: SLST, CH 1, 36 SC [2 rows]
- Round 10: SLST, CH 1, 11 SC, DEC, (3 SC, DEC) x 2, 13 SC [33 SC]
- Round 11: SLST, CH 1, 9 SC, DEC, (2 SC, DEC) x 2, 14 SC [30 SC]
- Round 12: SLST, CH 1, 8 SC, DEC, (SC, DEC) x 3, 8 SC, DEC, SC [25 SC]
- Round 13: SLST, CH 1, 8 SC, (DEC) x 3, 11 SC, SLST, CH 1, cut yarn [22 SC]
Create the boot top and laces following detailed instructions in reference.
Farm Boy Creating the Plant Friend
Plant Head
- 6 SC into magic ring
- Round 2: (INC) x 6 [12 SC]
- Round 3: (SC, INC) x 6 [18 SC]
- Rounds 4-5: 18 SC [2 rows]
- Round 6: (2 SC, INC) x 6 [24 SC]
- Round 7: 24 SC
- Round 8: 4 SC, crochet next SC loosely, 4 SC, crochet next SC loosely, 14 SC [24 SC]
- Rounds 9-10: 24 SC [2 rows]
- Round 11: (2 SC, DEC) x 6 [18 SC]
- Round 12: (SC, DEC) x 6 [12 SC]
- Round 13: (DEC) x 6, SLST, CH 1, save yarn for later
- Add facial details as shown in photos
Farm Boy Leaves and Flower Pot
- Big Leaf: Make 7 CH, then SC, HDC, DC, DC, TR, 5 TR in next SC, TR, DC, DC, HDC, SC, SLST, CH 1, cut yarn
- Small Leaf: Make 5 CH, then SC, HDC, DC, 5 TR in same SC, DC, HDC, SC, SLST, CH 1, cut yarn
- Hat: Follow pattern for small hat similar to main doll’s hat
- Flower pot: Create with red and brown yarn following detailed instructions
Farm Boy Final Assembly
- Insert wire armature through body if not done earlier
- Attach all parts securely
- Add decorative details and finishing touches
- Position the plant in doll’s hand
- Make any final adjustments to posture and appearance
Check this out :Crochet an Adorable Cat Amigurumi Toy
Conclusion
Creating this adorable farm boy amigurumi doll is a rewarding project that combines various crochet techniques and attention to detail. The finished piece makes a wonderful gift or display item, showcasing your handcrafting skills.
The posable wire structure allows for customizable positioning, and the removable clothes add to the play value. With practice, you can create variations of this design by changing colors, adding accessories, or modifying features to suit your preferences.
Remember that amigurumi is as much about the journey as the destination—enjoy the process of bringing this charming character to life, one stitch at a time.




Leave a Reply