Table of Contents
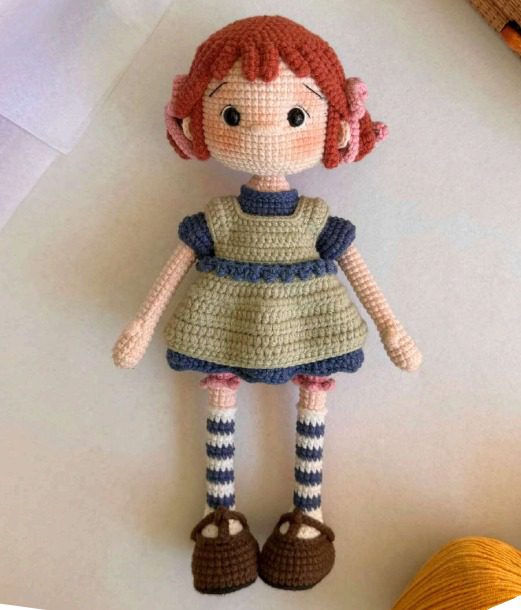
Creating a handmade amigurumi doll allows you to craft a unique treasure with personality and charm that mass-produced toys simply cannot match. This comprehensive guide will walk you through creating a delightful vintage-inspired amigurumi doll featuring auburn hair, a classic dress with blue trim, charming striped stockings, and adorable brown shoes. Whether you’re an experienced crocheter or just beginning your amigurumi journey, this detailed pattern provides all the instruction you need to create a special handcrafted keepsake.
Essential Materials for Your Vintage Amigurumi Doll
Gathering quality materials before beginning ensures the best results for your handmade creation. Here’s everything you’ll need:
Vintage Yarn Selection
Choose medium weight (worsted/DK) cotton yarn for best results:
- Skin Tone Yarn (Light Peach/Beige) – Approximately 30g for head, arms, and legs
- Auburn/Copper Yarn – Approximately 25g for hair
- Light Sage Green Yarn – Approximately 30g for dress body
- Navy Blue Yarn – Approximately 20g for dress trim and sleeves
- White Yarn – Approximately 15g for stockings
- Brown Yarn – Approximately 15g for shoes
- Black Yarn – Small amount for eyes (if not using safety eyes)
- Pink Yarn – Small amount for cheeks and accessories
Vintage Essential Tools and Notions
- Crochet Hooks:
- 2.5mm hook for main construction
- 2.0mm hook for detailed areas
- Eyes and Features:
- 9-10mm black safety eyes (1 pair)
- Alternative: Black yarn for embroidered eyes
- Finishing Materials:
- Premium polyester fiberfill for stuffing
- Thin wire (optional) for poseable limbs
- Small amounts of felt for shoe soles (optional)
- Assembly Tools:
- Yarn needle with large eye
- Sharp scissors
- Stitch markers
- Stuffing tool or chopstick
- Measuring tape or ruler
Vintage Understanding Amigurumi Terminology
For clarity throughout this pattern, these are the standard crochet terms used:
- Magic Ring (MR): The starting technique for most amigurumi pieces
- Single Crochet (SC): The foundation stitch used throughout
- Increase (INC): Working 2 single crochets in the same stitch
- Decrease (DEC): Combining two stitches into one
- Chain (CH): Creating a series of loops
- Slip Stitch (SL ST): Joining rounds or moving position
- Half Double Crochet (HDC): A medium-height stitch
- Double Crochet (DC): A taller stitch
- Front Loop Only (FLO): Working through only the front loop of each stitch
- Back Loop Only (BLO): Working through only the back loop of each stitch
Vintage Head Construction
The head forms the foundation of your doll’s personality and charm.
Start with skin tone yarn:
- Round 1: Create a magic ring with 6 single crochet stitches (6)
- Round 2: Increase in each stitch around (12)
- Round 3: [Single crochet, increase] repeat 6 times (18)
- Round 4: [2 single crochet, increase] repeat 6 times (24)
- Round 5: [3 single crochet, increase] repeat 6 times (30)
- Round 6: [4 single crochet, increase] repeat 6 times (36)
- Round 7: [5 single crochet, increase] repeat 6 times (42)
- Round 8: [6 single crochet, increase] repeat 6 times (48)
- Rounds 9-16: Single crochet in each stitch around for 8 rounds (48)
Insert safety eyes between rounds 9 and 10, approximately 8-10 stitches apart. If using embroidered eyes, you may wait until the head is complete before adding them.
Begin decreasing to shape the head:
- Round 17: [6 single crochet, decrease] repeat 6 times (42)
- Round 18: [5 single crochet, decrease] repeat 6 times (36)
- Round 19: [4 single crochet, decrease] repeat 6 times (30)
- Round 20: [3 single crochet, decrease] repeat 6 times (24)
- Round 21: [2 single crochet, decrease] repeat 6 times (18)
Start stuffing the head firmly at this point.
- Round 22: [Single crochet, decrease] repeat 6 times (12)
- Round 23: Decrease 6 times (6)
Fasten off, leaving a tail for closing. Thread yarn needle and weave through front loops of remaining 6 stitches. Pull tight to close hole and secure with a knot.
Vintage Facial Detailing
The face brings personality to your amigurumi doll.
For embroidered eyes (if not using safety eyes):
- Use black yarn to create small circular eyes
- Add white highlight stitches for sparkle
- Use auburn yarn for simple embroidered eyebrows (2-3 small straight stitches)
- Add subtle blush to cheeks using pink yarn (optional)
Vintage Hair Construction
The auburn hair defines this doll’s vintage character.
Create a hair cap base:
- Round 1: With auburn yarn, create a magic ring with 6 single crochet (6)
- Round 2: Increase in each stitch around (12)
- Round 3: [Single crochet, increase] repeat 6 times (18)
- Round 4: [2 single crochet, increase] repeat 6 times (24)
- Round 5: [3 single crochet, increase] repeat 6 times (30)
- Round 6: [4 single crochet, increase] repeat 6 times (36)
- Round 7: [5 single crochet, increase] repeat 6 times (42)
- Round 8: [6 single crochet, increase] repeat 6 times (48)
- Fasten off, leaving a long tail for sewing to head
For hair buns/pigtails (make 2):
- Round 1: Create a magic ring with 6 single crochet (6)
- Round 2: Increase in each stitch around (12)
- Round 3: [Single crochet, increase] repeat 6 times (18)
- Round 4: Single crochet in each stitch around (18)
- Round 5: [Single crochet, decrease] repeat 6 times (12)
- Round 6: Decrease 6 times (6)
- Fasten off, stuff lightly
Sew the hair cap to the head, positioning it to cover the top and back of the head. Attach the hair buns at each side of the head as shown in the image.
For additional texture, you may add hair strands:
- Cut 20-30 pieces of auburn yarn, each about 15cm long
- Fold in half and attach along the hairline and parting using a crochet hook
- Trim as needed to create the desired style
Vintage Arms Construction (Make 2)
The arms are simple tubes without complex shaping.
Start with skin tone yarn:
- Round 1: Create a magic ring with 6 single crochet (6)
- Round 2: Increase in each stitch around (12)
- Rounds 3-4: Single crochet in each stitch around for 2 rounds (12)
- Round 5: [4 single crochet, decrease] repeat 2 times (10)
- Rounds 6-20: Single crochet in each stitch around for 15 rounds (10)
Do not stuff the arms heavily – keep them lightly stuffed so they hang naturally. Fasten off, leaving a long tail for attaching to the body.
Legs and Stockings Construction (Make 2)
The striped stockings add a whimsical touch to this vintage doll.
Start with brown yarn for shoes:
- Round 1: Create a magic ring with 6 single crochet (6)
- Round 2: Increase in each stitch around (12)
- Round 3: [Single crochet, increase] repeat 6 times (18)
- Round 4: Single crochet in back loops only around (18)
- Rounds 5-6: Single crochet in each stitch around for 2 rounds (18)
- Round 7: 6 single crochet, decrease 3 times, 6 single crochet (15)
- Round 8: 5 single crochet, decrease 2 times, 6 single crochet (13)
- Round 9: 5 single crochet, decrease, 6 single crochet (12)
- Round 10: Single crochet in each stitch around (12)
Switch to white yarn for stockings:
- Round 11: Single crochet in back loops only (12)
- Round 12: Single crochet in each stitch around (12)
Begin striped pattern:
- Round 13: With white yarn, single crochet in each stitch around (12)
- Round 14: With navy blue yarn, single crochet in each stitch around (12)
- Round 15: With white yarn, single crochet in each stitch around (12)
- Round 16: With navy blue yarn, single crochet in each stitch around (12)
Repeat rounds 13-16 three more times (total of 4 white and 4 blue stripes)
Switch to skin tone yarn for legs:
- Round 29: Single crochet in each stitch around (12)
- Rounds 30-35: Single crochet in each stitch around for 6 rounds (12)
- Fasten off, leaving a long tail for attaching to the body
Stuff the legs firmly, especially in the foot area.
Body Construction
The body connects all elements and provides structure for the dress.
Start with skin tone yarn:
- Round 1: Create a magic ring with 6 single crochet (6)
- Round 2: Increase in each stitch around (12)
- Round 3: [Single crochet, increase] repeat 6 times (18)
- Round 4: [2 single crochet, increase] repeat 6 times (24)
- Round 5: [3 single crochet, increase] repeat 6 times (30)
- Round 6: [4 single crochet, increase] repeat 6 times (36)
- Rounds 7-12: Single crochet in each stitch around for 6 rounds (36)
- Round 13: [4 single crochet, decrease] repeat 6 times (30)
- Rounds 14-15: Single crochet in each stitch around for 2 rounds (30)
- Round 16: [3 single crochet, decrease] repeat 6 times (24)
- Rounds 17-18: Single crochet in each stitch around for 2 rounds (24)
Stuff the body firmly, then attach the arms at each side between rounds 12-13.
- Round 19: [2 single crochet, decrease] repeat 6 times (18)
- Round 20: [Single crochet, decrease] repeat 6 times (12)
- Round 21: Decrease 6 times (6)
- Fasten off, weave in end
Attach the legs at the bottom of the body, positioning them about 6 stitches apart.
Dress Construction
The two-tone dress with its vintage look is the defining garment for this doll.
Dress Body
Start with sage green yarn:
- Round 1: Chain 36, join with slip stitch to form a ring
- Round 2: Chain 1 (does not count as stitch), single crochet in each chain around (36)
- Round 3: [5 single crochet, increase] repeat 6 times (42)
- Rounds 4-7: Single crochet in each stitch around for 4 rounds (42)
- Round 8: [6 single crochet, increase] repeat 6 times (48)
- Rounds 9-12: Single crochet in each stitch around for 4 rounds (48)
- Fasten off
Dress Bodice and Sleeves
Start with navy blue yarn:
- Round 1: Join yarn at the top edge of dress, chain 1, single crochet in each stitch around (36)
- Round 2: [4 single crochet, decrease] repeat 6 times (30)
- Round 3: Single crochet in each stitch around (30)
- Round 4: Working in back loops only, single crochet in each stitch around (30)
- Round 5: Single crochet in each stitch around (30)
- Fasten off
For sleeve trim (make 2):
- Join navy blue yarn at armhole edge
- Round 1: Work 12 single crochet evenly around armhole
- Round 2: Single crochet in each stitch around (12)
- Round 3: [Single crochet, decrease] repeat 4 times (8)
- Round 4: Single crochet in each stitch around (8)
- Fasten off
For bottom dress trim:
- Join navy blue yarn at bottom edge of dress
- Round 1: Working in available loops, single crochet in each stitch around (48)
- Round 2: Working in back loops only, single crochet in each stitch around (48)
- Fasten off
Final Assembly
Now that all pieces are complete, follow these steps for final assembly:
- If not already attached, sew the head securely to the body
- Place the dress over the doll’s body, adjusting it to sit properly
- Sew any loose ends or gaps in hair or clothing
- Add any final embroidery or details to the face
- For the hair buns, sew pink yarn bows or small pink crochet flowers as accents (optional)
Your vintage-style amigurumi doll is now complete and ready to be displayed or gifted!
Customization Options
This pattern can be easily modified to create variations of your doll:
- Color Changes: Substitute different colors for the dress, hair, or accessories
- Hair Styles: Create longer hair, braids, or a different style entirely
- Clothing Options: Design additional outfits like pants, skirts, or seasonal wear
- Accessories: Add miniature bags, hats, or other accessories to complement the look
Care Instructions for Your Amigurumi Creation
To ensure your handcrafted doll remains in excellent condition:
- Spot clean with a damp cloth when necessary
- Allow to air dry completely if washing is required
- Keep away from direct sunlight to prevent color fading
- Display in a dust-free environment
- If giving to a child, ensure all parts are securely attached
Check this out :Adorable Matching Amigurumi Dolls
Conclusion
Creating this vintage-inspired amigurumi doll combines various crochet techniques to produce a charming character with personality and nostalgic appeal. The process may take time, but the result is a one-of-a-kind handcrafted treasure that showcases your skill and creativity.
Each stitch contributes to bringing this little personality to life, from her expressive face to her carefully crafted outfit. Take pride in your creation and enjoy the satisfaction that comes from handmaking something special. Whether kept as a personal keepsake, displayed as a decorative piece, or given as a heartfelt gift, your amigurumi doll represents the joy and artistry of handmade crafting.
Happy crocheting!


Leave a Reply