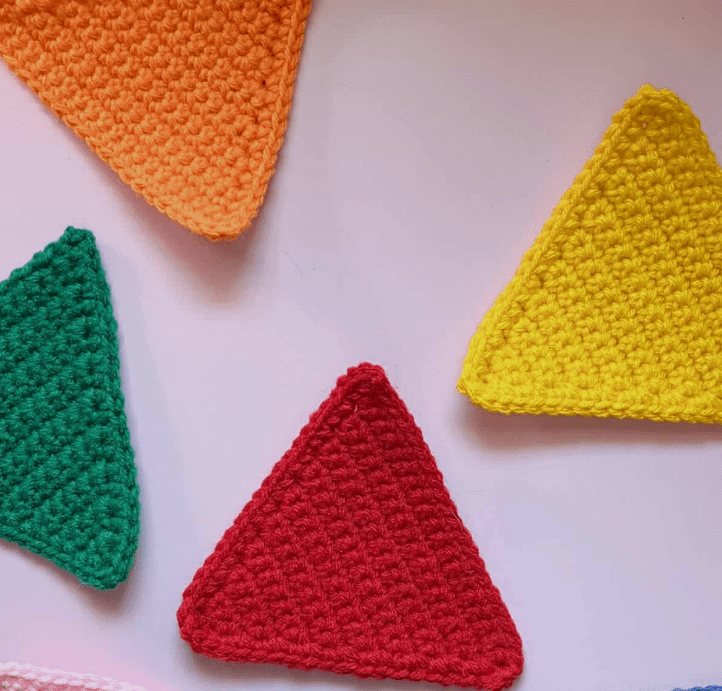
Are you looking to expand your crochet skills beyond basic squares and circles? Learning how to crochet a triangle opens up a world of creative possibilities! This fundamental shape serves as the building block for countless projects—from striking geometric blankets to festive buntings and even three-dimensional objects.
Why Triangles Matter in Your Crochet Journey
Triangles might seem simple, but they’re incredibly versatile in the crochet world. Unlike more complex 3D shapes, flat triangles are accessible even to beginners and can be quickly completed. Once you’ve mastered the triangle, you’ll have the skills to:
- Create diamond patterns by joining triangles together
- Design eye-catching bunting and garlands
- Craft geometric blankets with unique visual appeal
- Build the foundation for 3D projects like pyramids or stuffed toys
- Make modular pieces that combine into larger projects
The beauty of learning to crochet a triangle is that it teaches essential techniques while producing a shape you can immediately use in various projects.
Essential Materials for Crocheting Triangles
Before getting started, gather these basic supplies:
- Yarn of your choice (beginners should avoid fuzzy yarns as they make it difficult to see stitches)
- Appropriate crochet hook (size depends on your yarn; a 5mm/H hook works well with worsted weight yarn)
- Tapestry needle for weaving in ends
- Stitch markers (optional but helpful for keeping track of increases)
- Scissors
Understanding Triangle Construction in Crochet
The key to creating a perfect triangle lies in understanding the increase pattern. For a standard equilateral triangle, you’ll typically:
- Start with a small number of stitches (often just 2)
- Increase at the beginning and end of every other row
- Work straight rows (without increases) in between to build height
This pattern creates a triangle that grows wider at a controlled rate while maintaining its shape. By adjusting the frequency of increases, you can create different triangle types—more frequent increases create wider triangles, while fewer increases result in taller, narrower triangles.
Step-by-Step Triangle Crochet Pattern
Let’s create a basic triangle using single crochet stitches:
Abbreviations Used
- Ch: Chain
- Sc: Single crochet
- Inc: Increase (2 stitches in the same stitch)
Instructions
Row 1: Chain 2, turn.
Row 2: In the second chain from your hook, make an increase (2 stitches in the same space). You now have 2 stitches. Chain 1 and turn.
Row 3: Single crochet in each stitch across (2 stitches). Chain 1 and turn.
Row 4: Increase in the first stitch, increase in the last stitch (4 stitches). Chain 1 and turn.
Row 5: Single crochet in each stitch across (4 stitches). Chain 1 and turn.
Row 6: Increase in the first stitch, single crochet in the next 2 stitches, increase in the last stitch (6 stitches). Chain 1 and turn.
Row 7: Single crochet in each stitch across (6 stitches). Chain 1 and turn.
Row 8: Increase in the first stitch, single crochet in the next 4 stitches, increase in the last stitch (8 stitches). Chain 1 and turn.
Row 9: Single crochet in each stitch across (8 stitches). Chain 1 and turn.
Row 10: Increase in the first stitch, single crochet in the next 6 stitches, increase in the last stitch (10 stitches). Chain 1 and turn.
Continue this pattern, with each even-numbered row having increases at the beginning and end, and each odd-numbered row being worked straight across. The stitch count will increase by 2 with each increase row. Work until your triangle reaches the desired size.
Adding a Clean Finishing Edge
Once your triangle reaches the desired size, you may want to add a finishing edge for a cleaner look:
- Work around the entire triangle with single crochet stitches
- For the sides without existing single crochet spaces, work one stitch into each row
- For the corners, work 3 single crochets in the same stitch to create a smooth turn
- Maintain consistent tension to prevent curling or waviness
Creative Variations for Triangle Crochet
The basic triangle pattern is just the beginning! Here are some ways to add variety:
Change the Angle
- For a wider triangle, increase every row instead of every other row
- For a taller, narrower triangle, add more rows between increases
Play with Colors
- Create rainbow triangles for a vibrant bunting
- Use color changes to create visually striking patterns within each triangle
- Work with ombré yarn for a gradient effect
Texture Experiments
- Try different stitches like half double crochet or double crochet
- Incorporate texture stitches like popcorn or bobble stitches
- Mix stitch heights for a textured surface
Troubleshooting Common Triangle Crochet Issues
Uneven Edges
If your triangle edges appear uneven or wavy, check your tension, especially at the beginning and end of rows. Maintaining consistent tension helps create clean edges.
Pointy Corners
For sharper points, make sure you’re working your increases exactly at the beginning and end of the increase rows. For rounded corners, add extra stitches at the corner points when doing your finishing edge.
Curling Edges
If your triangle curls, try blocking it to help it lay flat. You can also add a border around the entire triangle to stabilize the edges.
Exciting Projects Using Crochet Triangles
Once you’ve mastered the triangle, consider these project ideas:
- Triangle Bunting: Create multiple triangles in different colors and string them together for festive decorations
- Geometric Blanket: Join triangles in various arrangements for a modern blanket design
- Shawls and Scarves: Larger triangles make beautiful, draped accessories
- Modular Toys: Combine triangles with other shapes to create stuffed animals or geometric decorations
- Wall Hangings: Arrange triangles in patterns for striking wall art
Finishing Touches: Blocking Your Triangles
For professional-looking results, blocking your finished triangles helps them maintain their shape:
- Dampen your finished triangles slightly
- Pin them to a flat surface in the desired shape
- Allow them to dry completely before using in your project
Conclusion
Learning how to crochet a triangle is a valuable skill that opens up countless creative possibilities. From simple decorations to complex geometric designs, this versatile shape serves as a foundation for projects of all types. With the steps outlined in this guide, you’re well-equipped to start creating perfect triangles and incorporating them into your crochet repertoire.
Remember, practice makes perfect—try making a few practice triangles before starting a larger project. You can always reuse the yarn later, or better yet, turn those practice pieces into a colorful banner or bunting!
Happy crocheting!
Have you created something amazing using crochet triangles? We’d love to see your projects in the comments below!


Leave a Reply