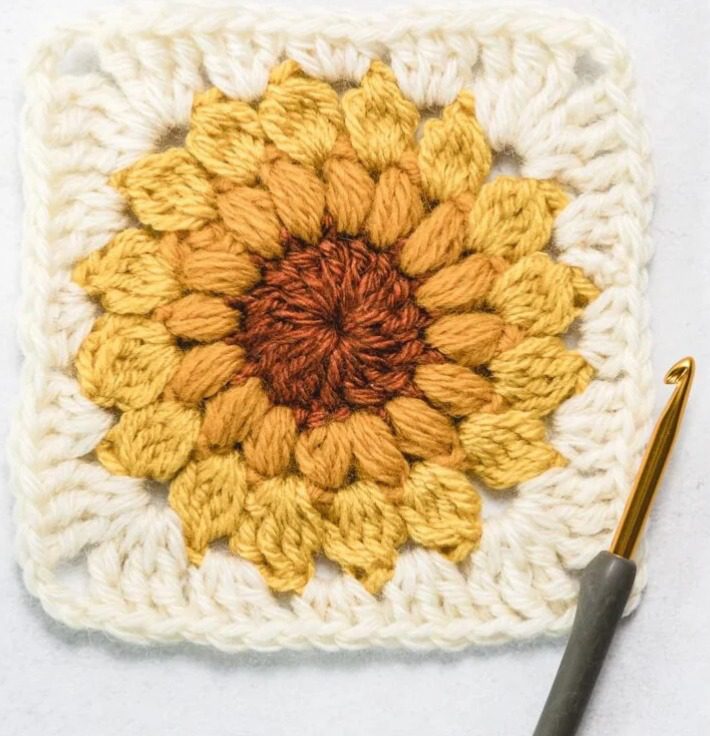
The crochet sunburst granny square is a stunning variation of the classic granny square that creates a beautiful flower-like design radiating from the center. This eye-catching pattern is perfect for creating colorful blankets, pillows, bags, and other projects that showcase your crochet skills. Whether you want to create a sunflower effect or play with various color combinations, this versatile pattern allows endless creativity while remaining accessible to crocheters with basic skills.
Understanding the Crochet Sunburst Granny Square
The sunburst granny square gets its distinctive appearance from textured stitches in the center rounds that create a radiant, sun-like effect. This design typically uses four different colors—a center color, two contrasting colors for the textural rounds, and a final color to form the square shape. The pattern builds outward from a circular center, gradually transforming into a square through strategic placement of stitches in the final round.
What makes this pattern so popular is its versatility—by changing colors, you can create different effects, from realistic sunflowers to abstract bursts of color. Despite its impressive appearance, this pattern uses basic crochet stitches along with a few special textured stitches that are easy to learn.
Materials Needed for Your Crochet Sunburst Granny Square
Before starting your sunburst granny square, gather these essential supplies:
Yarn
For a traditional sunflower-inspired sunburst square, select worsted weight (category 4) yarn in four colors:
- Brown (for the center)
- Gold (for the puff stitch round)
- Yellow (for the cluster stitch round)
- Cream or white (for the final square shaping round)
Alternative color combinations might include:
- Blue center with light blue and white bursting rounds for a water-inspired theme
- Red center with orange and yellow for a traditional sun design
- Green center with various green shades for a natural, floral look
Tools
- Size H-8 (5mm) crochet hook
- Yarn needle for weaving in ends
- Scissors
- Optional: stitch markers to mark the beginning of rounds
Essential Stitches for the Crochet Sunburst Granny Square
Before diving into the pattern, familiarize yourself with these stitches:
Basic Stitches
- Chain stitch (ch)
- Slip stitch (sl st)
- Double crochet (dc)
- Half double crochet (hdc)
- Treble crochet (tr)
Special Stitches
- Puff Stitch: This creates the textured second round and forms the “petals” of the sunburst. To make a puff stitch: Yarn over, insert hook into the stitch, yarn over and pull up a loop (repeat two more times in the same stitch until you have 7 loops on your hook), yarn over and pull through all loops, chain 1 to secure.
- Cluster Stitch: Used in the third round to add dimension. To make a cluster stitch: (Yarn over, insert hook into stitch, yarn over and pull up a loop, yarn over and pull through 2 loops) repeat until you have 5 loops on your hook, yarn over and pull through all loops.
Step-by-Step Crochet Sunburst Granny Square Tutorial
Follow these detailed instructions to create your sunburst granny square:
Round 1: Creating the Center (Brown)
- Start with a magic ring (also called a magic circle)
- Chain 3 (counts as your first double crochet)
- Work 15 more double crochet stitches into the magic ring
- Join with a slip stitch to the top of the beginning chain-3
- You’ll have 16 double crochet stitches total
- Cut yarn and fasten off
The center of your sunburst is now complete, forming a small circle that will serve as the foundation for the next rounds.
Round 2: Adding the Puff Stitches (Gold)
- Join gold yarn with a slip stitch to any double crochet from Round 1
- Chain 2 (does not count as a stitch)
- Make a puff stitch in the same stitch where you joined the yarn
- Continue making puff stitches in each double crochet around the circle
- Join with a slip stitch to the first puff stitch
- You’ll have 16 puff stitches total, each separated by the chain-1 that secures the puff
- Cut yarn and fasten off
This round creates the dimensional “petals” that give the sunburst its texture and flower-like appearance.
Round 3: Creating the Cluster Round (Yellow)
- Join yellow yarn with a slip stitch in any chain-1 space from Round 2
- Chain 2 (does not count as a stitch)
- Work the first cluster stitch in the same space where you joined
- Chain 2
- Continue working (cluster stitch, chain 2) in each chain-1 space around
- Join with a slip stitch to the top of the first cluster
- You’ll have 16 cluster stitches total, each separated by chain-2 spaces
- Cut yarn and fasten off
The cluster stitches add another layer of texture while beginning to expand the diameter of your work.
Round 4: Forming the Square Shape (Cream/White)
- Join cream yarn with a slip stitch in any chain-2 space
- Chain 4 (counts as first treble crochet)
- Work 2 more treble crochets in the same space
- Working the first side: 3 double crochets in the next chain-2 space, 3 half double crochets in the next chain-2 space, 3 double crochets in the next chain-2 space
- Creating the first corner: In the next chain-2 space, work (3 treble crochets, chain 3, 3 treble crochets)
- Repeat steps 4-5 three more times to create all four sides and corners
- Join with a slip stitch to the top of the beginning chain-4
- Cut yarn and fasten off
This final round transforms the circular shape into a square by working different height stitches along the sides and creating defined corners with treble crochet groups.
Finishing and Blocking Your Crochet Sunburst Granny Square
After completing all rounds, weave in the ends securely using your yarn needle. For a professional finish, block your square:
- Dampen the square by spraying with water or briefly soaking it
- Lay it flat on a blocking board or towel
- Pin the corners and sides to create a perfect square shape
- Allow to dry completely before removing pins
Blocking helps even out your stitches and makes the square perfectly flat, which is especially important if you plan to join multiple squares together.
Troubleshooting Common Issues
My Square Is Curling or Not Lying Flat
This usually happens when your tension is too tight or there aren’t enough stitches in the outer rounds. Try:
- Using a slightly larger hook
- Making sure you’re creating proper corners with (3 tr, ch 3, 3 tr)
- Adding additional chain spaces if needed
The Shape Looks More Like a Circle Than a Square
This indicates that your corner stitches may not be prominent enough. Ensure you’re:
- Working full treble crochets at the corners
- Using chain-3 spaces at each corner
- Creating distinct sides with the pattern of decreasing stitch heights (tr, dc, hdc)
My Puff Stitches Don’t Look Full and Dimensional
If your puff stitches appear flat:
- Make sure you’re pulling up loops to the height of your double crochet
- Use the chain-1 to secure each puff properly
- Try using a larger hook just for the puff stitch round
Creative Variations of the Crochet Sunburst Granny Square
Sunflower Square
For a realistic sunflower effect:
- Use dark brown for the center round
- Deep gold for the puff stitches
- Bright yellow for the cluster round
- Green for the final round to represent leaves
Rainbow Burst
Create a vibrant rainbow effect:
- Use purple for the center
- Work the puff stitches in blue
- Use green for the cluster round
- Yellow or white for the final round
Dimensional Variation
For extra texture:
- Replace the cluster stitch round with popcorn stitches
- Use a contrasting color for the chain spaces in the final round
- Add an additional round of shell stitches for border decoration
Joining Crochet Sunburst Granny Squares
When you’ve created multiple squares, there are several ways to join them:
Whip Stitch Join
The simplest method:
- Place squares side by side with right sides facing up
- Thread yarn on a needle
- Sew through the back loops of both squares
- Continue along the entire edge
Slip Stitch Join
For a decorative ridge:
- Hold squares together with right sides facing out
- Insert hook through both sets of edge loops
- Yarn over and slip stitch
- Continue along the edge
Single Crochet Join
For a stronger, more defined join:
- Hold squares with right sides facing out
- Insert hook through both edge loops
- Work single crochet stitches along the seam
Project Ideas Using Crochet Sunburst Granny Squares
Sunflower Blanket
Join multiple sunflower-themed sunburst squares for a stunning summer blanket:
- Arrange 25-36 squares in a grid pattern
- Add a simple border in green or brown
- Perfect as a throw or baby blanket
Decorative Cushion Cover
Create a statement piece for your home:
- Make four large sunburst squares
- Join to form the front of a cushion cover
- Add a simple back panel with buttons or a zipper closure
Tote Bag
Turn your sunburst squares into a functional accessory:
- Use 2-3 squares for each side of the bag
- Join with a contrasting color
- Add straps and a lining for durability
Table Runner
Create a seasonal decoration:
- Join squares in a single line
- Add tassels or fringe to the ends
- Perfect for summer or fall table settings
Tips for Perfect Crochet Sunburst Granny Squares
Color Selection
- Choose colors with good contrast for the most striking effect
- Consider using a color wheel to select complementary colors
- For a subtle look, use different shades of the same color family
Tension Control
- Maintain consistent tension across all rounds
- The center rounds may feel tight to work into—this is normal
- If your square buckles, try blocking before assuming there’s a problem
Size Variations
- For larger squares, add additional rounds of traditional granny square pattern after Round 4
- For smaller squares, use thinner yarn and a smaller hook
- Keep stitch counts consistent regardless of size adjustments
Preserving and Caring for Your Finished Projects
To ensure your sunburst granny square projects remain beautiful for years:
- Hand wash items in cool water with mild detergent
- Lay flat to dry, reshaping as needed
- Store folded rather than hung to prevent stretching
- For display items, keep away from direct sunlight to prevent fading
Conclusion
The crochet sunburst granny square offers endless creative possibilities while building on basic crochet skills. Whether you’re creating a single square as a coaster or joining dozens for a statement blanket, this versatile pattern creates striking results that showcase your crochet talents. By mastering the special stitches and following the round-by-round instructions, you’ll be able to create beautiful sunburst designs that can be incorporated into countless projects.
Remember that like any crochet technique, practice leads to improvement—your first sunburst square might not be perfect, but each one you make will be better than the last. Have fun experimenting with different color combinations and applications for this beautiful granny square variation!


Leave a Reply