Table of Contents
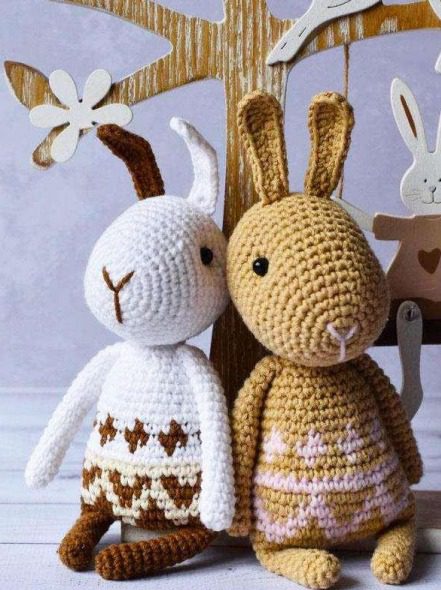
Creating a realistic amigurumi rabbit is a rewarding project that yields adorable results. Unlike typical amigurumi patterns, this rabbit has realistic proportions and decorative patterns on its body that give it a charming, lifelike appearance. This comprehensive guide will walk you through the entire process of creating this cute bunny companion.
Realistic Materials You’ll Need
To make this beautiful amigurumi rabbit, gather these materials:
- Yarn Art Jeans (55% cotton, 45% polyacrylic, 160m length) in white, linen, and brown colors
- 1.75mm crochet hook
- Hollow fiber filling
- 2 bead eyes
- Scissors
- Large needle for sewing pieces
- White sewing thread for tightening the muzzle
- Black sewing thread for attaching the eyes
Realistic Understanding the Terminology
Before starting, familiarize yourself with these crochet abbreviations:
- MR – Magic ring
- sc – Single crochet
- inc – Increase in single crochet
- dec – Decrease
- dc – Double crochet
- st – Stitch
- tr – Triple crochet
- sl st – Slip stitch
- ch – Chain
- FLO – Front loop only
- BLO – Back loop only
- pst – Puff stitch
Realistic Creating the Head
Start with white yarn:
- Round 1: 6 sc in magic ring
- Round 2: 6 increases (12 stitches)
- Round 3: (1 sc, inc) x 6 (18 stitches)
- Round 4: (2 sc, inc) x 6 (24 stitches)
- Round 5: 24 sc
- Round 6: (3 sc, inc) x 6 (30 stitches)
- Round 7: 30 sc
- Round 8: (4 sc, inc) x 6 (36 stitches)
- Round 9: (5 sc, inc) x 6 (42 stitches)
- Rounds 10-17: 42 sc (maintain for 8 rounds)
- Round 18: (5 sc, dec) x 6 (36 stitches)
- Round 19: (4 sc, dec) x 6 (30 stitches)
- Round 20: (3 sc, dec) x 6 (24 stitches)
At this point, stuff the head with filling.
- Round 21: (2 sc, dec) x 6 (18 stitches)
- Round 22: (1 sc, dec) x 6 (12 stitches)
- Round 23: 6 decreases (6 stitches)
Cut the yarn, secure the thread, and hide the end.
Realistic Creating the Legs (Make 2)
Use brown yarn:
- Round 1: 6 sc in magic ring
- Round 2: 2 increases, 4 sc (8 stitches)
- Rounds 3-12: 8 sc (maintain for 10 rounds)
Do not stuff the legs. Work the second leg the same way. From the second leg, create a chain of 10 ch, and insert your hook into the first stitch of the last round of the first leg. Place a marker and begin working in rounds.
Realistic Forming the Body
- Round 13: 8 sc for the left leg, 10 sc for the chain, 8 sc for the right leg, 10 sc for the chain (36 stitches total)
- Round 14: (5 sc, inc) x 6 (42 stitches)
Now begin working the decorative pattern by incorporating linen-colored yarn. When changing colors:
- The last 2 loops on the hook should be worked with the new color yarn
- Carry the unused yarn along the edge of the previous row so it’s crocheted into the fabric, creating a double-sided appearance
Work the pattern according to these instructions: 15. Round 15: 1 sc (brown), (2 sc linen, 5 sc brown) x 5, 2 sc linen, 4 sc brown (42 stitches) 16. Round 16: (4 sc linen, 3 sc brown) x 5, 4 sc linen, 2 sc brown, 1 sc linen (42 stitches) 17. Round 17: Create an alternating pattern of brown and linen stitches 18. Round 18: (4 sc brown, 3 sc linen) x 6 (42 stitches) 19. Round 19: Continue the alternating pattern
- Round 20: 42 sc in linen color
- Round 21: Switch to white yarn, (5 sc, dec) x 6 (36 stitches)
- Round 22: 2 sc white, 1 sc brown, (3 sc white, 1 sc brown) x 8, 1 sc white (36 stitches)
- Round 23: (1 sc white, 3 sc brown) x 9 (36 stitches)
- Round 24: 2 sc white, 1 sc brown, (3 sc white, 1 sc brown) x 8, 1 sc white (36 stitches)
- Round 25: 36 sc in white
- Round 26: (4 sc, dec) x 6 (30 stitches)
- Rounds 27-28: 30 sc (maintain for 2 rounds)
- Round 29: (3 sc, dec) x 6 (24 stitches)
- Round 30: 24 sc
- Round 31: (2 sc, dec) x 6 (18 stitches)
- Round 32: 18 sc
Stuff the body firmly.
- Round 33: (1 sc, dec) x 6 (12 stitches)
Finish crocheting, cut off the yarn, leaving a long end for sewing the head.
Creating the Arms (Make 2)
Use white yarn:
- Round 1: 6 sc in magic ring
- Round 2: 2 increases, 4 sc (8 stitches)
- Rounds 3-19: 8 sc (maintain for 17 rounds)
- Round 20: 1 sc, fold the hole at the bottom and work 3 sc through both layers
Cut the yarn, leaving a long end for sewing. Do not stuff the arms.
Making the Ears (Make 2)
Crochet one ear with white yarn and the second with brown yarn:
- Make a chain of 13 ch
- Starting from the second loop from the hook, work 5 sc, 3 puff stitches, 3 dc, 6 dc in one loop
- Work along the other side: 3 dc, 3 puff stitches, 5 sc
Finish crocheting, cut the yarn, leaving a thread for sewing. Bring the top thread to the base of the ear and secure it.
Creating the Tail
Use linen-colored yarn:
- Round 1: 6 sc in magic ring
- Round 2: (1 sc, inc) x 3 (9 stitches)
- Rounds 3-4: 9 sc (maintain for 2 rounds)
- Round 5: (1 sc, dec) x 3 (6 stitches)
Finish crocheting, cut the yarn, leaving a long thread for sewing.
Assembly
- Shape the muzzle by tightening with thread around row 12
- Sew the eyes at the tightened spots
- Attach the ears at row 16
- Sew the tail at rows 6-7
- Attach the arms at row 19
Now your realistic amigurumi rabbit is complete! With its charming pattern and lifelike proportions, this bunny makes a wonderful handmade gift or a delightful addition to your own collection.
This pattern creates a double-sided fabric with the colorwork, meaning the rabbit looks good from all angles. Take your time with the color changes to ensure a clean, professional finish. The puff stitches in the ears add texture and dimension, enhancing the realistic appearance of your amigurumi rabbit.Réessayer
Check this out :Crochet an Adorable Tiger Amigurumi
Conclusion
Creating amigurumi dolls like the Wednesday Addams character or the realistic rabbit requires patience, attention to detail, and some intermediate crochet skills. These adorable handcrafted toys are more than just decorative items—they represent the beautiful intersection of art, craftsmanship, and personal expression.
The beauty of amigurumi lies in its versatility. Whether you prefer the gothic charm of Wednesday Addams with her characteristic black dress and braided hair, or the soft natural appearance of a realistic rabbit, the techniques you’ve learned can be applied to countless other designs. Each stitch contributes to bringing these characters to life, from the structured shaping of the head to the delicate details of facial features.
As you become more comfortable with the patterns, don’t be afraid to customize and experiment. Try different yarn weights, adjust colors to match your vision, or modify proportions to create unique variations. The skills you’ve developed—working in continuous rounds, color changes, stuffing techniques, and assembly—form a solid foundation for your amigurumi journey.
Remember that perfection comes with practice. Each amigurumi you create will help you refine your technique and develop your personal style. Document your progress, share your creations with the community, and most importantly, enjoy the meditative process of bringing these charming characters from yarn to reality.
Happy crocheting!


Leave a Reply