Table of Contents
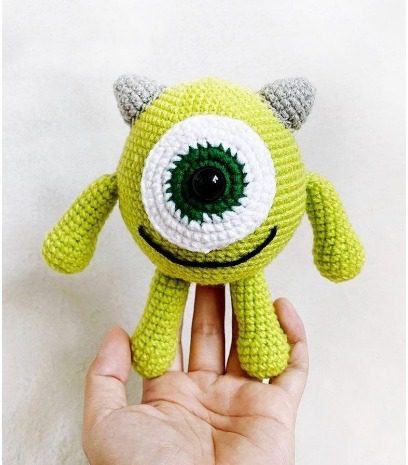
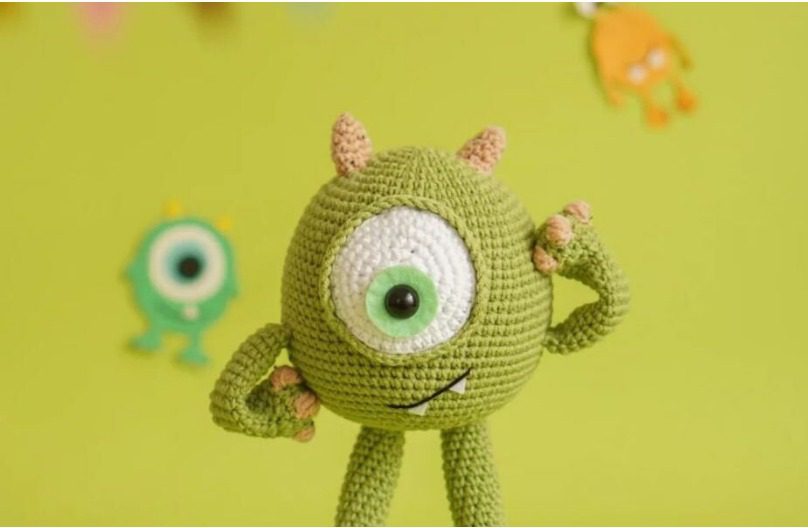
Bring everyone’s favorite one-eyed green monster to life with this delightful amigurumi pattern! This adorable crocheted character features a vibrant green body, expressive single eye, and characteristic horns that fans of the beloved animated character will instantly recognize. Perfect for monster lovers of all ages, this Amigurumi intermediate-level pattern creates a charming plush toy that’s ideal for display, play, or gifting to fellow animation enthusiasts. Follow this comprehensive guide to craft your very own friendly monster using just yarn and a crochet hook.
Essential Materials for Your Monster Amigurumi
Before beginning your crochet journey, gather these supplies:
Amigurumi Yarn Colors
- Color A (green): Alize Cotton Gold 385 (100g, 330m) or similar
- Color B (white): YarnArt Jeans 62 (50g, 160m) or similar
- Color C (skin color): Alize Cotton Gold Tweed 262 (100g, 330m) or similar
Amigurumi Additional Supplies
- Crochet hook size 2-2.5mm
- 12mm black safety eye
- White and green felt fabric
- Black embroidery thread
- Tapestry needles
- Pins for assembly
- Stitch markers
- Scissors
- Polyester fiberfill for stuffing
Understanding Crochet Terminology
This pattern uses US crochet terms with the following abbreviations:
- Ch – Chain
- Sc – Single Crochet
- Inc – Single Crochet Increase (2 sc in same stitch)
- Dec – Single Crochet Decrease (2 sc worked together)
- Hdc – Half Double Crochet
- Slst – Slip Stitch
- Mr – Magic Ring
- Dc – Double Crochet
- Tr – Treble Crochet
- (…) – Work all stitches in the same stitch
- […]…x – Repeat instructions in brackets the indicated number of times
- Bobble – Bobble Stitch
- BLO – Back Loop Only
- FLO – Front Loop Only
- Rnd – Round
- Sts – Stitches
Creating the Monster Legs
Make two identical legs using Color A (green) with accent details:
Round 1: Create 6 single crochet in a magic loop (6) Round 2: Increase in each stitch around (12) Round 3: Work [2 single crochet, 1 increase] 4 times (16) Round 4: Single crochet 4, change to Color C (skin color), work [Bobble stitch, 2 single crochet] 3 times, single crochet 3 (16) Round 5: Single crochet in each stitch around (16) Round 6: Single crochet 4, decrease 4 times, single crochet 4 (12) Round 7: Single crochet 4, decrease 2 times, single crochet 4 (10) Rounds 8-20: Single crochet in each stitch around for 13 rounds (10)
Make the second leg following the same pattern. Break the yarn, stuff the legs firmly, and leave a tail for attaching to the head later.
Crafting the Monster Arms
Make two identical arms using Color A (green) with accent details:
Round 1: Create 6 single crochet in a magic loop (6) Round 2: Increase in each stitch around (12) Round 3: Work [3 single crochet, 1 increase] 3 times (15) Round 4: Single crochet 4, change to Color C (skin color), work [Bobble stitch, 2 single crochet] 3 times, single crochet 2 (15) Round 5: Single crochet in each stitch around (15) Round 6: Single crochet 5, decrease 3 times, single crochet 4 (12) Round 7: Single crochet 4, decrease 2 times, single crochet 4 (10) Rounds 8-22: Single crochet in each stitch around for 15 rounds (10)
Break the yarn, leaving a long tail. Stuff the hands lightly, and sew the two edges together to flatten the arm ends.
Forming the Characteristic Horns
Make two identical horns using Color C (skin color):
Round 1: Create 3 single crochet in a magic loop (3) Round 2: Increase in each stitch around (6) Round 3: Single crochet in each stitch around (6) Round 4: Work (increase, single crochet 1) 3 times (9) Rounds 5-6: Single crochet in each stitch around for 2 rounds (9)
Break the yarn, leaving a long tail for sewing. Stuff each horn lightly.
Shaping the Monster Head
Use Color A (green) for this main section:
Round 1: Create 6 single crochet in a magic loop (6) Round 2: Increase in each stitch around (12) Round 3: Work [1 single crochet, 1 increase] 6 times (18) Round 4: Work [1 single crochet, 1 increase, 1 single crochet] 6 times (24) Round 5: Work [3 single crochet, 1 increase] 6 times (30) Round 6: Work [2 single crochet, 1 increase, 2 single crochet] 6 times (36) Round 7: Work [5 single crochet, 1 increase] 6 times (42) Round 8: Work [3 single crochet, 1 increase, 3 single crochet] 6 times (48) Round 9: Work [7 single crochet, 1 increase] 6 times (54) Round 10: Work [4 single crochet, 1 increase, 4 single crochet] 6 times (60) Rounds 11-13: Single crochet in each stitch around for 3 rounds (60) Round 14: Work [14 single crochet, 1 increase] 4 times (64) Rounds 15-17: Single crochet in each stitch around for 3 rounds (64) Round 18: Work [15 single crochet, 1 increase] 4 times (68) Rounds 19-21: Single crochet in each stitch around for 3 rounds (68) Round 22: Work [16 single crochet, 1 increase] 4 times (72) Rounds 23-28: Single crochet in each stitch around for 6 rounds (72) Round 29: Work [7 single crochet, 1 decrease] 8 times (64) Round 30: Work [6 single crochet, 1 decrease] 8 times (56) Round 31: Work [5 single crochet, 1 decrease] 8 times (48) Round 32: Work [4 single crochet, 1 decrease] 8 times (40) Round 33: Work [3 single crochet, 1 decrease] 8 times, begin stuffing (32) Round 34: Work [2 single crochet, 1 decrease] 8 times (24) Round 35: Work [1 single crochet, 1 decrease] 8 times (16) Round 36: Decrease 8 times (8)
Break the yarn, use a tapestry needle to weave in the last 8 stitches and hide the yarn. Ensure the head is firmly stuffed before closing completely.
Creating the Eye Components
Eye Brim
Use Color A (green) for this accent piece:
Round 1: Chain 47, start on the second stitch from the hook, single crochet 24, slip stitch 22 (46)
Break the yarn, leaving a long tail for sewing. The single crochet section will cover the upper part of the eye, while the slip stitch section covers the lower part.
Eye
Use Color B (white) for the main eye:
Round 1: Create 8 single crochet in a magic loop (8) Round 2: Increase in each stitch around (16) Round 3: Work [1 single crochet, 1 increase] 8 times (24) Round 4: Work [1 single crochet, 1 increase, 1 single crochet] 8 times (32) Round 5: Work [3 single crochet, 1 increase] 8 times (40) Round 6: Single crochet in each stitch around (40)
Break the yarn, leaving a long tail for sewing.
Final Assembly Instructions
Follow these steps to bring your monster amigurumi to life:
- Prepare the Eye: Attach the black safety eye to the center of the white crocheted eye. Position the green eye brim around the white eye, with the single crochet section at the top and the slip stitch section at the bottom.
- Attach the Eye: Sew the completed eye assembly to the front center of the head.
- Add Eye Details: Using green felt, cut a small pupil shape and attach it to the center of the black safety eye. Use white felt to create a small reflection highlight and attach it to the pupil.
- Attach the Horns: Sew the horns to the top of the head, positioning them symmetrically.
- Connect Limbs: Attach the arms to the sides of the head, and the legs to the bottom of the head.
- Final Touches: Use black embroidery thread to add any additional facial details as desired.
Customization Ideas for Your Monster
Once you’ve mastered the basic pattern, consider these creative variations:
- Color Changes: Experiment with different shades of green for a unique look, or try entirely different colors for a fantasy monster.
- Accessories: Add small accessories like a tiny hat, glasses, or a miniature microphone for different character interpretations.
- Size Adjustments: Use different yarn weights and appropriate hook sizes to create monsters of various sizes.
- Expression Variations: Modify the eye positioning or add embroidered details to change the monster’s expression.
Why This Amigurumi Monster Pattern Is Perfect for Crochet Enthusiasts
This pattern offers several advantages that make it appealing to crocheters of various skill levels:
The design incorporates multiple crochet techniques that help develop your skills, from basic increases and decreases to specialty stitches like the Bobble stitch. The clear round-by-round instructions make the pattern accessible for those with some amigurumi experience.
With its distinctive one-eyed appearance and vibrant green color, this monster creates an instantly recognizable character that appeals to animation fans of all ages. The finished amigurumi stands out as both a collectible and a playable toy.
The project uses a thoughtful combination of yarns to create texture variations in the arms and legs, adding visual interest and tactile appeal. Whether you’re creating this monster as a gift for a movie buff, for a craft fair, or for your own collection, the result is a charming handmade creation that’s sure to bring smiles.
The Joy of Creating Your Own Monster Amigurumi
Completing an amigurumi monster brings a special sense of accomplishment. This charming character represents hours of careful craftsmanship and attention to detail. As you attach the final pieces and add the finishing touches, take pride in the character you’ve brought to life through your own handiwork.
These monsters make wonderful gifts for animation enthusiasts, children, or anyone who appreciates handmade treasures. Their cheerful appearance and soft, huggable texture make them ideal presents for birthdays, holidays, or just to brighten someone’s day. Each handmade monster carries with it the care and creativity you’ve invested in every stitch.
For those new to character-based amigurumi, this monster serves as an excellent project to develop your skills, teaching valuable techniques that will serve you well in future creations. For experienced crocheters, the pattern offers enough interesting elements and details to keep the process engaging and satisfying.

Check this out :Crochet an Adorable Amigurumi Duck
Showcasing Your Finished Monster
Once you’ve completed your monster, consider photographing it in creative settings that highlight its personality. Many crafters create small scenes or vignettes featuring their amigurumi creations, bringing them to life in charming ways. Share these images on social media using popular crafting and animation hashtags to connect with fellow enthusiasts and inspire others.
If you’re feeling particularly creative, consider creating companion characters from the same animated universe or developing a backstory for your monster. The storytelling aspect of amigurumi is part of what makes these creations so special and beloved by people of all ages.
Remember that each handmade item carries your personal touch and creativity, making it truly one-of-a-kind. Your amigurumi monster represents not just a completed project, but also the time, patience, and imagination you’ve invested in creating something magical from simple materials.
Happy crocheting, and may your monster bring joy to all who encounter it!


Leave a Reply