Table of Contents
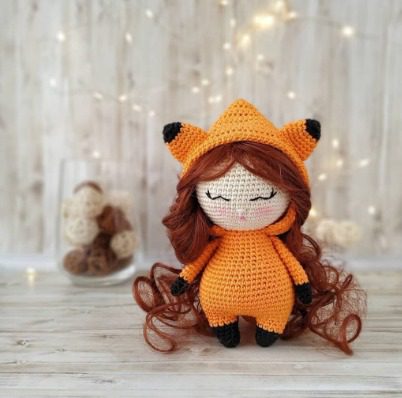
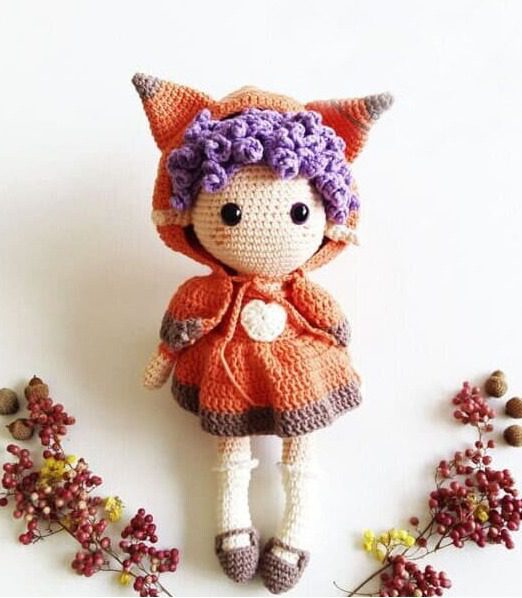
Bring charm and whimsy to your amigurumi collection with this delightful Fox Girl Foxella doll pattern. This Girl Doll adorable character combines the cute features of a fox with the stylish appearance of a fashion doll, making it perfect for children and collectors alike. With her purple curly hair, fox-themed hood, and detailed outfit, Foxella is a standout project that showcases your crochet skills. This intermediate-level pattern creates a huggable friend that’s sure to delight anyone who loves foxes, dolls, or unique handmade creations.
Essential Materials for Your Fox Girl Doll
Before beginning your Foxella project, gather these supplies:
Girl Doll Yarn Colors
- Yarnart Jeans or similar in these colors:
- Skin color (Color code 73)
- Brown (Color code 71)
- Cream (Color code 03)
- Orange (Color code 23)
- Purple (Color code 72)
Girl Doll Additional Supplies
- 12mm purple safety eyes
- Polyester fiberfill for stuffing
- Tapestry needle
- Pins for assembly
- 2.5mm crochet hook
- Scissors
Understanding Girl Doll Terminology
This pattern uses the following abbreviations:
- sc – Single Crochet
- inc – Increase (2 single crochet in the same stitch)
- dec – Decrease (2 single crochet worked together)
- tr – Treble/Triple Crochet
- dc – Double Crochet
- hdc – Half Double Crochet
- sl-st – Slip Stitch
- ch – Chain
- DCinc – Double Crochet Increase
- DCdec – Double Crochet Decrease
- FLO – Front Loops Only
- BLO – Back Loops Only
- (..) – Total number of stitches after the round/row
- (…) x … times – Repeat instructions in parentheses the specified number of times
Girl Doll Creating the Legs and Body
Legs in Cream (Make 2)
Round 1: Create 6 single crochet into a magic ring (6) Round 2: Increase in each stitch around (12) Rounds 3-11: Single crochet in each stitch around for 9 rounds (12) Round 12: Decrease twice, single crochet 3, decrease twice, single crochet 3 (8) Round 13: Single crochet in each stitch around (8) Round 14: Decrease twice, single crochet 3, decrease twice, single crochet 3 (8) Rounds 15-16: Single crochet in each stitch around for 2 rounds (8) Round 17: Work in back loops only, single crochet in each stitch around (8)
Change to skin color.
Rounds 18-24: Single crochet in each stitch around for 7 rounds (8)
Change to orange color.
Rounds 25-26: Single crochet in each stitch around for 2 rounds (8)
Complete the first leg, then repeat the process for the second leg. When you finish Round 26 of the second leg, work 2 single crochet into the stitches to reach the middle. The underpants and dress will be orange, so continue with orange yarn. Make sure the feet are pointing toward each other when joining.
Stuff the legs firmly before joining them together.
Girl Doll Body in Orange
Round 27: Join the legs with a chain of 6 stitches (36 total) Rounds 28-38: Single crochet in each stitch around for 11 rounds (36) Round 39: Work in back loops only, single crochet in each stitch around (36) Round 40: Single crochet in each stitch around (36) Round 41: (Single crochet 4, decrease) repeat 6 times (30) Rounds 42-43: Single crochet in each stitch around for 2 rounds (30) Round 44: (Single crochet 3, decrease) repeat 6 times (24) Round 45: Single crochet in each stitch around (24) Round 46: Single crochet 2, decrease (18)
Change to skin color.
Round 47: Work in back loops only, single crochet in each stitch around (18) Rounds 48-49: Single crochet in each stitch around for 2 rounds (18)
Don’t break the yarn as you’ll continue to crochet the head.
Adding Sock Ruffles
For decorative sock ruffles, join yarn in the back loops of Round 17 and work (Chain 1, single crochet 1) 12 times around each leg.
Continue stuffing the body as you progress with the pattern.
Shaping Girl Doll Head
Continue with skin color from the body:
Round 50: (Single crochet 2, increase) repeat 6 times (24) Round 51: (Single crochet 3, increase) repeat 6 times (30) Round 52: (Single crochet 4, increase) repeat 6 times (36) Round 53: (Single crochet 5, increase) repeat 6 times (42) Round 54: (Single crochet 6, increase) repeat 6 times (48) Round 55: (Single crochet 7, increase) repeat 6 times (54) Rounds 56-60: Single crochet in each stitch around for 5 rounds (54) Round 61: (Single crochet 7, decrease) repeat 6 times (48) Rounds 62-66: Single crochet in each stitch around for 5 rounds (48) Round 67: (Single crochet 6, decrease) repeat 6 times (42) Round 68: (Single crochet 5, decrease) repeat 6 times (36) Round 69: (Single crochet 4, decrease) repeat 6 times (30) Round 70: (Single crochet 3, decrease) repeat 6 times (24) Round 71: (Single crochet 2, decrease) repeat 6 times (18) Round 72: (Single crochet 1, decrease) repeat 6 times (12) Round 73: Decrease 6 times (6)
Fasten off and weave in the end.
Girl Doll Creating the Arms
Make two arms using skin color:
Round 1: Create 5 single crochet into a magic ring (5) Round 2: Increase in each stitch around (10) Rounds 3-5: Single crochet in each stitch around for 3 rounds (10) Round 6: Decrease once, single crochet 6, decrease once (8) Round 7: Single crochet in each stitch around (8)
Change to orange color.
Rounds 8-20: Single crochet in each stitch around for 13 rounds (8) Round 21: Decrease 4 times (4)
Fasten off, leaving a long tail for sewing.
Girl Doll Adding Facial Features and Attaching Arms
Place the safety eyes between Rounds 60-61 with a distance of 7 stitches between them. Stuff the arms firmly and sew them to the body at the collar section (where Round 47 begins), being careful to hide the color changes when sewing.
Girl Doll Creating the Hair
Hair Cap in Purple
Round 1: Create 6 single crochet into a magic ring (6) Round 2: Work in back loops only, increase in each stitch around (12) Round 3: Work in back loops only, (single crochet 1, increase) repeat 6 times (18) Round 4: Work in back loops only, (single crochet 2, increase) repeat 6 times (24) Round 5: Work in back loops only, (single crochet 3, increase) repeat 6 times (30) Round 6: Work in back loops only, (single crochet 4, increase) repeat 6 times (36) Round 7: Work in back loops only, (single crochet 5, increase) repeat 6 times (42) Round 8: Work in back loops only, (single crochet 6, increase) repeat 6 times (48) Round 9: Work in back loops only, single crochet in each stitch around (48) Round 10: Work in back loops only, (single crochet 7, increase) repeat 6 times (54) Rounds 11-16: Work in back loops only, single crochet in each stitch around for 6 rounds (54)
Leave a long tail for sewing the cap to the head.
Curlycues in Purple
Join yarn into the first back loop stitch of Round 2 with a slip stitch, then:
- Chain 11, insert hook into the second stitch from hook
- Increase in each stitch for 10 stitches
- Work 6 slip stitches along the hair cap
- Repeat (Chain 11, increase in each stitch) pattern until you’ve worked around the entire cap
You’ll have approximately 107 curlycues when finished. Sew the hair cap to the head using the long tail you left earlier.
Girl Doll Crafting the Ears
Make two ears in skin color:
Round 1: Create 4 single crochet into a magic ring (4) Rounds 2-3: Single crochet in each stitch around for 2 rounds (4) Round 4: Increase in each stitch around (8) Round 5: Single crochet in each stitch around (8) Round 6: Decrease 4 times (4)
Fasten off and place the ears on both sides of the head, under the curlycues. Use pins to position them before sewing. Don’t stuff the ears. The pointed edges should face outward and upward.
Girl Doll Adding Decorative Details
Facial Details
Embroider small freckles using orange yarn, making each freckle approximately 1 stitch long.
Collar
Join yarn into the back loops of Round 47 with a slip stitch, then work (Chain 1, single crochet 1) 18 times around.
Girl Doll Skirt in Orange
Join yarn into the back loops of Round 39:
Round 1: Double crochet increase in each stitch around (72) Rounds 2-3: Double crochet in each stitch around for 2 rounds (72) Round 4: Double crochet 3, double crochet increase around (90) Round 5: Double crochet in each stitch around (90)
Change to brown color.
Rounds 6-7: Double crochet in each stitch around for 2 rounds (90)
Remember to chain 2 at the beginning of each round of the skirt.
Decorative Heart in Cream
The heart decoration is created as follows:
- Chain 4 (the 4th stitch will be your magic ring)
- Work into the chain 4: triple crochet 3, double crochet 3, chain 1, triple crochet 1, chain 1, double crochet 3, triple crochet 3
- Slip stitch to join to the beginning
Sew the heart between the body and collar, centered on the front.
Creating the Hood and Cloak
Hood in Orange
Start with a foundation chain:
Round 1: Chain 71 Round 2: Insert hook into the second stitch from hook and work: single crochet 3, half double crochet 5, double crochet 54, half double crochet 5, single crochet 3, chain 1 and turn (70) Rounds 3-14: Repeat the pattern from Round 2 for 12 more rounds (70)
Break the yarn, leaving a long tail. Fold the hood in half and sew the edges together.
Work 26 single crochet stitches under the hood to prepare for the cloak.
Cloak in Orange
Round 1: Single crochet 26, chain 2 and turn Round 2: Double crochet increase in each stitch around (52) Rounds 3-5: Double crochet in each stitch around for 3 rounds (52)
Change to brown color.
Rounds 6-7: Double crochet in each stitch around for 2 rounds (52)
Hood Laces in Orange (Make 2)
Chain 25 for each lace. Attach the laces where the hood and cloak join, one on each side.
Adding Fox Ears to the Hood
Make two fox ears:
Round 1: Create 5 single crochet into a magic ring (5) Round 2: Single crochet in each stitch around (5) Round 3: Increase in each stitch around (10) Round 4: Single crochet in each stitch around (10)
Change to orange color.
Round 5: Single crochet 1, increase around (15) Rounds 6-7: Single crochet in each stitch around for 2 rounds (15) Round 8: Single crochet 2, increase around (20) Rounds 9-10: Single crochet in each stitch around for 2 rounds (20) Round 11: Single crochet 3, increase around (25) Round 12: Single crochet in each stitch around (25)
Place the hooded cloak on the doll and sew the fox ears to the hood at the front, on the third round, one on each side.
Making the Shoes
Make two shoes in brown:
Round 1: Create 6 single crochet into a magic ring (6) Round 2: Increase in each stitch around (12) Round 3: Single crochet 3, increase around (15) Rounds 4-6: Single crochet in each stitch around for 3 rounds (15) Rounds 7-8: Chain 1, turn, single crochet 10 for 2 rounds
Chain 5 to create a shoelace and sew it to the opposite side of each shoe.
Final Assembly and Finishing Touches
- Clothing: Ensure the skirt is positioned correctly around the waist, with the brown trim at the bottom.
- Hood and Cloak: Adjust the hood so it sits properly on the head, with the fox ears positioned evenly.
- Accessories: Check that the heart decoration is centered on the front of the outfit.
- Final Details: Make any necessary adjustments to the positioning of the ears, arms, and other elements.
- Facial Expression: Verify that the safety eyes and embroidered freckles create the desired facial expression.
Why This Fox Girl Amigurumi Pattern Is Special
This Foxella doll pattern stands out for several reasons that make it appealing to crochet enthusiasts:
The design combines cute animal features with a fashionable doll appearance, creating a character with broad appeal. The fox-themed hood and outfit details make this more than just a standard doll pattern, while the curly hairstyle adds a distinctive touch that showcases advanced crochet techniques.
The construction method, which builds the body continuously from legs to head, creates a sturdy doll with excellent proportions. The separate clothing elements allow for creative customization and provide practice with various crochet stitches and techniques.
The finished doll has a charming personality and makes an excellent gift for children or a unique addition to an amigurumi collection. The size is perfect for play while still allowing for detailed features that display your crochet skills.
Customization Ideas for Your Fox Girl Doll
Once you’ve mastered the basic pattern, consider these creative variations:
- Color Changes: Experiment with different color combinations for the outfit, hair, or even create a different animal theme by changing the colors of the hood and ears.
- Outfit Modifications: Design additional clothing items like different dresses, accessories, or seasonal outfits to change your doll’s look.
- Hairstyle Variations: Alter the number or placement of curlycues, or try straight hair by using chains without increases for a completely different look.
- Size Adjustments: Use different yarn weights and appropriate hook sizes to create dolls of various sizes.
The Joy of Creating Your Own Fox Girl Amigurumi
Completing a Foxella doll brings a special sense of accomplishment. This charming character represents hours of careful craftsmanship and attention to detail. As you attach the final pieces and add the finishing touches, take pride in the unique creation you’ve brought to life through your own handiwork.
These dolls make wonderful gifts for children or collectors who appreciate handmade treasures. Their charming appearance and soft, huggable texture make them ideal presents for birthdays, holidays, or just to brighten someone’s day. Each handmade doll carries with it the care and creativity you’ve invested in every stitch.
For those new to complex amigurumi patterns, this fox girl serves as an excellent project to develop your skills, teaching valuable techniques that will serve you well in future creations. For experienced crocheters, the pattern offers enough interesting elements and details to keep the process engaging and satisfying.

Check this out :Adorable Crazy Dragon Amigurumi
Showcasing Your Finished Fox Girl
Once you’ve completed your Foxella doll, consider photographing her in creative settings that highlight her personality. Many crafters create small scenes or vignettes featuring their amigurumi creations, bringing them to life in charming ways. Share these images on social media using popular crafting hashtags to connect with fellow enthusiasts and inspire others.
If you’re feeling particularly creative, consider creating companion dolls with different animal themes using the same basic pattern. The storytelling aspect of amigurumi is part of what makes these creations so special and beloved by people of all ages.
Remember that each handmade item carries your personal touch and creativity, making it truly one-of-a-kind. Your Foxella doll represents not just a completed project, but also the time, patience, and imagination you’ve invested in creating something magical from simple materials.
Happy crocheting, and may your Fox Girl Foxella bring joy to all who encounter her!


Leave a Reply