Table of Contents
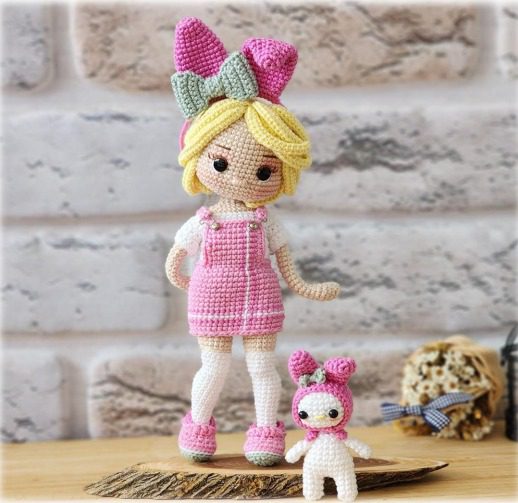
Are you looking to create a charming amigurumi doll that’s both adorable and personalized? The Maya Doll pattern offers the perfect blend of cuteness and craftsmanship, allowing crochet enthusiasts of all levels to create a beautiful character with delightful details. This comprehensive guide walks you through every step of creating your own Maya Doll, complete with her signature pink outfit, cute bow, and companion My Melody.
What Makes the Maya Doll Special
The Maya Doll stands out among amigurumi patterns for its thoughtful design elements – from the fully posable limbs to the removable clothing pieces that allow for customization. Standing approximately 30 cm tall when completed, this doll features:
- Blonde yarn hair styled in a charming bob cut
- Posable arms and legs with wire armature
- Removable pink jumper dress and white blouse
- Adorable headband with mint green bow
- Cute pink shoes
- A miniature My Melody companion
Materials Needed for Your Maya Doll
For the Doll
- Catania 263 – skin tone
- Catania 105 – white
- Catania 287 – dark pink
- Catania 222 – pink
- Catania 403 – yellow (for hair)
- Catania 402 – mint green (for bow)
- 2.00 mm crochet hook
- 8 mm black safety eyes
- Small amount of brown embroidery thread (for facial details)
- 1 meter of 2.5 mm wire (for armature)
- 3 small buttons
- Dress hanger accessory (or follow the alternative in the pattern)
- Fiberfill stuffing
For My Melody Companion
- Catania 105 – white
- Catania 287 – dark pink
- Catania 402 – mint green (for ribbon)
- 5 mm black safety eyes
Understanding the Crochet Terminology
Before you begin, it’s helpful to understand the abbreviations used throughout the pattern:
- zn: Chain stitch
- sh: Magic ring
- x: Single crochet
- v: Increase (2 single crochet in one stitch)
- e: Decrease
- w: 3 single crochet in one stitch
- m: Decrease 3 stitches together
- hdc: Half double crochet
- dc: Double crochet
- cc: Slip stitch
- hdc(e): Half double crochet decrease
- flo: Front loop only
- blo: Back loop only
- ai: In the same stitch
Detailed Step-by-Step Instructions
Head Construction (Worked in Spirals)
Begin with skin tone yarn:
- Create a magic ring with 6 sc (6)
- Increase in each stitch (12)
- 1 sc, 1 inc repeat 6 times (18)
- 2 sc, 1 inc repeat 6 times (24)
- 3 sc, 1 inc repeat 6 times (30)
- 4 sc, 1 inc repeat 6 times (36)
- 5 sc, 1 inc repeat 6 times (42)
- 6 sc, 1 inc repeat 6 times (48)
- 7 sc, 1 inc repeat 6 times (54) 10-14. 54 sc for 5 rounds (54)
- 1 dec, 7 sc, 1 dec repeat 2 times, 14 sc, 1 dec, 7 sc, 1 dec repeat 2 times (48)
- 48 sc (48)
- 20 sc, ch 1 – skip 1 st, 7 sc, ch 1 – skip 1 st, 19 sc (note: these chain spaces are for the eyes)
- 15 sc, 1 sc, 1 inc repeat 3 times, 7 sc, 1 inc, 1 sc repeat 3 times, 14 sc (54) 19-21. 54 sc for 3 rounds (54)
Continue decreasing gradually through rounds 22-28 following the pattern to shape the face and chin, ending with 11 stitches before closing the head.
Installing the Eyes
Insert 8 mm safety eyes into the chain spaces created in round 17.
Arms (Worked in Spirals)
- Magic ring with 5 sc (5)
- 5 increases (10)
- 10 sc (10)
- 4 sc, 1 inc repeat 2 times (12)
- 12 sc (12)
- 4 sc, 1 dec repeat 2 times (10)
- 3 sc, 1 dec repeat 2 times (8) 8-23. 8 sc for 16 rounds (8)
Make two arms and insert wire if desired for posability.
Legs (Worked in Spirals with White Yarn)
The pattern provides detailed instructions for the left and right legs, working from the foot up through the leg with shape transitions. Each leg includes color changes to create white socks with skin-colored upper legs.
Body Assembly (Connecting the Legs and Adding the Torso)
- Align the legs side by side and join them with a chain stitch bridge
- Work in the round to create the lower torso
- Join the arms to the body in round 18
- Continue decreasing to shape the upper torso
- Close off with 10 stitches at the neck
Clothing Items (Worked with Row Turns)
White Blouse
Work with white yarn in rows, including openings for sleeves and a button closure in the back.
Pink Jumper Dress
Create in pink yarn using rows with increases to create the A-line shape, adding straps and decorative details.
Shoes
The pattern includes detailed instructions for creating adorable shoes using mint green, white, and pink yarn with clever construction techniques.
Hair Creation
The blonde hair is created using individual strands of various lengths attached to a cap base, with special attention to framing the face.
Accessories
Bow Headband
Create the mint green bow and pink bunny ear sections separately, then attach to a simple headband structure.
My Melody Companion Figure
A simplified small companion figure is included in the pattern, featuring:
- Small white body with bunny ears
- Pink bow detail
- Simple facial features
Assembly Tips and Techniques
- Wire Armature: For best results, insert wire into arms and legs before closing them completely
- Facial Embroidery: Use brown thread for subtle mouth and eyebrow details
- Clothing Assembly: Attach dress straps securely but not too tight to allow outfit changes
- Hair Attachment: Work carefully in sections to achieve an even, natural-looking hairstyle
Customization Options
While the pattern shows the classic pink and white color scheme, you can personalize your Maya Doll by:
- Using different color combinations for the clothing
- Creating alternative hairstyles or hair colors
- Adding additional accessories like tiny bags or hats
- Embroidering different facial expressions
Crochet Difficulty Level
This pattern is suitable for intermediate crocheters who have experience with:
- Working in the round
- Increases and decreases
- Color changes
- Basic assembly techniques
- Simple embroidery
Beginners who have mastered basic amigurumi techniques can also attempt this pattern with patience.
Care Instructions for Your Finished Doll
To keep your Maya Doll looking her best:
- Spot clean with mild soap and water as needed
- Allow to air dry completely
- Brush hair gently with a soft toothbrush to maintain style
- Store in a dust-free environment

Check this out :Crochet Mermaid Princess Ariel Doll Pattern
Conclusion
The Maya Doll amigurumi pattern creates a delightful character full of personality that’s sure to become a treasured item. With careful attention to detail and the step-by-step instructions provided, you’ll be able to create your own Maya Doll with professional-looking results.
Remember, the creator of this pattern kindly asks that if you share images of your completed Maya Doll, please credit the original designer by tagging @lorthobby on social media. This allows the designer to see your wonderful creations and possibly feature them in their stories.
Happy crocheting, and enjoy bringing your Maya Doll to life!
Note: This pattern is for personal use only. While dolls made from this pattern may be sold, the pattern itself should not be shared on other platforms without permission.
#AmigurumiDoll #MayaDoll #CrochetPattern #HandmadeToys #AmigurumiPattern #CrochetDoll #ArtDoll #CrochetToys


Leave a Reply