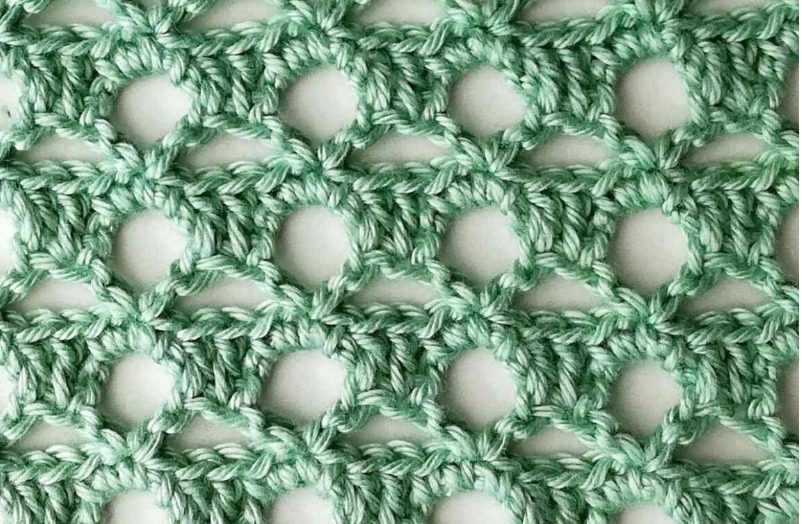
The eyelet mesh stitch is a delicate, lacy crochet pattern that creates an airy, open fabric perfect for lightweight garments, summer accessories, and decorative home items. This elegant stitch combines basic crochet techniques to create a visually stunning pattern with diamond-shaped openings, yet it’s surprisingly simple to master. If you can work single and double crochet stitches, you can create this beautiful eyelet mesh stitch pattern with just a bit of practice.
Understanding the Eyelet Mesh Stitch Pattern
The eyelet mesh stitch creates a gorgeous lattice-like fabric with distinctive diamond-shaped openings. What makes this stitch particularly appealing is its delicate appearance combined with its relatively simple execution. The pattern consists of just two alternating rows, making it easy to memorize once you’ve worked through a few repetitions.
This versatile stitch works wonderfully for:
- Light summer garments like tops, cardigans, and dresses
- Airy scarves and shawls
- Decorative blankets and throws
- Curtains and home decor items
- Market bags and totes
The openwork nature of the eyelet mesh stitch makes it perfect for warm-weather projects where breathability is desired. It also creates a beautiful drape that flatters garments and accessories.
Materials You’ll Need to Crochet the Eyelet Mesh Stitch
To practice the eyelet mesh stitch, gather these basic supplies:
- Yarn: Choose a smooth, light-colored yarn to learn with. Cotton or mercerized cotton works particularly well for this stitch as it shows the pattern definition clearly. For beginners, a DK or worsted weight yarn may be easier to work with.
- Crochet hook: Select a hook size appropriate for your chosen yarn—typically the size recommended on the yarn label or one size larger for a more open, drapey fabric.
- Scissors: For cutting your yarn when finishing.
- Tapestry needle: For weaving in ends when your project is complete.
For this tutorial, we’ll be using a mercerized cotton yarn with a 2.0mm hook, but feel free to adjust based on your preference and the project you have in mind.
Crochet Stitches Used in the Eyelet Mesh Pattern
Before beginning, make sure you’re comfortable with these fundamental crochet techniques:
- Chain stitch (ch): Forms the foundation of your project and creates the spaces in the mesh.
- Double crochet (dc): One of the main stitches used in this pattern.
- Single crochet (sc): Creates stability between the openwork sections.
- Turning chains: Used at the beginning of each row to bring your work to the proper height.
Step-by-Step Tutorial: How to Crochet the Eyelet Mesh Stitch
The eyelet mesh stitch follows a two-row repeat pattern. Once you complete Row 1 and Row 2, you’ll simply alternate between Row 3 (which follows the same pattern as Row 1) and Row 2 for the remainder of your project.
Starting Your Foundation Chain
Begin by creating a foundation chain with a multiple of 5 chains, plus 6 more for your turning chain. For example, if you want to make a swatch with 3 mesh openings across, you would chain (5 × 3) + 6 = 21 chains.
Row 1: Creating the Eyelet Pattern
- Make a double crochet in the 7th chain from your hook. This means you’ll skip 6 chains from where your hook is—the skipped chains count as your first double crochet plus a chain 3.
- Chain 5.
- Work another double crochet into the same stitch where you just made your first double crochet.
- Skip 4 chains in your foundation row.
- Work a double crochet into the next chain.
- Chain 5.
- Work another double crochet into the same stitch.
- Continue this pattern (skip 4 chains, dc in next chain, ch 5, dc in same stitch) until you reach the end of your foundation chain with 3 chains remaining.
- Skip 2 chains and work a double crochet into the last chain.
- Chain 3 and turn your work.
You’ve now completed Row 1, which establishes the basic framework of your eyelet mesh pattern.
Row 2: Stabilizing the Mesh
- The chain 3 you made at the end of Row 1 counts as your first double crochet. Work a double crochet into the second stitch (which will be the second double crochet from Row 1).
- Work 3 single crochets into the chain-5 space.
- Work a double crochet into the next double crochet from Row 1.
- Work another double crochet into the following double crochet from Row 1.
- Work 3 single crochets into the next chain-5 space.
- Continue this pattern (2 dc into the two dc from previous row, 3 sc in chain-5 space) until you reach the end of the row.
- Work 3 single crochets in the final chain-5 space.
- Work a double crochet into the next double crochet, and another double crochet into the top of the turning chain from Row 1.
- Chain 3 and turn your work.
Row 2 creates stability in your mesh pattern and defines the diamond shapes.
Row 3 and Beyond: Repeating the Pattern
Row 3 follows the same pattern as Row 1, but instead of working into chain stitches, you’ll be working into the stitches of Row 2:
- The chain 3 you made at the end of Row 2 counts as your first double crochet. Skip the next 3 stitches.
- Work a double crochet into the 4th stitch (which will be the second single crochet from the previous row).
- Chain 5.
- Work another double crochet into the same stitch.
- Skip 4 stitches.
- Work a double crochet into the next stitch.
- Chain 5.
- Work another double crochet into the same stitch.
- Continue this pattern (skip 4 stitches, dc in next stitch, ch 5, dc in same stitch) until you reach the end of the row with 3 stitches remaining.
- Skip 2 stitches and work a double crochet into the top of the turning chain from Row 2.
- Chain 3 and turn your work.
For Row 4, repeat the instructions for Row 2.
Continue alternating between the Row 3 pattern and the Row 2 pattern until your project reaches the desired length.
Common Questions About the Eyelet Mesh Stitch
How do I fix uneven edges in my eyelet mesh stitch?
Uneven edges often result from inconsistent tension or missed stitches. Make sure you’re working your turning chains correctly at the beginning of each row, and be careful to identify the correct stitches at the end of each row. Blocking your finished piece can also help even out the edges.
Can I use the eyelet mesh stitch for a blanket?
Absolutely! The eyelet mesh stitch creates a beautiful, lightweight blanket. Keep in mind that the open nature of the pattern means it won’t be as warm as a solid stitch pattern, making it perfect for spring and summer throws or decorative blankets.
My eyelet mesh looks too loose. What should I do?
If your mesh looks too loose or floppy, try using a smaller hook size. You can also try working with a firmer tension or using a yarn with less drape, such as cotton instead of a silky bamboo or tencel blend.
How do I adapt this stitch for working in the round?
To work the eyelet mesh stitch in the round, you’ll need to join each round with a slip stitch and adapt the beginning and ending of each round. Instead of turning your work, you’ll be working continuously in the same direction, which means you’ll need to adjust how you position your double crochets and chain spaces at the join.
Project Ideas Using the Eyelet Mesh Stitch
Now that you’ve mastered the eyelet mesh stitch, here are some project ideas to put your new skill to use:
Summer Top or Cover-Up
The lightweight, breathable nature of the eyelet mesh stitch makes it perfect for summer garments. Create a simple rectangular top by making two panels and seaming them together, leaving openings for the neck and arms.
Elegant Scarf or Wrap
Work the eyelet mesh stitch in a luxury yarn like a silk blend or fine merino wool for a gorgeous accessory. The drape of this stitch is particularly flattering in scarves and shawls.
Market Bag
The open structure of the eyelet mesh stitch is ideal for market bags or beach totes. Use cotton yarn for durability, and consider adding a solid stitch pattern for the base and handles.
Decorative Pillow Cover
Add texture to your home decor by creating pillow covers using the eyelet mesh stitch. For a more substantial fabric, use a thicker yarn and appropriate hook size.
Curtain Panels
Lightweight curtains worked in the eyelet mesh stitch allow gentle filtration of light while adding textural interest to your windows. Use cotton thread for a delicate, lace-like appearance.
Tips for Working with the Eyelet Mesh Stitch
Maintain Consistent Tension
Even tension is particularly important in openwork patterns like the eyelet mesh stitch. Focus on keeping your chain spaces and double crochets consistent in size for the most attractive finished fabric.
Count Your Stitches
Especially when first learning this pattern, count your stitches in each row to ensure you’re maintaining the correct stitch count. This helps prevent the pattern from becoming distorted as you progress.
Use Stitch Markers
Place stitch markers at the beginning and end of your rows, or at regular intervals within long rows, to help keep track of your pattern. This is particularly helpful when working on larger projects.
Block Your Finished Piece
Blocking is essential for most crochet projects, but it’s particularly important for openwork patterns like the eyelet mesh stitch. Proper blocking will open up the lacy pattern and help your project achieve its final, beautiful drape.
Customizing the Eyelet Mesh Stitch
Once you’re comfortable with the basic eyelet mesh stitch, you can explore these variations:
Color Changes
Experiment with color changes every few rows to create striped effects. The eyelet mesh stitch shows off color transitions beautifully due to its open structure.
Mixed Stitch Patterns
Combine sections of eyelet mesh stitch with solid stitch patterns like double crochet or half double crochet for contrast and visual interest.
Varied Chain Spaces
Try increasing or decreasing the number of chains in your chain spaces. More chains will create larger openings, while fewer will result in a tighter mesh.
Conclusion
The eyelet mesh stitch is a beautiful, versatile crochet pattern that creates an elegant openwork fabric perfect for a wide range of projects. Despite its intricate appearance, this stitch pattern is accessible to beginners who have mastered the basic crochet stitches. With just a two-row repeat pattern, you’ll quickly be able to work this stitch from memory, making it perfect for relaxing, meditative crochet sessions.
As you practice the eyelet mesh stitch, you’ll develop a feel for the rhythm of the pattern and may soon find yourself creating beautiful garments, accessories, and home decor items that showcase this delicate, lacy texture. Don’t be afraid to experiment with different yarns, hook sizes, and project types to fully explore the possibilities of this lovely crochet stitch pattern.
Whether you’re creating a lightweight summer garment, an elegant accessory, or a decorative home item, the eyelet mesh stitch offers a perfect balance of visual impact and technical simplicity. Happy crocheting!


Leave a Reply