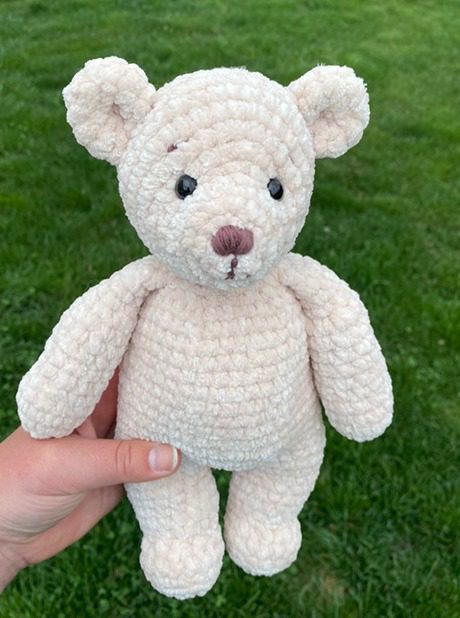
Creating your own handmade teddy bear is one of the most rewarding crochet projects you can undertake. The cuddly crochet teddy bear pattern we’re sharing today is perfect for crafters of all skill levels who want to make an adorable, huggable friend for someone special. This amigurumi teddy bear features a chubby belly, round head, and cute little tail that gives it personality and charm. Whether you’re making it as a gift for a child, a baby shower present, or simply as a creative project for yourself, this free pattern will guide you through every step of the process.
Why This Cuddly Crochet Teddy Bear Pattern Stands Out
Not all teddy bear patterns are created equal. This particular cuddly crochet teddy bear pattern has several features that make it special:
First, the design includes a chubby belly and a noticeable backside when properly stuffed, giving it a more realistic and huggable appearance than many flat-looking amigurumi bears.
Second, the pattern uses simple crochet techniques that even beginners can master, making it accessible to crafters of various skill levels.
Third, the bear’s proportions are carefully calculated to create a cute, somewhat chubby appearance that everyone loves in a teddy bear.
Finally, the design allows for customization with facial features, including safety eyes and embroidered details that give your bear personality and expression.
Materials Needed for Your Cuddly Crochet Teddy Bear
Before you begin crocheting your teddy bear, gather these essential materials:
- 2 skeins of velvet yarn (approximately 3.5 oz/92 yards each)
- 5.0 mm crochet hook (size H)
- Stitch markers to keep track of your rounds
- Yarn needle for assembly
- Colored embroidery floss for facial details
- 2 safety eyes (size can vary based on preference)
- Fiberfill stuffing
- Scissors
Choosing the Perfect Yarn
The yarn you select significantly impacts your teddy bear’s final appearance and feel. While the pattern recommends velvet yarn for its extraordinary softness, you have several options:
Velvet Yarn: Creates an incredibly soft, plush bear that’s perfect for cuddling. This 5 bulky weight yarn gives the bear a luxurious feel and professional appearance.
Worsted Weight Yarn: A great alternative if velvet isn’t available. Standard worsted weight (size 4) works well for this pattern and comes in countless colors.
Fluffy or Plush Yarn: Special textured yarns can create interesting effects, though they may make seeing stitches more challenging.
The color choice is entirely up to you. While traditional browns and tans create classic teddy bears, don’t be afraid to experiment with unique colors for a special touch. You might even use a different color for accents on the nose or paws.
Understanding the Crochet Techniques
This cuddly crochet teddy bear pattern uses several basic crochet techniques. Here’s a quick refresher on the stitches you’ll need:
Chain (ch): The foundation of your crochet work, creating the initial loops.
Single Crochet (sc): The primary stitch used throughout the pattern, creating a tight, firm fabric perfect for amigurumi.
Increase (inc): Making two single crochet stitches in the same stitch, which expands your work.
Decrease (dec): Combining two stitches into one, which contracts your work.
Slip Stitch (sl st): Used to join rounds and create smooth transitions.
Back Loop Only (BLO): Working through only the back loop of a stitch, creating a visible ridge that’s perfect for defining sections of the bear.
Magic Ring (mr): A technique for starting crochet in the round with no hole in the center.
If you’re new to any of these techniques, there are excellent tutorials online that can help you master them before starting your teddy bear.
Step-by-Step Cuddly Crochet Teddy Bear Pattern
Let’s break down this pattern into manageable parts. We’ll create each body part separately and then assemble them for the finished teddy bear.
Creating the Arms
Begin by making two identical arms:
- Start with a chain 2, then work 6 single crochet stitches in the second chain from the hook. Join with a slip stitch to form a circle.
- Increase by working 2 single crochet in each stitch around, bringing the total to 12 stitches.
- For rounds 3-10, simply single crochet in each stitch around, maintaining those 12 stitches.
- At this point, stuff the arm with fiberfill.
- For round 11, decrease the width by alternating decrease stitches with single crochet, reducing to 8 stitches.
- Work rounds 12-14 with single crochet in each stitch.
- Finish by folding the top of the arm and joining the edges with 4 single crochet stitches.
- Leave a long tail for attaching to the body later.
The arm design creates a slight taper that looks proportional when attached to the body.
Crafting the Legs and Body
The legs connect to form the lower body in this clever pattern:
- Create the first leg following the pattern through round 12, then finish off.
- Make the second leg the same way, but don’t finish off after round 12.
- To join the legs and create the body, chain 4 from the second leg, then single crochet across both legs, creating a bridge between them.
- Work in rounds to form the body, creating the bear’s distinctive chubby belly with strategic increases and decreases.
- The pattern shapes the waist, belly, and chest through careful stitch placement in rounds 16-30.
- Stuff the body firmly with fiberfill before closing.
- Attach the arms during rounds 31-32, incorporating them directly into the body stitches.
This construction method creates a seamless transition from legs to body, reducing the amount of sewing required later.
Forming the Perfect Teddy Bear Head
The head gives your bear its personality:
- Begin with a small circle of 6 stitches, then increase gradually through rounds 2-10 to form the rounded shape.
- Work even rounds 11-15 to create the face area.
- Gradually decrease through rounds 16-21 to close the head.
- Insert safety eyes between rounds 15-16, about 6-8 stitches apart.
- Stuff the head firmly before closing completely.
- Leave a long tail for attaching to the body.
The head shaping creates the perfect canvas for adding facial details that give your bear character.
Creating the Ears and Tail
These small details add personality to your cuddly crochet teddy bear:
For each ear:
- Work 6 single crochet in a magic ring.
- Increase to 12 stitches in round 2, then to 16 stitches in round 3.
- Work one even round, then decrease in the final round.
- Pinch the bottom of each ear and sew to create the curved ear shape.
For the tail:
- Work 8 single crochet in a magic ring.
- Increase to 16 stitches over rounds 2-3.
- Decrease back to 8 stitches in the final round.
- Leave unstitched for a soft, rounded appearance.
Assembly and Finishing Touches
Bringing all the parts together creates your cuddly teddy bear:
- Attach the head to the body using the long tail left from finishing the head. Sew with tight, secure stitches.
- Position and sew the ears to the top of the head, angled slightly outward for a cute appearance.
- Attach the tail to the back of the body, positioned to give your bear a cute behind.
- Use colored embroidery floss to create the nose, mouth, eyebrows, and any other facial details you desire.
- For the nose, create a small triangle or oval shape in black or brown floss.
- The mouth can be a simple line or a “Y” shape for a sweeter expression.
- Add eyebrows above the safety eyes for more expression.
- Optional: add eyelashes for a more feminine look, or leave them off for a more traditional teddy bear.
Take your time with the facial embroidery, as these details bring your bear to life and give it unique character.
Tips for Crochet Teddy Bear Success
To ensure your cuddly crochet teddy bear turns out perfect, keep these tips in mind:
Maintain consistent tension throughout your project for an even, professional appearance. Inconsistent tension can make parts look mismatched.
Count your stitches regularly to stay on track with the pattern. Using stitch markers at the beginning of rounds can help.
Stuff firmly but not too tightly. Your bear should be huggable but still maintain its shape. Pay special attention to stuffing the head and limbs evenly.
Adjust hook size if needed based on your personal tension and the yarn you’ve chosen. The recommended 5.0mm hook works for most velvet yarns, but you might need to size up or down depending on how tight or loose your stitches naturally are.
Weave in ends securely to prevent them from working loose over time, especially in a toy that will receive lots of love and handling.
Position safety eyes carefully before inserting them, as they cannot be repositioned once the backs are secured.
Customizing Your Cuddly Crochet Teddy Bear
One of the joys of making handmade teddy bears is the ability to personalize them. Here are some ways to make your bear unique:
Color variations: Beyond traditional brown, consider pastel colors for baby gifts, bright colors for children, or even multi-colored bears using different yarns for various body parts.
Size adjustments: You can make a larger or smaller bear by changing your yarn weight and hook size proportionally. A smaller hook and finer yarn create a tiny bear, while chunky yarn and a larger hook make a bigger cuddle buddy.
Clothing and accessories: Consider crocheting simple accessories like scarves, hats, or even full outfits for your bear. A small bow around the neck adds a sweet finishing touch.
Embroidered details: Beyond the basic facial features, you might add hearts, stars, or other small embroidered elements to your bear’s paws or chest.
Scented stuffing: For an extra special touch, add a few drops of lavender essential oil to the stuffing for a calming, soothing bear perfect for bedtime.
Why Handmade Teddy Bears Make Special Gifts
A cuddly crochet teddy bear made with your own hands carries special significance that store-bought toys simply cannot match. Each stitch represents time and care invested in creating something unique for someone you love.
Handmade teddy bears become cherished keepsakes, often passed down through generations as treasured mementos. Many adults still fondly remember and keep the special handmade toys from their childhood.
For babies and young children, these soft, cuddly bears become comfort objects that provide security and companionship. The custom nature of handmade bears means you can create the perfect companion that matches the recipient’s personality or preferences.
The act of making something by hand also connects us to traditional crafts and provides a meaningful alternative to mass-produced items in our increasingly digital world.
Final Thoughts on Your Cuddly Crochet Teddy Bear
Creating this cuddly crochet teddy bear pattern might take a few hours of your time, but the results are truly worth the effort. The joy on a child’s face when receiving a handmade teddy bear or the satisfaction of creating something beautiful with your own hands makes every stitch worthwhile.
Remember that each bear you make will have its own unique character and charm—no two handmade bears are exactly alike, even when following the same pattern. Embrace these small variations as part of what makes handmade items special.
Whether this is your first amigurumi project or you’re an experienced crocheter, this cuddly crochet teddy bear pattern offers a satisfying project that yields heartwarming results. The techniques you practice while making this bear will improve your overall crochet skills and prepare you for even more complex amigurumi projects in the future.
So gather your materials, find a comfortable spot, and enjoy the process of bringing your own cuddly teddy bear to life, one stitch at a time. Happy crocheting!


Leave a Reply