Table of Contents
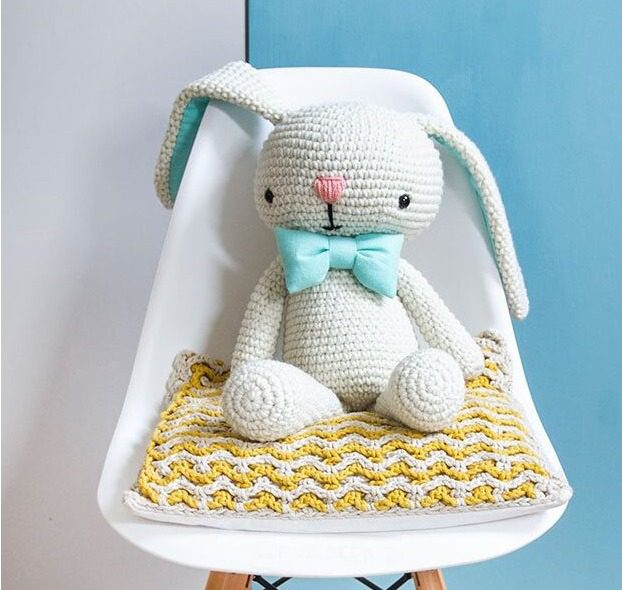
Create Amigurumi Bunny an adorable oversized bunny amigurumi that stands at an impressive 55 cm (22½ inches) tall. This Amigurumi Bunny huggable companion, named Cory, features long floppy ears with mint green inner details, a cute pompom tail, and a dapper bow tie. Perfect for beginners, this amigurumi bunny makes a wonderful gift for children or a charming addition to your home decor.
Materials for Your Amigurumi Bunny
To create Cory the Giant Bunny, you will need:
- 4 balls of chunky yarn (recommended: Women’s Institute Soft and Chunky yarn – 70% Acrylic, 30% Merino Wool, 100g/110m) in cream color
- 6 mm crochet hook
- Mint green cotton flannel fabric for inner ears and bow tie
- 15 mm safety eyes (one pair)
- Large pompom maker (9 cm diameter)
- Black and pink tapestry wool for facial features
- Toy stuffing
- Stitch markers
- Sewing thread
- Sewing needle
- Tapestry needle
Amigurumi Bunny Size and Modifications
The finished bunny will stand approximately 55 cm (22½ inches) tall when using the recommended yarn and hook size. However, you can easily adjust the size by using a smaller crochet hook and appropriate yarn. This Amigurumi Bunny will create a smaller bunny while maintaining the same adorable proportions.
Understanding the Amigurumi Technique
This pattern Amigurumi Bunny uses the standard amigurumi method, which involves working in continuous spiral rounds without joining each round with a slip stitch. Using a stitch marker in the last stitch of each round and moving it up as you progress will help you keep track of your place in the pattern.
Cory the Giant Bunny is worked in separate pieces that are sewn together at the end. Each component (head, body, legs, arms, ears) is created individually, stuffed as needed, and then assembled to create the complete bunny.
Amigurumi Bunny Abbreviations and Terms
The pattern uses these standard crochet terms:
- st: stitch/stitches
- ch: chain
- slst: slip stitch
- sc: single crochet
- Rnd: round/rounds
- inc: single crochet increase (making two single crochets in one stitch)
- dec: single crochet decrease (combining two stitches into one)
- [number]: the total number of stitches in that round or row
Creating Amigurumi Bunny Head
- Begin by creating a magic ring and work 6 single crochets into it.
- Round 2: Increase in each stitch around, making 12 stitches total.
- Round 3: Work an increase followed by one single crochet, repeating this sequence 6 times around. You will have 18 stitches total.
- Round 4: Work an increase followed by 2 single crochets, repeating this sequence 6 times around. You will have 24 stitches total.
- Round 5: Work an increase followed by 3 single crochets, repeating this sequence 6 times around. You will have 30 stitches total.
- Round 6: Work an increase followed by 4 single crochets, repeating this sequence 6 times around. You will have 36 stitches total.
- Round 7: Work an increase followed by 5 single crochets, repeating this sequence 6 times around. You will have 42 stitches total.
- Round 8: Work an increase followed by 6 single crochets, repeating this sequence 6 times around. You will have 48 stitches total.
- Round 9: Work an increase followed by 7 single crochets, repeating this sequence 6 times around. You will have 54 stitches total.
- Round 10: Work an increase followed by 8 single crochets, repeating this sequence 6 times around. You will have 60 stitches total.
- Rounds 11 through 18: Work single crochets in each stitch around for 8 rounds, maintaining 60 stitches.
- Round 19: Work a decrease followed by 8 single crochets, repeating this sequence 6 times around. You will have 54 stitches total.
- Round 20: Work a decrease followed by 7 single crochets, repeating this sequence 6 times around. You will have 48 stitches total.
- Round 21: Work a decrease followed by 6 single crochets, repeating this sequence 6 times around. You will have 42 stitches total.
- At this point, insert the safety eyes between rounds 16 and 17, positioning them approximately 16 stitches apart. Begin stuffing the head and continue adding stuffing as you complete the remaining rounds.
- Round 22: Work a decrease followed by 5 single crochets, repeating this sequence 6 times around. You will have 36 stitches total.
- Round 23: Work a decrease followed by 4 single crochets, repeating this sequence 6 times around. You will have 30 stitches total.
- Round 24: Work a decrease followed by 3 single crochets, repeating this sequence 6 times around. You will have 24 stitches total.
- Fasten off and weave in the yarn end.
- For the facial features, use pink embroidery thread to create a triangular nose between rounds 15 and 17, using long stitches. Then use black embroidery thread to create a mouth under the nose between rounds 18 and 20, also using long stitches.
Amigurumi Bunny Making the Floppy Ears
Make two identical ears:
- Begin with a magic ring and work 6 single crochets into it.
- Round 2: Work an increase followed by 2 single crochets, repeating this sequence twice. You will have 8 stitches total.
- Round 3: Work an increase followed by 3 single crochets, repeating this sequence twice. You will have 10 stitches total.
- Round 4: Work an increase followed by 4 single crochets, repeating this sequence twice. You will have 12 stitches total.
- Round 5: Work an increase followed by 5 single crochets, repeating this sequence twice. You will have 14 stitches total.
- Round 6: Work an increase followed by 6 single crochets, repeating this sequence twice. You will have 16 stitches total.
- Rounds 7 through 21: Work single crochets in each stitch around for 15 rounds, maintaining 16 stitches.
- Round 22: Decrease once, then work single crochets in the remaining 14 stitches. You will have 15 stitches total.
- Round 23: Work single crochets in each stitch around, maintaining 15 stitches.
- Round 24: Decrease once, then work single crochets in the remaining 13 stitches. You will have 14 stitches total.
- Round 25: Work single crochets in each stitch around, maintaining 14 stitches.
- Round 26: Decrease once, then work single crochets in the remaining 12 stitches. You will have 13 stitches total.
- Round 27: Work single crochets in each stitch around, maintaining 13 stitches.
- Round 28: Decrease once, then work single crochets in the remaining 11 stitches. You will have 12 stitches total.
- Round 29: Work single crochets in each stitch around, maintaining 12 stitches.
- Round 30: Decrease once, then work single crochets in the remaining 10 stitches. You will have 11 stitches total.
- Round 31: Work single crochets in each stitch around, maintaining 11 stitches.
- Round 32: Decrease once, then work single crochets in the remaining 9 stitches. You will have 10 stitches total.
- Round 33: Work single crochets in each stitch around, maintaining 10 stitches.
- Do not stuff the ears. Fasten off, leaving a long tail for sewing the ears to the head.
For the inner ear details:
- Cut two pieces from mint green flannel fabric.
- Fold the fabric along the center line.
- Use sewing pins to secure the fabric to the crocheted ears.
- Sew the inner ear pieces in place using sewing thread.
Creating Amigurumi Bunny Body
- Begin with a magic ring and work 6 single crochets into it.
- Round 2: Increase in each stitch around, making 12 stitches total.
- Round 3: Work an increase followed by one single crochet, repeating this sequence 6 times around. You will have 18 stitches total.
- Round 4: Work an increase followed by 2 single crochets, repeating this sequence 6 times around. You will have 24 stitches total.
- Round 5: Work an increase followed by 3 single crochets, repeating this sequence 6 times around. You will have 30 stitches total.
- Round 6: Work an increase followed by 4 single crochets, repeating this sequence 6 times around. You will have 36 stitches total.
- Round 7: Work an increase followed by 5 single crochets, repeating this sequence 6 times around. You will have 42 stitches total.
- Round 8: Work an increase followed by 6 single crochets, repeating this sequence 6 times around. You will have 48 stitches total.
- Rounds 9 through 13: Work single crochets in each stitch around for 5 rounds, maintaining 48 stitches.
- Round 14: Work a decrease followed by 6 single crochets, repeating this sequence 6 times around. You will have 42 stitches total.
- Rounds 15 through 17: Work single crochets in each stitch around for 3 rounds, maintaining 42 stitches.
- Round 18: Work a decrease followed by 5 single crochets, repeating this sequence 6 times around. You will have 36 stitches total.
- Rounds 19 through 21: Work single crochets in each stitch around for 3 rounds, maintaining 36 stitches.
- Round 22: Work a decrease followed by 4 single crochets, repeating this sequence 6 times around. You will have 30 stitches total.
- Rounds 23 through 25: Work single crochets in each stitch around for 3 rounds, maintaining 30 stitches.
- Round 26: Work a decrease followed by 3 single crochets, repeating this sequence 6 times around. You will have 24 stitches total.
- Stuff the body firmly with toy stuffing.
- Fasten off, leaving a long tail for sewing the body to the head.
Making Amigurumi Bunny Legs
Make two identical legs:
- Begin with a magic ring and work 6 single crochets into it.
- Round 2: Increase in each stitch around, making 12 stitches total.
- Round 3: Work an increase followed by one single crochet, repeating this sequence 6 times around. You will have 18 stitches total.
- Round 4: Work an increase followed by 2 single crochets, repeating this sequence 6 times around. You will have 24 stitches total.
- Rounds 5 through 9: Work single crochets in each stitch around for 5 rounds, maintaining 24 stitches.
- Round 10: Work a decrease followed by 6 single crochets, repeating this sequence 3 times around. You will have 21 stitches total.
- Round 11: Work single crochets in each stitch around, maintaining 21 stitches.
- Round 12: Work a decrease followed by 5 single crochets, repeating this sequence 3 times around. You will have 18 stitches total.
- Rounds 13 through 15: Work single crochets in each stitch around for 3 rounds, maintaining 18 stitches.
- Round 16: Work a decrease followed by 4 single crochets, repeating this sequence 3 times around. You will have 15 stitches total.
- Rounds 17 through 19: Work single crochets in each stitch around for 3 rounds, maintaining 15 stitches.
- Round 20: Work a decrease followed by 3 single crochets, repeating this sequence 3 times around. You will have 12 stitches total.
- Rounds 21 through 23: Work single crochets in each stitch around for 3 rounds, maintaining 12 stitches.
- Round 24: Work a decrease followed by 2 single crochets, repeating this sequence 3 times around. You will have 9 stitches total.
- Rounds 25 through 27: Work single crochets in each stitch around for 3 rounds, maintaining 9 stitches.
- Stuff the legs lightly with toy stuffing.
- Fasten off, leaving a long tail for sewing the legs to the body.
Amigurumi Bunny Creating the Fluffy Tail
- Using a large pompom maker (9 cm diameter), create a fluffy pompom using the cream yarn.
- Cut a long tail of yarn to thread through the center of the pompom.
- Use this same tail to securely sew the pompom to the back of the bunny’s body.
Amigurumi Bunny Making the Arms
Make two identical arms:
- Begin with a magic ring and work 6 single crochets into it.
- Round 2: Increase in each stitch around, making 12 stitches total.
- Rounds 3 through 9: Work single crochets in each stitch around for 7 rounds, maintaining 12 stitches.
- Round 10: Decrease once, then work single crochets in the remaining 10 stitches. You will have 11 stitches total.
- Rounds 11 and 12: Work single crochets in each stitch around for 2 rounds, maintaining 11 stitches.
- Round 13: Decrease once, then work single crochets in the remaining 9 stitches. You will have 10 stitches total.
- Rounds 14 through 19: Work single crochets in each stitch around for 6 rounds, maintaining 10 stitches.
- Stuff the arms lightly with toy stuffing.
- Fasten off, leaving a long tail for sewing the arms to the body.
Amigurumi Bunny Creating the Charming Bow Tie
- From the mint green flannel fabric, cut a rectangle measuring 17 cm × 14 cm.
- With the wrong side of the fabric facing down, fold along the long side (the sides that measure 17 cm) and overlap by 2 cm.
- Sew along the open sides using a running stitch.
- Turn the piece inside out and insert some toy stuffing to give it volume.
- Cut another rectangle from the flannel fabric, measuring 10 cm × 5 cm. This will form the center of the bow.
- With the right side of the fabric facing down, fold 1 cm of the long sides to create a smooth edge.
- Wrap this piece of fabric around the middle of the main bow piece, adjusting until you achieve an attractive bow shape.
- Secure the center piece with a few stitches.
- Sew the completed bow onto the bunny’s body, or use a safety pin for temporary attachment.
Amigurumi Bunny Assembling Your Giant Bunny
Now that you’ve created all the individual components, it’s time to assemble your giant bunny:
- Sew the ears to the head, positioning them between rounds 6 and 8 of the head.
- Attach the head to the body, aligning them carefully and sewing securely.
- Sew the arms to the sides of the upper body.
- Attach the legs to the bottom of the body.
- Secure the pompom tail to the back of the body.
- Sew or pin the bow tie to the front of the bunny.
Tips for a Perfect Giant Bunny
- Maintain consistent tension throughout your work for a professional finish.
- When stuffing, use enough filling to give your bunny structure without stretching the stitches.
- For stability, make sure to stuff the bottom of the body and legs firmly.
- Position the safety eyes carefully before securing them, as they cannot be repositioned once locked in place.
- For the bow tie, experiment with different fullness levels of stuffing to achieve your preferred look.
- If using this bunny as a gift for a small child, consider embroidering the eyes rather than using safety eyes.
Customizing Your Giant Bunny
While Cory is designed to be a cream-colored bunny with mint green accents, you can easily customize this pattern to create a bunny that matches your preferences or decor:
- Try different yarn colors for a unique bunny – gray, white, brown, or even pastel colors work beautifully.
- Experiment with different fabric patterns for the inner ears and bow tie.
- Add extra embroidered details like eyebrows or rosy cheeks for additional character.
- Create a girl bunny by replacing the bow tie with a fabric flower or small necklace.
- For seasonal variations, create interchangeable accessories like scarves, hats, or different bow ties.

Check this out :Crochet an Adorable Amigurumi Koala
Conclusion
Your giant amigurumi bunny is now complete! Standing at an impressive 55 cm tall, Cory makes a wonderful companion, decorative piece, or treasured gift. The combination of the soft, chunky yarn and the charming details like the mint green inner ears and bow tie creates a truly special handmade creation.
Amigurumi bunnies have a timeless appeal, and this oversized version brings extra huggability and presence to the classic design. Whether displayed on a shelf, in a nursery, or loved by a child, this giant bunny is sure to bring smiles for years to come.
With this beginner-friendly pattern, you’ve created a professional-looking amigurumi that showcases your crochet skills. Enjoy your adorable giant bunny creation!


Leave a Reply