Table of Contents
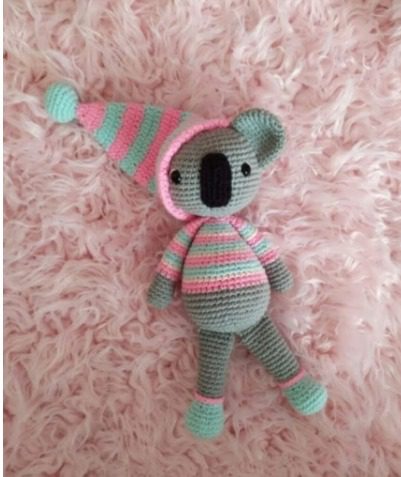
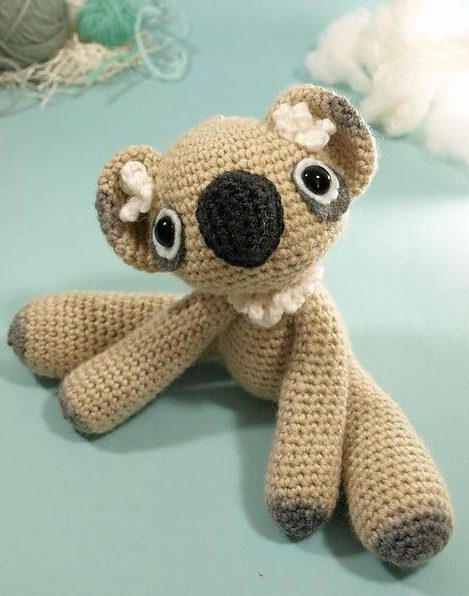
Are you looking for a charming new crochet Amigurumi Koala project? This amigurumi Amigurumi Koala koala pattern creates a delightful stuffed toy that measures approximately 6 inches tall when completed. Perfect for gifts, decorations, or building your handmade collection, this koala combines simplicity with cuteness that crochet enthusiasts of all levels can appreciate.
Essential Materials for Your Amigurumi Koala
Before beginning your koala project, gather these supplies:
- Main color yarn (color A): approximately 100 yards of worsted weight yarn
- Accent color yarn (color B): approximately 10 yards for facial features
- Crochet hook size F (3.75mm)
- Stuffing material
- 12mm safety eyes or glass eyes
- Felt for eye details
- Yarn needle for assembly
- Scissors
Understanding the Stitches and Rounds
This pattern uses several basic crochet techniques:
- Magic circle (to start each section)
- Chain stitch (ch)
- Single crochet (SC)
- Increase (INCR) – making two single crochets in one stitch
- Decrease (DCR) – combining two stitches into one
All sections of this koala pattern Amigurumi Koala work in continuous rounds (sometimes called spirals) rather than joined rounds. This means you’ll crochet continuously without slip stitching or chaining up at the end of each round. Using a stitch marker to track the beginning of your rounds is highly recommended, as it’s easy to lose track during shaping. Move your marker up as you complete each round.
Crafting Your Amigurumi Koala Step by Step
This koala is assembled from the top down in a continuous spiral. For best results, start with the arms and legs so they’re ready to attach when you complete the head.
Amigurumi Koala Creating the Arms
Make two identical arms using color A:
- Begin with a magic circle and make 6 single crochets into it. Pull the tail to close the loop. (6 stitches total)
- In the second row, increase in each stitch around by making 2 single crochets in each stitch. (12 stitches total)
- For the third row, alternate between 1 single crochet and an increase around the circle. (18 stitches total)
- Rows 4-5: Single crochet in each stitch around. (18 stitches total)
- For even rows 6 through 20, distribute decreases evenly throughout each row.
- For odd rows 7 through 19, single crochet in every stitch.
- After completing row 20, you should have 10 stitches remaining.
- Bind off, stuff the arm firmly but not too tightly, and set aside. Repeat for the second arm.
Amigurumi Koala Forming the Legs
Make two identical legs using color A:
- Start with a magic circle and make 6 single crochets into it. Pull the tail to close the loop. (6 stitches total)
- In row 2, increase in each stitch around. (12 stitches total)
- For row 3, alternate between 1 single crochet and an increase. (18 stitches total)
- For row 4, work [2 single crochets, increase] repeated 6 times. (24 stitches total)
- Rows 5-7: Single crochet in each stitch around. (24 stitches total)
- For even rows 8 through 26, distribute decreases evenly.
- For odd rows 9 through 25, single crochet in every stitch.
- After row 26, you should have 14 stitches remaining.
- Bind off, stuff each leg, and set aside.
Amigurumi Koala Shaping the Ears
Make two identical ears using color A:
- Begin with a magic circle and make 6 single crochets. Pull tail to close the loop. (6 stitches total)
- Row 2: Increase in each stitch around. (12 stitches total)
- Row 3: [Single crochet, increase] repeated 6 times. (18 stitches total)
- Row 4: [2 single crochets, increase] repeated 6 times. (24 stitches total)
- Row 5: [3 single crochets, increase] repeated 6 times. (30 stitches total)
- Rows 6-8: Single crochet in each stitch around.
- Bind off and set aside.
Creating the Nose
Using color B:
- Chain 7 and work in a continuous spiral.
- Row 1: Single crochet in the next 5 chains, then work 3 single crochets in the end chain. Working across the opposite side, single crochet in the next 4 chains, and make 2 single crochets in the end chain. (14 stitches total)
- Row 2: Single crochet in the next 4 stitches, 3 single crochets in the next stitch, single crochet in the next 3 stitches, 3 single crochets in the next stitch, single crochet in the next 4 stitches, increase in the last stitch. (19 stitches total)
- Row 3: Single crochet in each stitch around.
- Bind off and set aside.
Crafting the Head
Using color A:
- Begin with a magic circle and make 6 single crochets. Pull the tail to close. (6 stitches total)
- Row 2: Increase in each stitch around. (12 stitches total)
- Row 3: [Single crochet, increase] repeated 6 times. (18 stitches total)
- Row 4: [2 single crochets, increase] repeated 6 times. (24 stitches total)
- Rows 5-11: Single crochet around, increasing 4 stitches evenly over each row. Try not to place increases in the same position row after row. (52 stitches after row 11)
- Rows 12-14: Single crochet in each stitch around. (52 stitches)
- Rows 15-18: Single crochet around, decreasing 6 stitches evenly over each row. (28 stitches after row 18)
- Row 19 to completion: [Single crochet, decrease] repeated until 15 stitches remain.
At this point, pause to stuff the head and position the eyes. For the felt eye details, trace and carefully cut out the shapes. If using safety eyes, make small slits in your felt pieces just large enough for the posts. Position the eyes and secure them firmly.
Assembling the Body
Continue from the center back of the head (row 19):
- Row 1: Single crochet in each stitch around. (15 stitches)
- Row 2: Single crochet around, increasing 3 stitches evenly. (18 stitches)
- Row 3: Starting at the center back of the head, single crochet in the next 2 stitches, then attach the first arm by aligning 5 stitches of the arm with the next 5 stitches of the body. Single crochet through both layers for those 5 stitches. Single crochet in the next 2 stitches, then repeat to attach the second arm. (18 stitches)
- Row 4: Single crochet in the next 2 stitches, single crochet in the next 5 stitches of the arm (which were skipped in the previous row), single crochet in the next 2 stitches, and repeat for the second arm. (18 stitches)
- Row 5: Single crochet around, increasing 6 stitches evenly. (24 stitches)
- Row 6: Single crochet in each stitch around. (24 stitches)
- Row 7: Single crochet around, increasing 3 stitches evenly. (27 stitches)
- Row 8: Single crochet in each stitch around. (27 stitches)
- Row 9: Single crochet around, increasing 3 stitches evenly. (30 stitches)
- Row 10: Single crochet in each stitch around. (30 stitches)
- Row 11: Single crochet around, increasing 3 stitches evenly. (33 stitches)
- Row 12: Single crochet in each stitch around. (33 stitches)
- Row 13: Single crochet around, increasing 3 stitches evenly. (36 stitches)
- Row 14: Single crochet in the next 6 stitches, then attach the first leg by aligning 7 stitches of the leg with the next 7 stitches of the body. Single crochet through both layers for those 7 stitches. Single crochet in the next 5 stitches, then repeat to attach the second leg. (36 stitches)
- Row 15: Following the same technique as the arm attachment, pick up the 7 stitches of each leg that were skipped in the previous row, and single crochet in each stitch around. (36 stitches)
- Rows 16-17: Single crochet around, decreasing 6 stitches evenly over each row. (24 stitches after row 17)
- Row 18: [2 single crochets, decrease] repeated 6 times. (18 stitches)
- Row 19: [Single crochet, decrease] repeated 6 times. (12 stitches)
- Row 20: Decrease 6 times around. (6 stitches)
- Bind off with a long tail, stuff the body, thread the tail through the remaining stitches, and pull to close.
Final Touches
- Attach the ears and nose using a whip stitch or ladder stitch with a single strand of yarn.
- Optional: Create whiskers by placing three long stitches just outside of each eye using a single strand of contrasting yarn.
- Add fuzzy ear and collar details with surface crochet: Make a single crochet by inserting your hook under a stitch on the head, chain 4, and repeat around the entire neckline and in front of each ear.
Tips for a Perfect Amigurumi Koala
- Maintain consistent tension throughout your work for a professional finish.
- When stuffing, use enough filling to maintain the shape without stretching the stitches.
- Eye placement can dramatically change the character of your koala – experiment before securing them permanently.
- Use stitch markers to track the beginning of each round, especially for the head and body sections.
- For a truly unique koala, consider using different color combinations for the main body and facial features.

Check this out :Crocheting a Fluffy Amigurumi Sheep Pattern
Conclusion: Your Completed Amigurumi Koala
Your finished amigurumi koala stands approximately 6 inches tall and features the characteristic fluffy ears, round body, and adorable face that makes koalas so beloved. The pattern’s continuous round technique creates a seamless, professional-looking stuffed toy that holds its shape beautifully.
Remember that amigurumi creation is both an art and a craft – each koala you make will have its own unique personality based on your tension, stuffing technique, and especially how you position and craft the facial features. Many crocheters find that they develop their own signature style after making a few of these adorable creatures.
This koala makes a treasured gift for children (ensuring all parts are securely attached), a delightful addition to your handmade collection, or even a charming decoration for a nursery or child’s room. The simple yet effective design demonstrates how basic crochet techniques can create something truly special.
If you enjoy this pattern, consider experimenting with different yarn weights or hook sizes to create koalas of varying dimensions. You might also try different color combinations – while traditional gray koalas are charming, imagine the possibilities with pastel or vibrant colors for a whimsical touch!
We hope you’ve enjoyed creating this adorable amigurumi koala. The joy of handmade crochet items is unmatched – both in the meditative process of creating them and in the delight they bring to recipients or your home. Happy crocheting!


Leave a Reply