Table of Contents
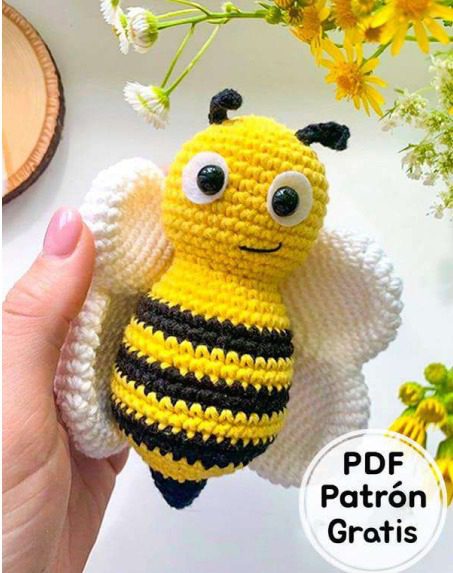
Bees are not only essential pollinators in our ecosystem, but they also make adorable crochet projects! The Chen Bee Amigurumi pattern offers a perfect opportunity to create a charming, huggable bee that will bring a touch of spring to your home all year round. With its bright yellow and black striped body, delicate white wings, and sweet smiling face, this bee amigurumi is irresistibly cute and surprisingly simple to make.
Materials You’ll Need for Your Bee Amigurumi
Before starting your bee amigurumi project, gather these essential supplies:
- Yellow yarn (for the head and body sections)
- Black yarn (for the stripes and legs)
- White yarn (for the wings)
- Safety eyes (size not specified, but 9-10mm would work well)
- Stuffing fiber
- Crochet hook (size not specified, but 3.0-3.5mm is recommended for most amigurumi)
- Yarn needle for assembly
- Scissors
- Black embroidery thread for the mouth
- Stitch markers (optional but helpful)
Understanding the Crochet Abbreviations
This pattern uses standard crochet terminology:
- cad – chain stitch
- AM – magic ring
- pb – single crochet
- aum – increase (2 single crochets in the same stitch)
- dism – decrease (2 single crochets worked together)
- pa – double crochet
- pc – slip stitch
- V – round(s)
Creating the Bee’s Body and Head
The body and head of this bee amigurumi are worked as a single piece, starting with the head in yellow yarn and incorporating color changes to create the distinctive bee stripes.
Using yellow yarn:
- Round 1: Start with 6 sc in a magic ring [6]
- Round 2: Increase in each stitch around [12]
- Round 3: (1 sc, inc) repeat 6 times [18]
- Round 4: (2 sc, inc) repeat 6 times [24]
- Round 5: (1 sc, inc, 2 sc) repeat 6 times [30]
- Round 6: (4 sc, inc) repeat 6 times [36]
- Rounds 7-13: 36 sc around [36]
Position and attach the safety eyes between rounds 9 and 10
- Round 14: (4 sc, dec) repeat 6 times [30]
- Round 15: (1 sc, dec, 2 sc) repeat 6 times [24]
- Round 16: (2 sc, dec) repeat 6 times [18]
- Round 17: (1 sc, inc) repeat 9 times [27]
- Round 18: 27 sc around [27]
- Round 19: (2 sc, inc) repeat 9 times [36]
- Round 20: 36 sc around [36]
Now we start creating the stripes by alternating yellow and black yarn:
- Round 21: Switch to black yarn, 36 sc [36]
- Round 22: 36 sc [36]
- Round 23: Switch to yellow yarn, 6 sc [36]
- Round 24: 36 sc [36]
- Round 25: Switch to black yarn, (1 sc, inc) repeat 3 times [39]
- Round 26: 39 sc [39]
- Round 27: Switch to yellow yarn, 39 sc [39]
- Round 28: 39 sc [39]
- Round 29: Switch to black yarn, 39 sc [39]
- Round 30: (11 sc, dec) repeat 3 times [36]
- Round 31: Switch to yellow yarn, (4 sc, dec) repeat 6 times [30]
- Round 32: (1 sc, dec, 2 sc) repeat 6 times [24]
- Round 33: (2 sc, dec) repeat 6 times [18]
- Round 34: (1 sc, dec) repeat 6 times [12]
- Round 35: Switch to black yarn, 12 sc [12]
- Round 36: 12 sc [12]
Stuff the body firmly with fiberfill
- Round 37: (2 sc, dec) repeat 3 times [9]
- Round 38: (1 sc, dec) repeat 3 times [6]
Finish with a slip stitch and hide the yarn end inside the amigurumi.
Creating the Wings
The bee’s wings are worked in two sections (upper and lower) that are then joined together. Make two identical wing units using white yarn.
For each wing (lower part):
- Round 1: 6 sc in magic ring [6]
- Round 2: Increase in each stitch around [12]
- Round 3: (1 sc, inc) repeat 6 times [18]
- Round 4: (2 sc, inc) repeat 6 times [24]
- Round 5: (1 sc, inc, 2 sc) repeat 6 times [30]
- Rounds 6-8: 30 sc around [30]
For each wing (upper part):
- Round 1: 6 sc in magic ring [6]
- Round 2: Increase in each stitch around [12]
- Round 3: (1 sc, inc) repeat 6 times [18]
- Round 4: (2 sc, inc) repeat 6 times [24]
- Rounds 5-7: 24 sc around [24]
Joining the wing parts:
- Round 1: Work 30 sc on the lower part + 24 sc on the upper part [54]
- Round 2: 54 sc around [54]
- Round 3: Dec, 12 sc, dec, 13 sc, 2 dec, 9 sc, dec, 8 sc, dec [48]
- Round 4: Dec, 11 sc, dec, 12 sc, dec, 7 sc, 2 dec, 6 sc, dec [42]
- Round 5: Dec, 8 sc, 2 dec, 9 sc, 2 dec, 6 sc, dec, 5 sc, dec [35]
- Round 6: Dec, 8 sc, dec, 7 sc, 2 dec, 5 sc, dec, 3 sc, dec [29]
- Round 7: Dec, 7 sc, dec, 5 sc, 2 dec, 7 sc, dec [24]
- Round 8: Dec, 7 sc [8]
Fold the wing in half and join the two sides with 11 sc. Fasten off and hide the yarn end.
Assembling Your Bee Amigurumi
- Position the wings: Place the wings on either side of the bee’s body, roughly aligned with the yellow section of the thorax.
- Attach the wings: Using white yarn and a yarn needle, securely sew the wings to the body. Make sure they’re positioned evenly on both sides.
- Embroider the face: If you haven’t already added safety eyes, attach them now. Use black embroidery thread to create a simple smile for your bee.
- Optional antenna: Though not specified in the pattern, you can add small black antenna by making two small black chains or small crochet pieces and attaching them to the top of the head.
- Final touches: Check that all parts are securely attached and that all yarn ends are hidden within the amigurumi.
Tips for Creating the Perfect Bee Amigurumi
- Tension matters: Keep your tension consistent throughout the project for the best results.
- Stuff as you go: Add stuffing gradually, especially in the narrow sections, to ensure even distribution.
- Yarn substitution: While the pattern doesn’t specify yarn weight, a medium (worsted) weight yarn will work well for this project.
- Color variations: Consider using different shades of yellow for a more vibrant bee, or try other color combinations for a fantasy bee.
- Size adjustments: Using a smaller hook will result in a tighter, smaller amigurumi, while a larger hook will create a bigger bee.
Check this out :Crochet a Teddy Bear Amigurumi with Crown and Bow Tie Free Pattern
Conclusion
This Chen Bee Amigurumi pattern creates an irresistibly cute bee that’s perfect for spring decorations, gifts for nature lovers, or as a sweet companion for children. The pattern is straightforward enough for beginners while offering interesting techniques for more experienced crocheters.
The alternating yellow and black stripes give this bee its classic appearance, while the white wings add dimension and character. When finished, your bee amigurumi will measure approximately 4-5 inches tall (10-13 cm), making it the perfect size for display or play.
Whether you’re making this bee as a gift, for your own collection, or as a cheerful reminder of spring, this amigurumi project combines creativity with the joy of handcrafting something unique and adorable. Happy crocheting!


Leave a Reply