Table of Contents
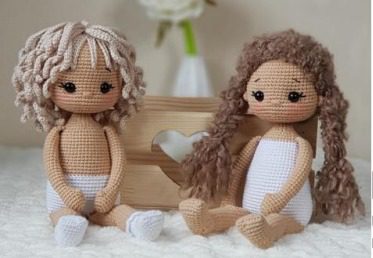
Creating a Amigurumi beautifully crafted amigurumi doll brings joy not only during the making process but also as a cherished handmade treasure. This comprehensive pattern will guide you through creating the Ksyusha doll – an adorable crochet figure with expressive features and stunning curly hair. With medium difficulty level, this project is perfect for crocheters with basic skills looking to advance their amigurumi techniques.
Amigurumi Materials Needed
For the doll:
- Body yarn – YarnArt Jeans No. 07 (beige/skin tone), slightly more than 1 skein
- Underwear and socks yarn – YarnArt Jeans No. 62 (white), 1/3 skein
- Curly hair option 1 – Pekhorka Children’s Novelty No. 89, 1 skein
- Curly hair option 2 – Pekhorka bouclé yarn
- 1.75 or 2.0 mm crochet hook for body and standard hair
- 3.5 mm crochet hook for bouclé hair
- 10 mm safety eyes
- 1.5 mm copper twisted wire or other sufficiently rigid wire, 27 cm
- Paper masking tape or electrical tape to insulate wire edges
- Fiberfill stuffing
- Black thread for eyelashes and eyebrows
- Strong thread in body color for face shaping
- Long needle for adjusting eyes
- Needle for sewing the wig
- Blush or dry pastels for coloring cheeks
- Marker or contrasting color thread
With the specified materials and tight tension, the finished doll will be approximately 27 cm (10.6 inches) tall.
Amigurumi Abbreviations
- MR – Magic ring
- sc – Single crochet
- dc – Double crochet
- hdc – Half double crochet
- inc – Increase (2 sc in same stitch)
- dec – Decrease (2 sc together)
- ch – Chain
- sl st – Slip stitch
- cl3dc – Cluster of 3 double crochet stitches
- (x) – Total number of stitches in row
- ( , ) * x – Repeat what’s in parentheses x times
Amigurumi Hands (Make 2)
Begin with beige/skin tone yarn. Stuff the palm firmly, the middle part moderately, and leave the top part (about 1-2 cm) unstuffed.
- MR, 6 sc
- 6 inc = (12)
- (5 sc, 1 inc) * 2 = (14) 4-5. 14 sc (2 rounds)
- cl3dc (finger), 13 sc = (14)
- 1 dec, 12 sc = (13) Stuff palm firmly
- 13 sc
- 1 dec, 3 sc, 1 dec, 3 sc, 1 dec, 1 sc = (10) Continue stuffing as you go
- 10 sc
- 1 inc, 3 sc, 1 inc, 3 sc, 1 inc, 1 sc = (13) 12-30. 13 sc (19 rounds)
- 1 sc, 1 dec, 10 sc = (12) The decrease should be parallel to the finger
- Fold in half, crochet 6 sc catching both walls. The finger should face sideways. Fasten off and cut the yarn. We’ll attach our hands to the body later.
Amigurumi Right Foot
Start with sock color yarn. If making without socks, begin with body color.
- MR with 6 sc, then 6 ch, starting from second sc from hook: 1 inc, 4 sc, 6 sc in the magic ring points, 4 sc, 1 inc = (18), place round marker. 2-7. 18 sc (6 rounds)
- 10 sc, 1 ch for height (crocheting in rows), turn the work Skip 1 sc: 7 sc, 1 dec, 1 ch, turn Skip 1 sc: 5 sc, 1 dec, 1 ch, turn Skip 1 sc: 3 sc, 1 dec, 1 ch, turn Skip 1 sc: 1 sc, 1 dec, continue crocheting in the round: 4 sc (along side wall), 1 dec, 4 sc, 1 dec (along front wall), 4 sc (along side wall). Place marker; this will be the beginning of the round. Follow the marker – it should run along the side of the leg. If the marker shifts, make slip stitches to adjust.
- 16 sc
- 1 sc, 1 inc, 14 sc = (17)
- 5 sc, 1 dec, 8 sc, 1 dec = (15) (decreases on the sides)
- 15 sc – Stuff the foot firmly
- 5 sc, 1 inc, 3 sc, 1 inc, 4 sc, 1 inc = (18)
- 18 sc – If making socks, change from white to body color after this round. Don’t cut the white yarn; pull it out before crocheting, as we’ll work on the sock edge later. If making without socks, continue in beige.
- 18 sc – if changing to beige, work in back loops only 16-23. 18 sc (8 rounds)
- 1 sc, 3 dec, 4 sc, 3 inc, 4 sc = (18) – Decreases should be exactly in the middle back, increases exactly in the middle front. If yours aren’t positioned correctly, make adjustment stitches.
- 18 sc
- 1 sc, 3 inc, 4 sc, 3 dec, 4 sc = (18) – Stuff the leg firmly as you crochet 27-28. 18 sc (2 rounds)
- 8 sc, 1 inc, 8 sc, 1 inc = (20) (increases on sides) 30-32. 20 sc (3 rounds)
- 9 sc, 1 inc, 9 sc, 1 inc = (22) 34-35. 22 sc (2 rounds)
- 10 sc, 1 inc, 10 sc, 1 inc = (24) (increases on sides)
- 24 sc
- 12 sc (incomplete row) – You might have a different number of sc; ensure the leg points directly at the toe
- 12 sc to join both sides. Fasten and cut yarn; the legs will be attached to the body. Stuff the leg firmly all the way to the top.
Amigurumi Sock Decoration
Hold the leg with toe pointing down, away from you. Return to row 15, and in the front loops crochet: 3 ch, skip 1 sc, 1 sl st to the next stitch, 3 ch, skip 1 sc, 1 sl st to the next stitch and continue this pattern to the end. Fasten yarn, cut and hide inside the leg.
Amigurumi Left Foot
Start with sock color yarn. If making without socks, use body color.
- MR with 6 sc, 6 ch, starting from second stitch after hook: 1 inc, 4 sc, 6 sc in magic ring points, 4 sc, 1 inc = (18) 2-7. 18 sc (6 rounds)
- 1 sc, 1 ch for height (crocheting in rows), turn the work Skip 1 sc: 7 sc, 1 dec, 1 ch, turn Skip 1 sc, 5 sc, 1 dec, 1 ch, turn Skip 1 sc, 3 sc, 1 dec, 1 ch, turn Skip 1 sc, 1 sc, 1 dec, continue crocheting in the round: 4 sc on side wall, 1 dec, 4 sc, 1 dec on front wall, 4 sc on side wall = (17) place round marker. Follow the marker, which runs along the leg from the side.
- 16 sc
- 1 sc, 1 inc, 14 sc = (17)
- 5 sc, 1 dec, 8 sc, 1 dec = (15) (decreases on sides)
- 15 sc
- 5 sc, 1 inc, 4 sc, 1 inc, 3 sc, 1 inc = (18) – Stuff foot firmly
- 18 sc – If making with socks, change from white to body color after this round. Don’t cut white yarn.
- 18 sc (if changing to beige) in back loops only 16-23. 18 sc (8 rounds)
- 1 sc, 3 dec, 4 sc, 3 inc, 4 sc = (18) – Decreases in middle back, increases in middle front
- 18 sc
- 1 sc, 3 inc, 4 sc, 3 dec, 4 sc = (18) – Stuff firmly while crocheting 27-28. 18 sc (2 rounds)
- 8 sc, 1 inc, 8 sc, 1 inc = (20) (increases on sides) 30-32. 20 sc (3 rounds)
- 9 sc, 1 inc, 9 sc, 1 inc = (22) 34-35. 22 sc (2 rounds)
- 10 sc, 1 inc, 10 sc, 1 inc = (24) (increases on sides)
- 24 sc
- 12 sc (incomplete row) – Ensure the leg points directly at the toe
- 12 sc to join both sides. Fasten and cut yarn; legs will be attached to body. Stuff firmly to the top.
Make sock decoration as done with the right foot.
Amigurumi Body
Follow the marker, which runs along the body from one side. If necessary, make adjustment stitches. Begin with underwear/panty color:
- Make 18 ch, starting from second stitch from hook: 1 inc, 15 sc, 4 inc in 1 stitch, 15 sc, 1 inc = (38)
- 2 inc, 15 sc, 4 inc, 15 sc, 2 inc = (46)
- (1 sc, 1 inc) * 2, 15 sc, (1 sc, 1 inc) * 4, 15 sc, (1 sc, 1 inc) * 2 = (54)
At this point, attach the legs with feet facing forward. When attaching legs, ensure they’re positioned exactly in the middle. You may need to make adjustment stitches at the beginning of the next row.
- 2 sc, 12 sc (joining first leg and body), 12 sc (joining second leg and body), 28 sc = (54)
- 9 sc, (1 inc, 2 sc) * 3, inc, 35 sc = (58) – increase should be exactly in middle of belly 6-14. 58 sc (9 rounds)
- 1 sc, 1 dec, 28 sc, 1 dec, 25 sc = (56) (decreases should be on sides)
- 35 sc, (1 dec, 1 sc) * 5, 1 dec, 4 sc = (50) – decreases exactly in middle back
- Change to body color (beige): crochet in back loops 50 sc, fasten and cut white yarn
- 6 sc, 1 dec, 15 sc, 1 dec, 14 sc, 1 dec, 9 sc = (47)
- 47 sc
- 7 sc, 1 dec, 12 sc, 1 dec, 24 sc = (45) – Stuff body firmly
- 36 sc, 1 dec, 7 sc = (44) 22-28. 44 sc (7 rounds)
- 8 sc, 1 dec, 10 sc, 1 dec, 8 sc, 1 dec, 10 sc, 1 dec = (40)
- 40 sc – Stuff firmly
Now attach the arms, positioning them exactly at the sides. Make adjustment stitches if necessary. Fingers should point forward.
- 2 sc, 6 sc joining arm and body stitches, 14 sc, 6 sc joining arm and body stitches, 12 sc = (40)
- 1 sc, 1 dec, 4 sc, 1 dec, 5 sc, 1 dec, 5 sc, 1 dec, 4 sc, 1 dec, 11 sc = (35) – Add stuffing
- (2 sc, 1 dec) * 7, 5 sc, 1 dec = (27)
- (2 sc, 1 dec) * 5, 5 sc, 1 dec = (21)
- (1 sc, 1 dec) * 2, 3 sc, (1 dec, 1 sc) * 4 = (15) – Stuff firmly 36-38. 15 sc (neck) (3 rounds). Cut yarn leaving a long end for sewing.
Stuff the neck firmly. If making a bodysuit version, continue in white up to row 29, then work row 30 in back loops with body color.
Amigurumi Head
Start with body color.
- MR with 6 sc
- (1 inc) * 6 = (12)
- (1 sc, 1 inc) * 6 = (18)
- (2 sc, 1 inc) * 6 = (24)
- (3 sc, 1 inc) * 6 = (30)
- 2 sc, 1 inc, (4 sc, 1 inc) * 5, 2 sc = (36)
- (5 sc, 1 inc) * 6 = (42)
- 3 sc, 1 inc, (6 sc, 1 inc) * 5, 3 sc = (48)
- (7 sc, 1 inc) * 6 = (54)
- 4 sc, 1 inc, (8 sc, 1 inc) * 5, 4 sc = (60) 11-19. 60 sc (9 rounds)
- 25 sc, 1 ch, skip 1 stitch, 9 sc, 1 ch, skip 1 stitch, 24 sc = (60) – Creating spaces for eyes. If using glue-on eyes or want to place them elsewhere, just work 60 sc in row 20.
- 60 sc
- 19 sc, (1 inc, 1 sc) * 4, 7 sc, (1 sc, 1 inc) * 4, 18 sc = (68) – Increases are for cheeks 23-25. 68 sc (3 rounds) – Insert safety eyes in the holes left previously
- (5 sc, 1 dec) * 9, 5 sc = (59)
- 2 sc, 1 dec, (4 sc, 1 dec) * 9, 1 sc = (49)
- 2 sc, 1 dec, (6 sc, 1 dec) * 5, 5 sc = (43)
- (5 sc, 1 dec) * 6, 1 sc = (37) – Stuff head firmly
- 2 sc, 1 dec, (4 sc, 1 dec) * 5, 3 sc = (31)
- (3 sc, 1 dec) * 6, 1 sc = (25)
- (2 sc, 1 dec) * 6, 1 sc = (19)
- (3 sc, 1 dec) * 3, 2 sc, 1 dec, sl st = (15) – Fasten and cut yarn. Stuff head firmly, paying special attention to cheeks.
Amigurumi Assembly
Connect body and head. First, reinforce the neck so the head doesn’t droop. Take wire (about 26-27 cm), bend it in half and twist it. Insulate the cut edge with tape.
Use a chopstick or similar tool to make a hole in the body almost to the bottom, and insert the wire. Add stuffing to the neck to keep it firm. Make a hole in the head with a stick, place the head on the wire, secure it with long pins or knitting needle so it doesn’t twist, and sew it to the body. Add stuffing where needed.
Amigurumi Face Shaping and Details
Mark two points, 1 stitch apart on the neck. Insert needle at the point, bring it out to the right in the middle of the eye. Insert needle on the other side of the same eye (thread passes over the eye), and take it to the second point below the neck. Again insert needle in the first point below the neck and bring it out from the left side of the second eye. With thread on top of the eye, insert needle from the other side of this eye and out through the second point. Tie the thread ends under the neck, pulling the eyes inward. Ensure eyes form uniformly. Hide the thread ends and knot in the head.
Amigurumi Ears (2 pieces)
Crochet a magic ring of 6 sc and without closing the ring, pull the yarn and cut it, leaving a long end for sewing. Mark with pins where to sew them, and attach.
Amigurumi Facial Features
For the nose, mark 2 points with distance of 2.5 stitches between them, and embroider making a few stitches. Embroider eyelashes and eyebrows as shown, trying to make them symmetrical.
Wig Option 1 (Curly Hair)
- MR with 6 sc
- (1 inc) * 6 = (12)
- (1 sc, 1 inc) * 6 = (18)
- (2 sc, 1 inc) * 6 = (24)
- (3 sc, 1 inc) * 6 = (30)
- (4 sc, 1 inc) * 6 = (36)
- (5 sc, 1 inc) * 6 = (42)
- 42 sc
- Crochet 35 chains in opposite direction, from second loop from hook crochet 34 sc along chain, 1 sl st in next stitch
- Crochet 35 ch, from second stitch from hook crochet 34 sc, 1 sl st through 1st stitch
Alternate joining curls to the circle: in the next column and through column 20. If using different yarn, make a test curl. If it doesn’t twist well, increase after every 2 sc or 3 sc. Make 10 long curls.
For bangs, make 10 ch, from second loop from hook make 9 sc, 1 sl st in next stitch. Make 8 short curls for bangs.
Next, crochet long curls – 28 curls in the first circle. Finish crocheting the circle, move up with 2 sl st. Skip 2 rounds and crochet in the third. Same principle: 35 ch, from 2nd loop 34 sc, 1 sl st.
No more bangs – all curls are 35 loops each. In the second round, make 17 curls. After the second circle of curls, move up 2 more rows with 2 sl st and crochet the next circle of curls. Third circle should have 11 curls. Make the fourth circle the same way, closing the crown.
Before sewing the wig, wash it first with shampoo, then add hair conditioner. Squeeze with a towel, smooth out and air dry. The curls will become softer and look beautiful.
Try the wig on the head, secure with pins and sew like a hat. Then fix the bottom row of curls with pins and sew them. Don’t sew the upper curls.
Wig Option 2 (Bouclé Hair)
Use a thicker hook, 3.5 mm:
- MR with 6 sc
- (1 inc) * 6 = (12) – Use a marker thread as stitches are hard to see in bouclé yarn
- (1 sc, 1 inc) * 6 = (18)
- (2 sc, 1 inc) * 6 = (24) – Try on head; if volume is sufficient, continue without adding stitches. If not, make another row with increases. 5-8. 24 sc, 1 sl st. Fasten and cut yarn.
Place the wig on the head, pulling it down, and secure with pins. Make pigtails – for one tail, cut 13 strands 30 cm long each. Fold in half, secure in the middle with thread. Make second tail the same way and sew to the sides of the head.
Check this out :Crochet a Luxurious Bamboo Baby Blanket
Final Touches
Now all that’s left is to dress your doll according to your preference. You can add blush to the cheeks for a more lifelike appearance.
Congratulations on completing your amigurumi doll with beautiful curly hair! This adorable creation makes a perfect gift or a charming addition to your handmade collection. With its expressive face and customizable clothing options, each doll becomes a unique treasure with its own personality.


Leave a Reply