Table of Contents
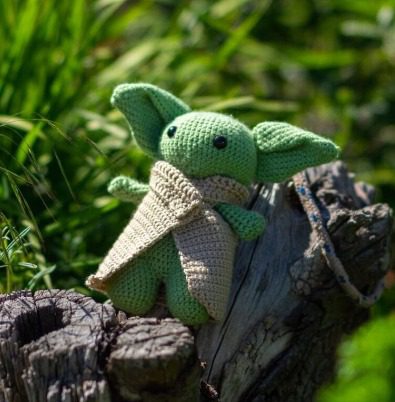
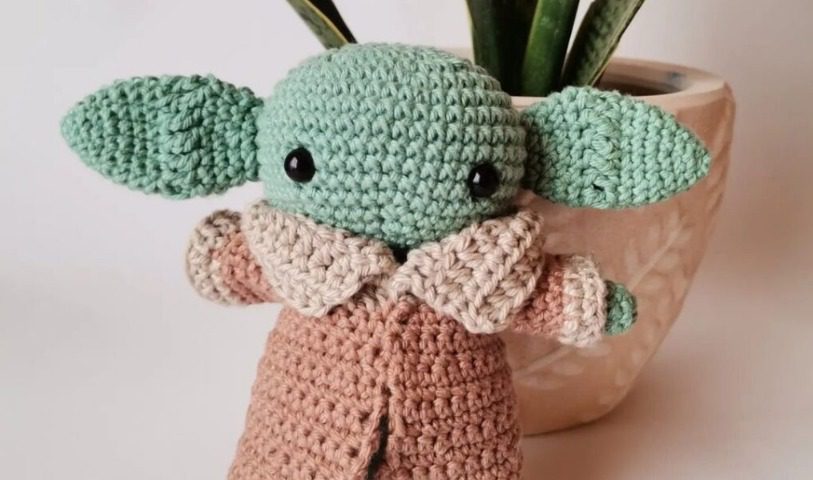
Are you looking to create an adorable Baby Yoda (The Child) amigurumi that will capture hearts just like the Yoda Amigurumi character did in The Mandalorian series? This comprehensive crochet pattern will guide you through creating your own cuddly version of the beloved character with simple techniques and readily available materials.
Introduction to Baby Yoda Amigurumi
Amigurumi, the Japanese art of crocheting small stuffed toys, has become increasingly popular among crafters worldwide. This Baby Yoda inspired pattern is perfect for beginners and intermediate crocheters looking to create a charming keepsake or gift. The finished amigurumi stands at approximately 4.75 inches (12 cm) tall and features the character’s iconic large ears, expressive eyes, and cozy brown outfit.
Yoda Amigurumi Skill Level and Requirements
This pattern is rated as beginner-friendly, requiring only basic crochet knowledge. You’ll need to be familiar with:
- Working in continuous rounds
- Basic stitch techniques (single crochet, double crochet, increases and decreases)
- Attaching yarn
- Sewing parts together
- Creating a magic ring
Yoda Amigurumi Materials Needed
Before beginning your Baby Yoda amigurumi project, gather these supplies:
- Medium weight (4) yarn in three colors:
- Green (for body parts)
- Light brown (for collar/scarf)
- Dark brown (for jacket)
- Two crochet hooks:
- 2.75mm hook for body parts
- 3.75mm hook for clothing pieces
- 10mm plastic safety eyes
- Fiberfill stuffing
- Yarn needle
- Scissors
- Blush powder
- Cotton swab/Q-tip for applying blush
Understanding Yoda Amigurumi Terminology
This pattern uses US crochet terminology:
- MR: Magic Ring – a technique that creates a tight center for crocheting in rounds
- Ch: Chain – the foundation of most crochet projects
- Sl st: Slip stitch – used to join rounds and create flat seams
- Sc: Single crochet – the most basic and common crochet stitch
- Inc: Increase – making two stitches in the same stitch to add width
- Dec: Decrease – combining two stitches into one to reduce width
- Dc: Double crochet – a taller stitch used for the clothing pieces
- Fdc: Foundation double crochet – creates a foundation chain and first row of double crochet stitches simultaneously
- FO: Fasten off – securing and ending your work
Yoda Amigurumi Head Instructions
Using your 2.75mm hook and green yarn:
Round 1: Create a magic ring and work 6 single crochet stitches into it. (6 stitches total) Round 2: Increase in each stitch around. (12 stitches) Round 3: Work [1 single crochet, 1 increase] 6 times. (18 stitches) Round 4: Work [2 single crochet, 1 increase] 6 times. (24 stitches) Round 5: Work [3 single crochet, 1 increase] 6 times. (30 stitches) Rounds 6-7: Single crochet in each stitch around. (30 stitches) Round 8: Work [4 single crochet, 1 increase] 6 times. (36 stitches) Rounds 9-10: Single crochet in each stitch around. (36 stitches) Round 11: Work [4 single crochet, 1 decrease] 6 times. (30 stitches) Round 12: Work [3 single crochet, 1 decrease] 6 times. (24 stitches) Round 13: Work [2 single crochet, 1 decrease] 6 times. (18 stitches)
Fasten off and weave in the ends. Insert 10mm safety eyes between rounds 8-9, positioning them approximately 8 stitches apart.
Ear Instructions (Make 2)
Using your 2.75mm hook and green yarn:
Round 1: Create a magic ring and work 4 single crochet stitches into it. (4 stitches) Round 2: Work [1 single crochet, 1 increase] 2 times. (6 stitches) Round 3: Work [2 single crochet, 1 increase] 2 times. (8 stitches) Round 4: Work [3 single crochet, 1 increase] 2 times. (10 stitches) Round 5: Work [4 single crochet, 1 increase] 2 times. (12 stitches) Round 6: Work [3 single crochet, 1 increase] 3 times. (15 stitches) Round 7: Work [4 single crochet, 1 increase] 3 times. (18 stitches) Round 8: Single crochet in each stitch around. (18 stitches)
Fasten off, leaving a long tail for sewing the ears to the head later.
Arm Instructions (Make 2)
Using your 2.75mm hook and green yarn:
Round 1: Create a magic ring and work 6 single crochet stitches into it. (6 stitches) Rounds 2-8: Single crochet in each stitch around. (6 stitches)
Fasten off, leaving a long tail for attaching the arms to the body.
Legs and Body Instructions
Legs (Make 2)
Using your 2.75mm hook and green yarn:
Round 1: Create a magic ring and work 6 single crochet stitches into it. (6 stitches) Round 2: Increase in each stitch around. (12 stitches) Round 3: Single crochet in each stitch around. (12 stitches) Round 4: Single crochet in 4 stitches, decrease twice, single crochet in remaining 4 stitches. (10 stitches) Rounds 5-7: Single crochet in each stitch around. (10 stitches)
For the first leg, fasten off. For the second leg, do not fasten off – you’ll continue to create the body.
Body
Continuing from the second leg:
Round 1 (Joining Round): Chain 3. Join to the first leg with a single crochet, then work 9 single crochet around that leg. Work 3 single crochet across one side of the chain. Work 10 single crochet around the second leg. Work 3 single crochet across the other side of the chain. (26 stitches total) Rounds 2-6: Single crochet in each stitch around. (26 stitches) Round 7: Work [11 single crochet, 1 decrease] 2 times. (24 stitches) Round 8: Work [6 single crochet, 1 decrease] 3 times. (21 stitches) Round 9: Work [5 single crochet, 1 decrease] 3 times. (18 stitches)
Fasten off, leaving a long tail for attaching the head later.
Clothing Instructions
Collar (Scarf)
Using your 3.75mm hook and light brown yarn:
Work 24 foundation double crochet stitches. (Note: The starting chain counts as a double crochet)
Fasten off, leaving a long tail for attaching to the body.
Jacket
Using your 3.75mm hook and dark brown yarn:
Body Panels:
Row 1: Work 22 foundation double crochet stitches. (Note: The starting chain counts as a double crochet) Row 2: Chain 3 (counts as first double crochet). Double crochet in each stitch across. (22 stitches) Row 3: Chain 3, double crochet in next 8 stitches. Chain 3, slip stitch in next stitch. Slip stitch in next 2 stitches. Slip stitch in next stitch, chain 3. Double crochet in next stitch. Double crochet in remaining 8 stitches.
Fasten off and weave in the ends. Fold your body panels in half, so that instead of being 22 stitches in height, it is now 11 stitches. Sew the bottom 6 stitches together. The last 10 stitches will remain unworked for now as the sleeve holes. Sew the back of both body panel pieces together, leaving the front flaps open.
Sleeves:
Attach dark brown yarn to the armhole. Chain 3, double crochet around the armhole. Join with a slip stitch to the first double crochet. (10 stitches)
Fasten off and weave in the ends. Repeat on the other side.
Assembly and Finishing
- Stuff the head firmly with fiberfill, ensuring it maintains its round shape.
- Stuff the body with fiberfill, making sure to add enough stuffing for a firm but slightly squeezable result.
- Using a yarn needle and the long tails you left, sew both arms to the sides of the body.
- Gently crease the top edge of each ear to create the characteristic fold, then sew them to both sides of the head.
- Attach the head to the body, adding any final stuffing before closing the opening completely.
- Dress your Baby Yoda by carefully fitting the jacket around the body, then add the collar/scarf. Use the long tail end of the collar to stitch it in place if needed.
- For the final touch, use a cotton swab/Q-tip to apply a small amount of blush powder to the cheeks and the inside of the ears for a lifelike appearance.
Customization Options
Feel free to personalize your Baby Yoda amigurumi with these creative variations:
- Adjust the size by using different yarn weights and appropriate hook sizes
- Create a miniature lightsaber or hovering pod accessory
- Add embroidered details for more facial expression
- Use variegated yarn for a unique texture effect
- Create a tiny Mandalorian companion using similar techniques
Troubleshooting Common Issues
- If your amigurumi seems too floppy, add more stuffing or try using a smaller hook for tighter stitches
- For ears that won’t stand properly, insert pipe cleaners or craft wire for support
- If parts are difficult to sew together, use pins to position them perfectly before stitching
- To prevent stuffing from showing through, use a slightly smaller hook for the outer portions
Caring for Your Finished Amigurumi
To keep your Baby Yoda amigurumi looking its best:
- Spot clean with mild soap and water
- Allow to air dry completely
- Display away from direct sunlight to prevent color fading
- Store in a clean, dry place when not on display

Check this out :Crochet a Kawaii Axolotl Amigurumi
Conclusion
Congratulations on completing your Baby Yoda amigurumi! This adorable handcrafted creation makes a wonderful gift for Star Wars fans or a charming addition to your own collection. Remember that practice makes perfect, so don’t worry if your first attempt isn’t flawless – each amigurumi you create will help develop your skills further.
Share your finished Baby Yoda amigurumi on social media and tag other crochet enthusiasts to inspire a community of creators. Happy crocheting!


Leave a Reply