Table of Contents
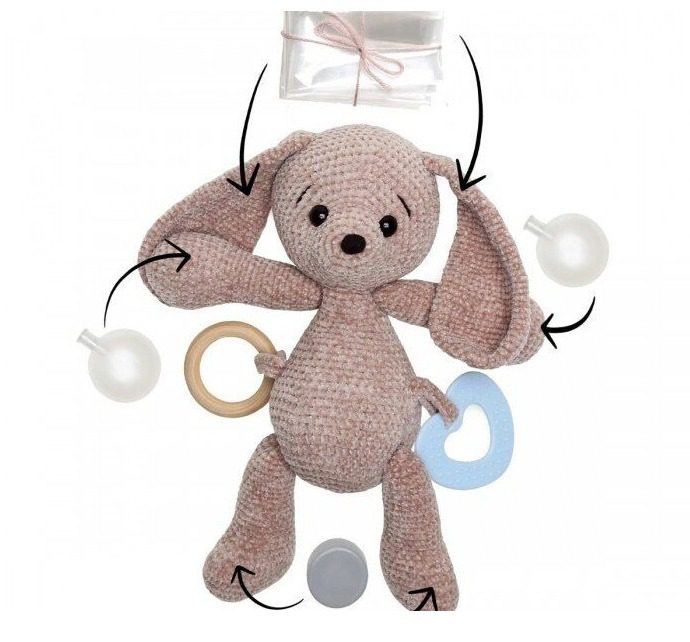
Create Sensory Bunny a special amigurumi toy designed to engage developing senses with this interactive Sensory Bunny pattern. Standing approximately 26 centimeters tall, this adorable bunny incorporates multiple tactile and auditory elements including crinkly ears, rattling legs, and squeaky arms. Perfect for babies and young children, this thoughtfully designed bunny combines the charm of traditional amigurumi with functional features that support sensory development and provide hours of engaging play.
Materials Needed for Your Sensory Bunny
Before beginning this interactive crochet project, gather these supplies:
- 3.0-3.5 mm crochet hook
- Approximately 100g of your chosen yarn (the pattern doesn’t specify a particular brand, so choose a soft, baby-friendly option)
- Small amount of black yarn for nose and eyebrows
- 12 mm safety eyes
- 55 mm wooden ring
- Teething ring in heart shape
- Hanging ring for suspension
- Rattle cellophane (for the crinkly ears)
- Rattle boxes (for the legs)
- Squeakers (for the arms)
- Polyester fiberfill stuffing
- Tapestry needle for assembly
Understanding Sensory Bunny Terminology
To help you follow the pattern smoothly, here’s a guide to the abbreviations used:
- st(s): Stitch(es)
- cr: Magic ring – the technique to begin crocheting in the round
- ch: Chain stitch – the foundation of many crochet techniques
- t-ch: Turn chain stitch – 1 chain, then turn the work
- sl st: Slip stitch – used for joining and creating smooth edges
- dc: Double crochet (US single crochet) – the main stitch used throughout
- 2 dc inc: Increase – making two double crochets in the same stitch
- dc 2 tog: Decrease – working two stitches together
- Numbers in parentheses at the end of rounds show the total stitch count
Important Note: This pattern uses UK terminology, where “dc” refers to what US patterns call a “single crochet.” Keep this in mind if you’re accustomed to US terminology.
Sensory Bunny General Instructions
Throughout this project, unless otherwise specified:
- Work in continuous spiral rounds without joining
- To finish a section, join the final round with a slip stitch
- Leave approximately 20cm of yarn when cutting for assembly
- Add stuffing gradually as you work rather than all at once
- For safety eyes, insert them from the outside and secure with the backing from the inside – they should fit tightly to ensure they won’t come loose
Creating Sensory Bunny Body
The body forms the foundation of your sensory bunny. Begin your project here:
Round 1: Create 8 double crochets in a magic ring [8 stitches total] Round 2: Increase in each stitch around [16 stitches total] Round 3: Work (1 double crochet, increase) 8 times around [24 stitches total] Round 4: Work (2 double crochets, increase) 8 times around [32 stitches total] Round 5: Work (3 double crochets, increase) 8 times around [40 stitches total] Round 6: Work (4 double crochets, increase) 8 times around [48 stitches total] Round 7: Work (5 double crochets, increase) 8 times around [56 stitches total] Round 8: Work (6 double crochets, increase) 8 times around [64 stitches total] Rounds 9-12: Work 1 double crochet in each stitch for 4 rounds [64 stitches remain] Round 13: Work (6 double crochets, decrease) 8 times around [56 stitches total] Rounds 14-15: Work 1 double crochet in each stitch for 2 rounds [56 stitches remain] Round 16: Work (5 double crochets, decrease) 8 times around [48 stitches total] Round 17: Work 1 double crochet in each stitch around [48 stitches remain] Round 18: Work (4 double crochets, decrease) 8 times around [40 stitches total] Rounds 19-22: Work 1 double crochet in each stitch for 4 rounds [40 stitches remain] Round 23: Work (3 double crochets, decrease) 8 times around [32 stitches total] Rounds 24-26: Work 1 double crochet in each stitch for 3 rounds [32 stitches remain] Round 27: Work (2 double crochets, decrease) 8 times around [24 stitches total] Rounds 28-32: Work 1 double crochet in each stitch for 5 rounds [24 stitches remain]
Stuff the body firmly at this point to create a solid base for your bunny.
Forming Sensory Bunny Head
The head gives your bunny its distinctive character:
Round 1: Create 6 double crochets in a magic ring [6 stitches total] Round 2: Increase in each stitch around [12 stitches total] Round 3: Work (1 double crochet, increase) 6 times around [18 stitches total] Round 4: Work (2 double crochets, increase) 6 times around [24 stitches total] Rounds 5-7: Work 1 double crochet in each stitch for 3 rounds [24 stitches remain]
At this point, insert the safety eyes after round 7.
Round 8: Work 2 double crochets, increase 6 times, 6 double crochets [30 stitches total] Round 9: Work 3 double crochets, increase 6 times, 6 double crochets [36 stitches total] Round 10: Work 4 double crochets, increase 6 times, 6 double crochets [42 stitches total] Round 11: Work 5 double crochets, increase 6 times, 6 double crochets [48 stitches total] Round 12: Work 6 double crochets, increase 6 times, 6 double crochets [54 stitches total] Round 13: Work 7 double crochets, increase 6 times, 6 double crochets [60 stitches total] Round 14: Work 8 double crochets, increase 6 times, 6 double crochets [66 stitches total] Rounds 15-21: Work 1 double crochet in each stitch for 7 rounds [66 stitches remain] Round 22: Work (9 double crochets, decrease) 6 times around [60 stitches total] Round 23: Work (8 double crochets, decrease) 6 times around [54 stitches total] Round 24: Work 1 double crochet in each stitch around [54 stitches remain] Round 25: Work (7 double crochets, decrease) 6 times around [48 stitches total] Round 26: Work (6 double crochets, decrease) 6 times around [42 stitches total] Round 27: Work (5 double crochets, decrease) 6 times around [36 stitches total] Round 28: Work 1 double crochet in each stitch around [36 stitches remain] Round 29: Work (4 double crochets, decrease) 6 times around [30 stitches total] Round 30: Work (3 double crochets, decrease) 6 times around [24 stitches total] Round 31: Work (2 double crochets, decrease) 6 times around [18 stitches total] Round 32: Work (1 double crochet, decrease) 6 times around [12 stitches total] Round 33: Decrease 6 times around [6 stitches total]
Add stuffing to the head at this point. Cut the yarn and pull through the remaining stitches, tighten, and sew the head closed.
Sensory Bunny Creating Facial Definition
To add character to your bunny’s face, you’ll create eye hollows:
Thread a needle with approximately 25cm of yarn. Insert the needle from under the chin and bring it out at the side of one eye. Guide the thread around several stitches near the eye, then bring it back out under the chin. Pull the yarn tight to create a hollow around the eye, then secure it with a few stitches under the chin.
Repeat this process for the other side of the same eye, maintaining tension to create a permanent hollow. Once the first eye is complete, repeat the entire process for the second eye.
Using black yarn, embroider a nose and eyebrows to give your bunny an expressive face.
Sensory Bunny Crafting the Crinkly Ears
The ears add character to your bunny and incorporate sensory elements. Make 2 identical ears:
Round 1: Create 6 double crochets in a magic ring [6 stitches total] Round 2: Increase in each stitch around [12 stitches total] Round 3: Work (1 double crochet, increase) 6 times around [18 stitches total] Round 4: Work (2 double crochets, increase) 6 times around [24 stitches total] Round 5: Work (3 double crochets, increase) 6 times around [30 stitches total] Round 6: Work (4 double crochets, increase) 6 times around [36 stitches total] Round 7: Work (5 double crochets, increase) 6 times around [42 stitches total] Rounds 8-12: Work 1 double crochet in each stitch for 5 rounds [42 stitches remain] Round 13: Work (5 double crochets, decrease) 6 times around [36 stitches total] Rounds 14-18: Work 1 double crochet in each stitch for 5 rounds [36 stitches remain] Round 19: Work (4 double crochets, decrease) 6 times around [30 stitches total] Rounds 20-24: Work 1 double crochet in each stitch for 5 rounds [30 stitches remain] Round 25: Work (3 double crochets, decrease) 6 times around [24 stitches total] Rounds 26-30: Work 1 double crochet in each stitch for 5 rounds [24 stitches remain] Round 31: Work (2 double crochets, decrease) 6 times around [18 stitches total] Rounds 32-36: Work 1 double crochet in each stitch for 5 rounds [18 stitches remain] Round 37: Work (1 double crochet, decrease) 6 times around [12 stitches total] Rounds 38-42: Work 1 double crochet in each stitch for 5 rounds [12 stitches remain]
Insert two layers of rattle cellophane into each ear for the crinkly sensory effect. Sew the ears onto the head as shown in the reference images.
Creating the Squeaky Arms
The arms provide an auditory element to your sensory bunny. Make 2 identical arms:
Round 1: Create 6 double crochets in a magic ring [6 stitches total] Round 2: Increase in each stitch around [12 stitches total] Round 3: Work (1 double crochet, increase) 6 times around [18 stitches total] Round 4: Work (2 double crochets, increase) 6 times around [24 stitches total] Round 5: Work (3 double crochets, increase) 6 times around [30 stitches total] Round 6: Work (4 double crochets, increase) 6 times around [36 stitches total] Rounds 7-8: Work 1 double crochet in each stitch for 2 rounds [36 stitches remain] Round 9: Work (4 double crochets, decrease) 6 times around [30 stitches total] Rounds 10-11: Work 1 double crochet in each stitch for 2 rounds [30 stitches remain] Round 12: Work (3 double crochets, decrease) 6 times around [24 stitches total] Round 13: Work 1 double crochet in each stitch around [24 stitches remain] Round 14: Work (2 double crochets, decrease) 6 times around [18 stitches total] Rounds 15-30: Work 1 double crochet in each stitch for 16 rounds [18 stitches remain] Round 31: Work (1 double crochet, decrease) 6 times around [12 stitches total] Round 32: Decrease 6 times around [6 stitches total]
Insert a squeaker and stuffing into each arm before closing. Sew the arms to the body securely.
Forming the Rattling Legs
The legs add stability and another sensory element to your bunny. Make 2 identical legs:
Round 1: Chain 8 stitches. Work 2 double crochets in 2nd chain from hook, 5 double crochets across chain, 5 double crochets in the final chain, continue on the opposite side of the chain with 5 double crochets, 2 double crochets in the final chain [19 stitches total] Round 2: Work 1 increase, 7 double crochets, 3 increases, 7 double crochets, 1 increase [24 stitches total] Round 3: Work 2 increases, 8 double crochets, 5 increases, 8 double crochets, 1 increase [32 stitches total] Round 4: Work 3 increases, 11 double crochets, 5 increases, 12 double crochets, 1 increase [41 stitches total] Rounds 5-6: Work 1 double crochet in each stitch for 2 rounds [41 stitches remain] Round 7: Work 1 double crochet in the back loop of each stitch around [41 stitches remain] Round 8: Work 18 double crochets, 4 decreases, 15 double crochets [37 stitches total] Round 9: Work 2 decreases, 13 double crochets, 3 decreases, 14 double crochets [32 stitches total] Round 10: Work 14 double crochets, 1 decrease, 1 double crochet, 1 decrease, 13 double crochets [30 stitches total] Round 11: Work 1 decrease, 10 double crochets, 3 decreases, 10 double crochets, 1 decrease [25 stitches total] Round 12: Work 9 double crochets, 1 decrease, 3 double crochets, 1 decrease, 9 double crochets [23 stitches total] Rounds 13-17: Work 1 double crochet in each stitch for 5 rounds [23 stitches remain] Round 18: Work 6 double crochets, 1 decrease, 4 double crochets, 1 decrease, 5 double crochets, 1 decrease, 2 double crochets [20 stitches total] Rounds 19-23: Work 1 double crochet in each stitch for 5 rounds [20 stitches remain] Round 24: Work 7 double crochets, 1 decrease, 7 double crochets, 1 decrease, 2 double crochets [18 stitches total] Rounds 25-27: Work 1 double crochet in each stitch for 3 rounds [18 stitches remain] Round 28: Work 3 double crochets, 1 decrease, 8 double crochets, 1 decrease, 3 double crochets [16 stitches total] Round 29: Work 1 double crochet, 5 decreases, 1 double crochet [11 stitches total] Round 30: Work 5 decreases, 1 double crochet [6 stitches total]
Insert a rattle box and stuffing into each leg before closing. Sew the legs securely to the body.
Creating the Suspension Cord
To add a hanging feature to your sensory bunny:
Fold a piece of yarn in half, insert your hook through a stitch on top of the head, and pull the folded yarn back through the stitch. Using both strands of yarn together, chain 15 stitches, then secure the loose chain with the remaining yarn to form a loop.
Making a Strap for Attachments
To create a strap for attaching additional sensory elements (size: 8 cm x 1 cm):
Row 1: Chain 26 stitches, turn work Row 2: Work 25 double crochets starting from the 2nd chain from hook, chain 1 and turn Row 3: Work 25 double crochets across
Finish off and attach either the heart-shaped teething ring or the wooden ring to the strap. Sew the strap to the bunny in your preferred location.
Assembling Your Sensory Bunny
Now that you’ve created all the components, it’s time to assemble your bunny:
- Sew the ears to the head, positioning them symmetrically.
- Attach the head to the body after inserting all the sensory elements and accessories.
- Sew the arms and legs securely to the body.
- Add the suspension cord to the top of the head if desired.
- Attach the strap with the teething ring or wooden ring.
Why Create a Sensory Bunny?
This special amigurumi goes beyond being just a cute stuffed toy. The sensory elements incorporated into the design serve important developmental purposes:
- Auditory stimulation: The rattling legs and squeaky arms help develop auditory discrimination and cause-and-effect understanding as babies learn that their actions produce different sounds.
- Tactile exploration: The different textures, including the crinkly ears, provide tactile stimulation that helps develop fine motor skills and sensory processing.
- Teething relief: The attached teething ring offers a safe, soothing surface for babies experiencing the discomfort of teething.
- Visual engagement: The contrasting colors and expressive face capture visual attention and help develop focus.
- Motor skill development: Grasping, squeezing, and manipulating the different parts of the bunny help strengthen hand muscles and coordination.
Safety Considerations
When creating toys for babies and young children, safety is paramount:
- Ensure all safety eyes are securely fastened before giving the toy to a child.
- Double-check that all sensory elements (squeakers, rattle boxes) are completely enclosed with no possibility of them coming loose.
- Use high-quality, non-toxic materials suitable for children.
- Make sure all yarn ends are woven in securely.
- Always supervise children during play with handmade toys.
- Regularly inspect the toy for any signs of wear or damage.
Check this out :Strawberry Bear Amigurumi Beginner-Friendly Pattern
Your Completed Sensory Bunny
Congratulations on creating your interactive sensory bunny! This thoughtfully designed toy combines the charm of traditional amigurumi with purposeful elements that support childhood development. The combination of visual appeal, tactile exploration, and auditory features makes this bunny a special gift that will engage a child’s senses and provide countless hours of developmental play.
Your handcrafted sensory bunny is not only a labor of love but also a valuable tool for supporting early childhood development. The different sensory elements stimulate curiosity, exploration, and learning through play – making this so much more than just a cute stuffed animal.
Consider creating multiple bunnies with different color combinations or varying the sensory elements based on a child’s preferences or developmental needs. Each sensory bunny you create can be uniquely tailored to its recipient.
If you share your creation on social media, consider tagging the original designer to showcase your work and connect with other crafters who’ve enjoyed making this special developmental toy.
Happy crocheting, and may your sensory bunny bring joy and developmental benefits to its lucky recipient!




Leave a Reply