Table of Contents
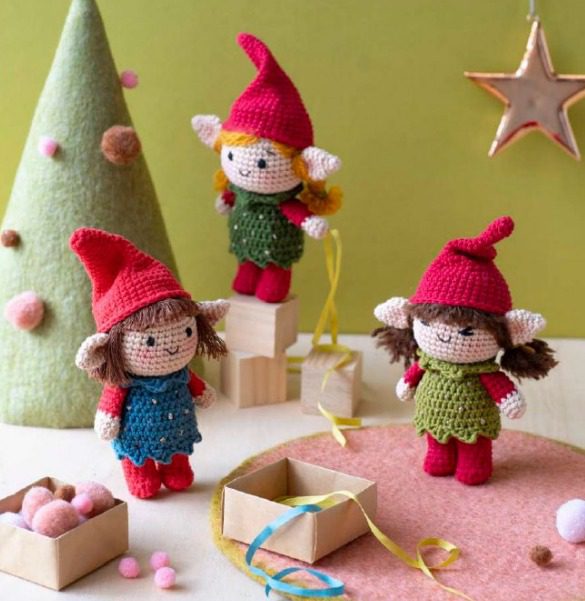
Bring the magic of the holiday season into your home with these charming Christmas Elves amigurumi dolls! Perfect for festive decorations, gifts, or adding a touch of whimsy to your holiday decor, these adorable crochet elves stand approximately 10cm (4 inches) tall. This comprehensive step-by-step tutorial will guide you through creating these cute companions with their distinctive pointed hats, elf ears, and festive outfits.
Christmas Elves Materials Needed
Before beginning your elf-making adventure, gather these supplies:
- Cotton yarn in these colors:
- Red (for hat and feet/legs)
- Green (for dress/outfit)
- Beige/skin tone (for head, ears, and hands)
- Brown (for hair)
- Black (for eyes and details)
- Tools and notions:
- 2.5mm or 2.75mm crochet hook
- Fiberfill stuffing
- Yarn needle
- Scissors
- Stitch markers
- Makeup blush (optional, for rosy cheeks)
- Brush (for styling hair)
Christmas Elves Abbreviations Used
- MR – Magic ring
- CH – Chain stitch
- SL ST – Slip stitch
- SC – Single crochet
- HDC – Half double crochet
- DC – Double crochet
- INC – Increase (2 SC in same stitch)
- DEC – Decrease (2 SC together)
- FLO – Front loop only
- BLO – Back loop only
Christmas Elves Legs and Body
First Leg
- Using red yarn:
- Round 1: 8 SC in magic ring [8]
- Round 2: 8 INC [16]
- Round 3: 6 SC, 4 HDC, 6 SC [16]
- Round 4: 6 SC, 2 DEC, 6 SC [14]
- Round 5: 5 SC, 2 DEC, 5 SC [12]
- Start stuffing the foot, adding more as you go
- Rounds 6-7: 12 SC [12]
- Round 8: 10 SC [10] (leave 2 stitches unworked)
- Fasten off and secure
Second Leg
- Repeat Rounds 1-7 from the first leg
- Round 8: 12 SC [12]
- Round 9: 3 SC [3] (leave 9 stitches unworked)
- Do not cut the yarn – we’ll join both legs to create the body
Christmas Elves Body
- Starting from the second leg:
- Make 1 CH and join to the first leg with 1 SC (this will be the first stitch of Round 1 of the body)
- Round 1: 26 SC (around both legs and chain) [26]
- Rounds 2-10: 26 SC [26]
- Begin stuffing, adding more as you go
- Round 11: 5 SC, 1 DEC, 11 SC, 1 DEC, 6 SC [24]
- Rounds 12-14: 24 SC [24]
- Change to green yarn:
- Round 15: 24 SC [24]
- Round 16: BLO (4 SC, 1 DEC) x4 [20]
- Don’t cut the yarn, we’ll crochet the collar next
Christmas Elves Collar
- Using green yarn:
- Round 1: In FLO of Round 16 (from body), CH 2, (4 HDC, 2 HDC in same stitch) x4, SL ST [24]
- Round 2: Repeat 6 times: skip 1 stitch; {1 HDC, 1 DC, 2 CH, 1 SL ST, 1 HDC} in 1 stitch; skip 1 stitch, 1 SL ST
- You’ll have 6 petals when finished
- Fasten off, leaving a long tail for sewing
Christmas Elves Dress
- Using green yarn:
- Round 1: Turn the body upside down, work in FLO of Round 15. CH 2, 24 HDC [24]
- Round 2: 24 HDC [24]
- Round 3: (3 HDC, 2 HDC in 1 stitch) x6 [30]
- Round 4: 30 HDC [30]
- Round 5: (4 HDC, 2 HDC in 1 stitch) x6 [36]
- Rounds 6-7: 36 HDC [36]
- Round 8: Repeat 9 times: Skip 1 stitch; {1 HDC, 1 DC, 2 CH, 1 SL ST, 1 HDC} in 1 stitch; skip 1 stitch, 1 SL ST
- You’ll have 9 petals when finished
- Fasten off, leaving a long tail for sewing
- Decorate the dress with small French knots using contrasting yarn
Arms (Make 2)
- Using beige (skin tone) yarn:
- Round 1: 8 SC in magic ring [8]
- Round 2: (1 INC, 3 SC) x2 [10]
- Rounds 3-4: 10 SC [10]
- Change to red yarn:
- Rounds 5-9: 10 SC [10]
- Fold in half and work 5 SC through both layers
- Fasten off, leaving a long tail for sewing
Ears (Make 2)
- Using beige (skin tone) yarn:
- Round 1: 5 SC in magic ring [5]
- Round 2: 1 INC, 4 SC [6]
- Round 3: (2 SC, 1 INC) x2 [8]
- Round 4: (1 SC, 1 INC) x4 [12]
- Rounds 5-7: 12 SC [12]
- Round 8: 6 DEC [6]
- Fasten off, leaving a long tail for sewing
Christmas Elves Hat
- Using red yarn:
- Round 1: 6 SC in magic ring [6]
- Round 2: 1 INC, 5 SC [7]
- Round 3: 1 INC, 6 SC [8]
- Round 4: (1 INC, 3 SC) x2 [10]
- Round 5: 10 SC [10]
- Round 6: (4 SC, 1 INC) x2 [12]
- Round 7: 12 SC [12]
- Round 8: (3 SC, 1 INC) x3 [15]
- Rounds 9-10: 15 SC [15]
- Round 11: (4 SC, 1 INC) x3 [18]
- Round 12: 18 SC [18]
- Round 13: (5 SC, 1 INC) x3 [21]
- Round 14: (6 SC, 1 INC) x3 [24]
- Round 15: 24 SC [24]
- Round 16: (3 SC, 1 INC) x6 [30]
- Round 17: 30 SC [30]
- Round 18: (4 SC, 1 INC) x6 [36]
- Rounds 19-24: 36 SC [36]
- Fasten off, leaving a long tail for sewing
Christmas Elves Head
- Using beige (skin tone) yarn:
- Round 1: 7 SC in magic ring [7]
- Round 2: 7 INC [14]
- Round 3: (1 SC, 1 INC) x7 [21]
- Round 4: (2 SC, 1 INC) x7 [28]
- Round 5: 1 SC, 1 INC, (3 SC, 1 INC) x6, 2 SC [35]
- Round 6: (4 SC, 1 INC) x7 [42]
- Rounds 7-15: 42 SC [42]
- Begin stuffing the head
- Round 16: (4 SC, 1 DEC) x7 [35]
- Round 17: 1 SC, 1 DEC, (3 SC, 1 DEC) x6, 2 SC [28]
- Round 18: (1 SC, 1 DEC, 2 SC, 1 DEC) x4 [20]
- Fasten off, leaving a long tail for sewing
Hair
- Using brown yarn:
- Round 1: 7 SC in magic ring [7]
- Round 2: FLO 7 INC [14]
- Fasten off, leaving a long tail for sewing
- Cut approximately 35 pieces of brown yarn about 10cm (4 inches) long
- Attach each strand to each stitch of Round 2 and the BLO of Round 1
- Use a brush to comb out the hair for a fluffy texture
Assembly Instructions
Now let’s bring your elf to life by assembling all the pieces:
- Arms: Sew one arm to each side of the body, positioned 1 round below the collar.
- Facial Features:
- Embroider eyes with black yarn, placed 4 stitches apart in Round 10
- Use brown yarn to embroider eyebrows above each eye
- Embroider a small mouth between the eyes in Round 12
- Apply blush to the cheeks using makeup (optional)
- Ears: Sew one ear to each side of the head at Rounds 10-11, positioned about 5 stitches away from the eyes.
- Hair: Place the hair base on the head and sew securely. Trim the hair as desired to create your preferred style.
- Hat: Sew the hat to the head. You can position it straight or at a slight angle for a playful look.
- Head to Body: Attach the head to the BLO of Round 16 of the body.
- Final Touches:
- Style the hair according to your preference
- Add any additional decorations to the outfit if desired
- Adjust the hat position for the perfect elf look
Tips for Success
- Tension: Maintain consistent tension throughout your project for a professional finish.
- Stuffing: Stuff firmly but not so tightly that the stitches stretch or the stuffing shows through.
- Hair Styling: For the best results when styling the yarn hair, use a pet brush or similar fine-toothed brush.
- Color Combinations: Feel free to experiment with different color combinations for clothing to create a variety of elves.
- Embellishments: Consider adding small buttons, sequins, or embroidered details to the outfits for extra holiday charm.
Creative Variations
- Create a family of elves in different sizes by adjusting your hook size
- Make boy and girl versions with different hairstyles and outfit colors
- Add miniature accessories like tiny presents, candy canes, or tools
- Craft matching scarves or winter accessories for extra warmth and charm
- Use variegated yarn for a festive, multi-colored effect in the clothing
Display Ideas
These charming elves can be displayed in many ways:
- Perched on mantels, shelves, or windowsills
- Hanging as tree ornaments (add a loop to the hat)
- Arranged in a holiday village display
- Tucked into stockings as sweet surprises
- Given as thoughtful handmade gifts
Check this out :Crochet a Vincent van Gogh Amigurumi Doll
Conclusion
Congratulations on creating your very own Christmas Elf amigurumi! These charming holiday companions bring a touch of handcrafted magic to your festive decorations. With their cute pointed hats, rosy cheeks, and festive outfits, they’re sure to become cherished seasonal favorites.
The joy of amigurumi comes not just from the finished dolls but from the creating process itself—each stitch infused with holiday spirit and the intention to bring joy. Whether you make one special elf or a whole workshop of helpers, these little friends are sure to brighten your holiday season.
Happy crocheting, and may your holidays be merry and bright!




Leave a Reply