Table of Contents
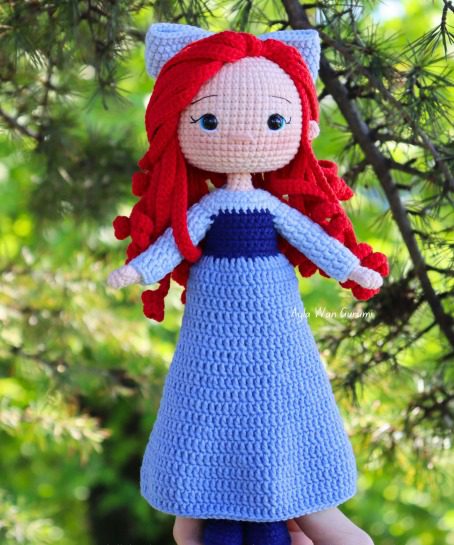
Welcome to this comprehensive guide for creating your own beautiful crochet Mermaid Princess Ariel doll. This pattern allows you to craft a stunning 24 cm (9.5 inch) amigurumi featuring Ariel’s signature red hair and two interchangeable outfit options – her classic mermaid tail and her elegant blue princess dress. Perfect for Disney enthusiasts and amigurumi lovers alike!
Mermaid Princess Ariel Doll Overview and Important Notes
This Mermaid Princess Ariel Doll pattern creates a detailed amigurumi doll with the following features:
- Finished size: 24 cm (9.5 inches) with recommended yarns
- Dual design: Create both mermaid and princess versions with one pattern
- Technique: Uses “x” shaped single crochet method for tighter, more defined stitches
- Skill level: Intermediate to advanced
Before beginning, please note:
- All rounds are worked in continuous spirals unless otherwise specified
- The “x” single crochet method creates a slightly tighter stitch for better leg definition
- The Mermaid Princess Ariel Doll pattern does not include basic crochet tutorials but provides detailed instructions
- This Mermaid Princess Ariel Doll pattern is designed for personal use only – finished items may be sold with credit to the designer
Materials and Supplies List
Yarn Requirements:
- Dark Blue – YarnArt Jeans 54 (for shoes)
- Red – YarnArt Jeans 26 (for hair)
- Blue – YarnArt Jeans 15 (for dress)
- Skin Color – YarnArt Jeans 73 (for body)
- Baby Blue – YarnArt Jeans 75 (for bow and accents)
- Green – YarnArt Jeans 69 (for tail)
- Light Green – YarnArt Jeans 11 (for fins)
Additional Materials:
- 2 mm crochet hook (Tulip hook recommended)
- Scissors and tapestry needle
- Wire for structure (for arms and legs)
- Fiberfill stuffing
- Stitch markers
- Blush for cheeks
- Pins for assembly
- 8 mm safety eyes
- Embroidery thread (black, brown, blue, and white)
- 3 cm hair clip (for bow construction)
- Two 10 mm buttons (one blue, one dark blue)
Abbreviations Used in This Pattern
- ch – chain
- sc – single crochet
- inc – increase (2 sc in same stitch)
- dec – decrease
- hdc – half double crochet
- hdc-inc – hdc increase
- hdc-dec – hdc decrease
- MR – magic ring
- FLO – front loops only
- BLO – back loops only
- bobble – bobble stitch
- slst – slip stitch
- tr – treble crochet
- dc – double crochet
- dc-dec – dc decrease
- dc-inc – dc increase
Detailed Pattern Instructions
Head Construction
Using skin color yarn:
- 6 sc in MR (6)
- 6 inc (12)
- (1 sc, 1 inc) x 6 (18)
- (2 sc, 1 inc) x 6 (24)
- (3 sc, 1 inc) x 6 (30)
- 2 sc, 1 inc, (4 sc, 1 inc) x 5, 2 sc (36)
- (5 sc, 1 inc) x 6 (42)
- 3 sc, 1 inc, (6 sc, 1 inc) x 5, 3 sc (48)
- (7 sc, 1 inc) x 6 (54)
-
- (13 rounds) 54 sc (54)
-
Important detail: Insert safety eyes between rounds 17 and 18, with 9 stitches between them.
- (7 sc, 1 dec) x 6 (48)
- 3 sc, 1 dec, (6 sc, 1 dec) x 5, 3 sc (42)
- (5 sc, 1 dec) x 6 (36)
- 2 sc, 1 dec, (4 sc, 1 dec) x 5, 2 sc (30)
- (3 sc, 1 dec) x 6 (24)
- (2 sc, 1 dec) x 6 (18)
- (1 sc, 1 dec) x 6 (12)
-
- (9 rounds) 12 sc (12)
-
Finish off and stuff as you go. Add facial features using embroidery thread:
- Use black thread for eyelash details
- Use white thread for eye highlights
- Use skin color yarn for nose details
- Create eyebrows with brown thread between rounds 14-15, making them 4 stitches wide and positioned 7 stitches apart
Push the neck portion into the head to complete assembly.
Ears (Make 2)
Using skin color yarn:
- 5 sc in MR (5)
Finish off, leaving a long tail for sewing. Attach ears between rounds 18 and 19, positioning them 7 stitches away from each eye.
Arms (Make 2)
Using skin color yarn:
- 4 sc in MR (4)
- 4 inc (8)
- 8 sc (8)
- 1 bobble, 7 sc (7)
- 1 dec, 6 sc (7)
-
- (16 rounds) 7 sc (7)
-
Finish off and weave in ends. Do not stuff the arms with fiberfill.
Legs (Make 2)
Using skin color yarn:
- 6 sc in MR (6)
- 6 inc (12)
-
- (2 rounds) 12 sc (12)
-
- 4 sc, 2 dec, 4 sc (10)
-
- (2 rounds) 10 sc (10)
-
- 1 inc, 9 sc (11)
- 11 sc (11)
- 1 inc, 10 sc (12)
- 12 sc (12)
- 11 sc, 1 inc (13)
-
- (3 rounds) 13 sc (13)
-
- 1 dec, 11 sc (12)
- 1 dec, 10 sc (11)
- 1 dec, 9 sc (10)
- 1 dec, 8 sc (9)
- 3 sc, 2 inc (these create the knee), 4 sc (11)
- 1 inc, 10 sc (12)
- 12 sc (12)
- 1 sc, 1 inc, 10 sc (13)
- 13 sc (13)
- 2 sc, 1 inc, 10 sc (14)
- 14 sc (14)
- 3 sc, 1 inc, 10 sc (15)
-
- (2 rounds) 15 sc (15)
-
For the left leg: 30. 12 sc (12) – Finish off and cut yarn
For the right leg: 30. 15 sc (15) 31. 7 sc (7) – Don’t cut yarn, continue to body construction
Complete the legs by:
- Cutting two 9-10 cm wire pieces and curving one end
- Inserting the wire into the legs with curved end downward
- Stuffing the legs using fiberfill (use thin wire to help with stuffing)
Body Construction
Continue with skin color yarn from the right leg:
- Ch 2 from right leg and join to first leg. Work 15 sc on left leg, 2 sc on chain, 15 sc on right leg, 2 sc on chain (34)
- 2 sc, 1 inc, 1 sc, 1 inc, 22 sc, 1 inc, 1 sc, 1 inc, 4 sc (38)
-
- (2 rounds) 38 sc (38)
-
- 3 sc, 1 dec, 2 sc, 1 dec, 18 sc, 1 dec, 2 sc, 1 dec, 5 sc (34)
- 34 sc (34)
- (2 sc, 1 dec) x 2, 3 sc, 1 dec, 6 sc, 1 dec, 3 sc, 1 dec, 2 sc, 1 dec, 4 sc (28)
- 28 sc (28)
- (2 sc, 1 dec) x 7 (21)
-
- (10 rounds) 21 sc (21)
-
- Add arms in this round: 5 sc, 2 sc (inner side of arm), 8 sc, 2 sc (inner side of arm), 4 sc (21)
- 5 sc, 5 sc (outer side of arm), 8 sc, 5 sc (outer side of arm), 4 sc (27)
Insert 16 cm wire into both arms for structure.
- 27 sc (27)
- 5 sc, 2 dec, 10 sc, 2 dec, 4 sc (23)
- 1 dec, (1 sc, 1 dec) x 7 (15)
- (1 sc, 1 dec) x 5 (10)
- (3 sc, 1 dec) x 2 (8)
-
- (8 rounds) 8 sc (8)
-
- 4 dec (4)
Close the loop, finish off, and hide yarn ends.
Hair Construction
Using red yarn:
- 6 sc in MR (6)
- 6 inc (12)
- (1 sc, 1 inc) x 6 (18)
- (2 sc, 1 inc) x 6 (24)
- (3 sc, 1 inc) x 6 (30)
- (4 sc, 1 inc) x 6 (36)
- Ch 55, from second loop work 54 sc, slst to next stitch on base
Crochet 36 hair strands in total. Leave a long tail for sewing and finish off. Iron the hair to create curly ends as shown in photos.
Fins (Make 2)
Using light green yarn, work in rows with ch 1 at end of each row:
- Ch 25, from second loop work 24 sc (24)
- 21 sc (21)
- Skip 1 stitch, 20 sc (20)
- 18 sc (18)
- Skip 1 stitch, 17 sc (17)
- 15 sc (15)
- Skip 1 stitch, 14 sc (14)
- 12 sc (12)
- Skip 1 stitch, 11 sc (11)
Finish off with long tail for sewing. Attach to back of tail between rounds 10-11, positioned 2-3 stitches apart.
Tail Construction
Using green yarn:
- 7 sc in MR (7)
- 7 sc (7)
- 3 sc, 1 inc, 3 sc (8)
- (3 sc, 1 inc) x 2 (10)
- 3 sc, 1 inc, 6 sc (11)
- 5 sc, 1 inc, 5 sc (12)
- 4 sc, 1 inc, 1 sc, 1 inc, 5 sc (14)
- 14 sc (14)
- 5 sc, 1 inc, 2 sc, 1 inc, 4 sc, 1 inc (17)
- 17 sc (17)
- 7 sc, 1 inc, 9 sc (18)
- 18 sc (18)
- 6 sc, 1 inc, 4 sc, 1 inc, 5 sc, 1 inc (21)
- 21 sc (21)
- 7 sc, (1 inc, 2 sc) x 2, 1 inc, 7 sc (24)
- 24 sc (24)
- 12 sc, 1 inc, 10 sc, 1 inc (26)
- 26 sc (26)
- (12 sc, 1 inc) x 2 (28)
- 28 sc (28)
- 8 sc, 1 inc, 9 sc, 1 inc, 9 sc (30)
- 30 sc (30)
- 9 sc, 1 inc, 4 sc, 1 inc, 14 sc, 1 inc (33)
- 33 sc (33)
- 9 sc, 1 inc, 6 sc, 1 inc, 15 sc, 1 inc (36)
-
- (16 rounds) 36 sc (36)
-
- 10 sc, 1 inc, 7 sc, 1 inc, 16 sc, 1 inc (39)
- 4 sc, 1 inc, 5 sc, 1 inc, 5 sc, 1 inc, 22 sc (42)
- 1 sc, 1 inc, 3 sc, 1 inc, (5 sc, 1 inc) x 2, 3 sc, 1 inc, 20 sc (47)
-
- (5 rounds) 47 sc (47)
-
- 1 sc, 1 dec, 3 sc, 1 dec, (5 sc, 1 dec) x 2, 3 sc, 1 dec, 20 sc (42)
- 10 sc, 1 dec, 1 sc (stop here – end of round 51/beginning of round 52)
- Change to light green yarn. Work in BLO: 41 slst (41)
- Work in BLO. Ch 2, 16 dc, 3 hdc, skip 1 stitch, 1 slst to next stitch, skip 1 stitch, 3 hdc, 16 dc (39)
Finish off and hide yarn tails.
Top (For Mermaid Version)
Using baby blue yarn, work in rows (ch 1 and turn at end of each row):
- Ch 15, from second loop work 14 sc (14)
-
- (3 rows) Work in BLO: 14 sc (14)
-
Leave a long tail for sewing and finishing off. Use the tail to shape the top by sewing through top and both short sides.
Mermaid Princess Ariel Doll Dress Construction
Start with baby blue yarn. Work in rows, chaining 1 at row ends:
- Ch 26, from 7th loop (skip 6 loops), 20 sc (20)
- (3 sc, 1 inc) x 5 (25)
- 3 sc, 1 inc, 4 sc, 1 inc, 7 sc, 1 inc, 4 sc, 1 inc, 3 sc (29)
- (4 sc, 1 inc) x 2, 1 sc, change to dark blue yarn, 8 sc, change to baby blue yarn, (1 inc, 4 sc) x 2 (33)
- Change to dark blue yarn. 5 sc, ch 4 and skip 6 stitches (creates arm hole), 10 sc, ch 4 and skip 6 stitches (creates second arm hole), 6 sc (29)
-
- (2 rows) 29 sc (29)
-
- 29 sc, Ch 6 and turn
- Skip 6 chains, 29 sc (29)
- 27 sc, 1 dec (28)
- Change to blue yarn. Ch 2, (1 dc, 1 dc-inc) x 14 (42), join to first stitch with slst
Now work in rounds, slst at end of each round and ch 2 at beginning: 12. – 15. (4 rounds) 42 dc (42) 16. 3 dc, 1 dc-inc, (6 dc, 1 dc-inc) x 5, 3 dc (48) 17. 48 dc (48) 18. (7 dc, 1 dc-inc) x 6 (54) 19. 54 dc (54) 20. 4 sc, 1 dc-inc, (8 sc, 1 dc-inc) x 5, 1 dc (60) 21. 60 dc (60) 22. (9 dc, 1 dc-inc) x 6 (66) 23. 66 dc (66) 24. 5 dc, 1 dc-inc, (10 dc, 1 dc-inc) x 5, 5 dc (72) 25. 72 dc (72) 26. (11 dc, 1 dc-inc) x 6 (78) 27. 78 dc (78) 28. 6 dc, 1 dc-inc, (12 dc, 1 dc-inc) x 5, 6 dc (84) 29. – 31. (3 rounds) 84 dc (84)
Finish off and hide yarn tails.
Mermaid Princess Ariel Doll Dress Sleeves
Using baby blue yarn, work in rounds:
- Ch 2 and 12 dc (12)
-
- (6 rounds) 12 dc (12)
-
- 12 sc (12)
Finish off and hide yarn tails. Repeat for second sleeve. Attach to arm holes. Add two blue buttons to the back of the dress along button holes.
Mermaid Princess Ariel Doll Bow Tie
Using baby blue yarn:
- Ch 56, join to first chain with slst, 56 hdc (56)
-
- (5 rounds) 56 hdc (56)
-
Finish off with long tail. Use this tail to shape the bow by wrapping around the middle and securing it to a hair clip.
Shoes (Make 2)
Using dark blue yarn:
- Ch 6, from second loop work 4 sc, 3 sc in one stitch, 3 sc, 1 inc (12)
- 1 inc, 3 sc, 3 inc, 3 sc, 2 inc (18)
- 1 sc, 1 inc, 4 sc, 1 inc, 2 sc, 1 inc, 4 sc, 1 inc, 2 sc, 1 inc, 3 sc (22)
- BLO: 22 sc (22)
-
- (2 rounds) 22 sc (22)
-
- 4 sc, 5 hdc-dec, 8 sc (17)
- 5 sc, 2 dec, 8 sc (15)
Finish off and hide yarn ends.
Shoe Soles (Make 2)
Using dark blue yarn, follow the same pattern as shoes steps 1-3, then finish off but don’t cut yarn. Attach sole to bottom of shoe with 22 slip stitches
Check this out : Crochet Easter Bunny Washcloth Pattern
Final Assembly Instructions
For Princess Version:
- Put shoes on doll’s body
- Dress the doll in the blue dress
- Place bow tie on doll’s hair
- Insert neck part into head
For Mermaid Version:
- Put top on doll’s body and tie at back
- Add tail to body
- Insert neck part into head
The design allows the head to remain detachable so you can easily switch between the princess and mermaid versions.

Finishing Touches and Display Tips
- Secure all parts firmly with invisible stitches
- Position the hair strands naturally around the face for best appearance
- For the mermaid version, ensure fins are properly angled on the tail
- The doll stands approximately 24 cm (9.5 inches) tall in princess form
- Display your finished doll in a shadow box or on a shelf with other Disney-inspired creations
Remember, this pattern is meant for personal use. You may sell finished dolls made from this pattern, but please credit the original designer in your listing.
Happy crocheting! Your Ariel doll will be a beautiful addition to any Disney collection or a wonderful gift for a Disney lover.


Leave a Reply