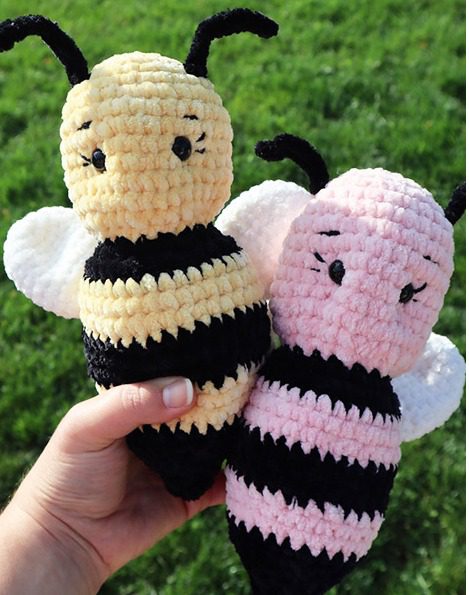
Creating a crocheted bumble bee is a delightful project that produces an adorable result. Whether you’re looking to make a sweet toy for a child, an endearing gift, or a charming decoration for your home, learning how to crochet a bee opens up a world of crafting possibilities. This comprehensive guide will walk you through each stage of creating your own cuddly bee, from gathering materials to adding those final touches that bring your creation to life.
Materials You Need to Crochet a Bee
Before diving into your bee-making adventure, gather these essential supplies:
Yarn Selections
- Yellow Yarn: For the bee’s main body and head. Two skeins of soft yellow yarn work perfectly, though you might substitute with pink for a unique twist. A bulky weight (size 5) yarn creates the perfect plush texture.
- Black Yarn: For the iconic stripes that make a bee recognizable. One skein of black yarn in the same weight as your yellow yarn ensures consistent texture.
- White Yarn: For creating delicate wings. White velvet yarn creates beautiful, soft wings that complement the bee’s body.
Essential Tools
- Crochet Hook: A 5.50 mm hook works well with bulky yarn, but adjust according to your yarn selection and personal tension preferences.
- Yarn Needle: Used for assembly and weaving in ends.
- Stitch Markers: Helpful for keeping track of your rounds, especially when working in spiral patterns.
- Stuffing: Polyester fiberfill or toy stuffing to give your bee its plump, huggable shape.
- Safety Eyes: 6 mm safety eyes add character, though you can also embroider eyes if preferred.
- Black Pipe Cleaners: For creating bee antennae.
Understanding the Crochet Techniques for Your Bee
Before starting, familiarize yourself with these essential amigurumi techniques:
Magic Ring or Alternative Starting Method
The magic ring creates a tight center for circular pieces like the bee’s head and wings. However, when working with bulky yarn, an alternative method using chain stitches may be easier:
- Create a slip knot
- Chain two stitches
- Work your first round of single crochet stitches into the first chain
This alternative produces similar results to the magic ring but can be less finicky with thicker yarns.
Single Crochet Increases
Increases expand your work in a controlled manner, essential for creating the rounded shapes of the bee’s head and body:
Make two single crochet stitches into the same stitch from the previous round. This adds one stitch and gradually widens your work.
Decreases for Shaping
Decreases help create the tapered shapes needed for your bee:
The invisible decrease is preferred for amigurumi work as it creates a smoother finish. To execute this technique:
- Insert your hook into the front loop of the next stitch
- Without completing the stitch, insert your hook into the front loop of the following stitch
- Yarn over and pull through both front loops (three loops on hook)
- Yarn over and pull through all three loops
This method reduces the number of stitches while maintaining a neat appearance.
Step by Step Guide to Crochet a Bee
Creating the Head
- Using your yellow yarn, chain 2 stitches.
- Work 8 single crochet stitches into the second chain from the hook.
- Join with a slip stitch to the first stitch made.
- Chain 1, then make a single crochet increase in each stitch around (16 stitches).
- Chain 1, single crochet in each stitch around, joining with a slip stitch.
- Chain 1, work (increase, single crochet) pattern around, joining with a slip stitch.
- Chain 1, single crochet in each stitch around, joining with a slip stitch.
- Chain 1, work (increase, 2 single crochet) pattern around, joining with a slip stitch.
- For rounds 7-12, chain 1 and single crochet in each stitch around, joining each round with a slip stitch.
- Chain 1, work (decrease, 2 single crochet) pattern around, joining with a slip stitch.
- Chain 1, work (decrease, single crochet) pattern around, joining with a slip stitch.
At this point, change to black yarn and insert safety eyes if you’re using them. Add stuffing to the head before continuing.
Forming the Body
- With black yarn, chain 1 and single crochet in each stitch around.
- Chain 1, work (increase, single crochet) pattern around, joining with a slip stitch.
- Chain 1, work (increase, 2 single crochet) pattern around, joining with a slip stitch.
- Change back to yellow yarn.
- For rounds 18-20, chain 1 and single crochet in each stitch around, joining with a slip stitch.
- Change to black yarn.
- For rounds 21-23, chain 1 and single crochet in each stitch around, joining with a slip stitch.
- Add stuffing to the body.
- Change back to yellow yarn.
- Chain 1, work (decrease, 2 single crochet) pattern around, joining with a slip stitch.
- For rounds 25-26, chain 1 and single crochet in each stitch around.
- Change to black yarn.
- Chain 1, single crochet in each stitch around, joining with a slip stitch.
- Chain 1, work (decrease, single crochet) pattern around, joining with a slip stitch.
- Chain 1, single crochet in each stitch around, joining with a slip stitch.
- Add final stuffing to the bee’s body.
- Chain 1, decrease around, joining with a slip stitch.
- For rounds 31-32, chain 1 and single crochet in each stitch around, joining with a slip stitch.
- Chain 1, decrease around. Leave a long tail of yarn, weave in the ends, and pull tight to finish off.
Creating the Wings
Make two identical wings using white yarn:
- Start with a magic ring (or chain 2 alternative).
- Chain 1 and work 6 single crochet stitches into the ring/chain.
- Pull the magic circle tight and join with a slip stitch to the first chain.
- Chain 1, increase in each stitch around, joining with a slip stitch.
- Chain 1, single crochet in each stitch around, joining with a slip stitch.
- Chain 1, work (increase, single crochet) pattern around, joining with a slip stitch.
- For rounds 5-9, chain 1 and single crochet in each stitch around, joining with a slip stitch.
- Chain 1, work (decrease, single crochet) pattern around, joining with a slip stitch.
- For rounds 11-12, chain 1 and single crochet in each stitch around, joining with a slip stitch.
- Chain 1, decrease around, finish off, and leave a long tail for sewing.
Crafting the Antennae
- Cut a black pipe cleaner in half.
- Fold the ends to eliminate sharp points.
- Using black yarn, make single crochet stitches around each pipe cleaner.
- Leave some pipe cleaner exposed at the bottom for insertion into the bee’s head.
- Leave long yarn tails for secure attachment.
Assembling Your Crocheted Bee
Now comes the rewarding part—bringing all the elements together to form your bee:
Attaching the Wings
- Thread the long tail of yarn from each wing through a yarn needle.
- Position the wings on the back of the bee body, ensuring they’re symmetrically placed.
- Securely sew each wing in place using the attached yarn.
- Tie off with a knot inside the body and weave in the ends to hide them.
Securing the Antennae
- Insert the exposed pipe cleaner ends into the top of the bee’s head.
- Use the yarn tails from the antennae to sew them securely in place.
- Ensure they’re positioned symmetrically on either side of the head.
Adding Facial Features
- Use black embroidery floss to create a smile or any desired facial expression.
- If you didn’t use safety eyes, embroider eyes using black floss.
- Optionally, use a piece of yellow yarn to create a subtle nose by pulling the face fabric slightly together under the eyes, then secure and hide the ends.
Expert Tips for Crocheting the Perfect Bee
Selecting the Ideal Yarn
The yarn you choose significantly impacts your bee’s appearance and feel:
- Velvet Yarn: Creates an exceptionally soft, huggable bee with a luxurious texture. Ideal for toys that will be handled frequently.
- Standard Acrylic Yarn: Offers excellent durability and color retention. A good medium-weight (size 4) acrylic works well if velvet isn’t available.
- Color Considerations: While traditional yellow and black create a classic bee, don’t hesitate to experiment with colors like pink for a whimsical variation.
Remember that different yarn weights will affect your bee’s final size. Bulky yarn (size 5) creates a larger bee, while worsted weight (size 4) produces a smaller one.
Mastering Tension for Amigurumi
Amigurumi projects like this bee benefit from tight, consistent tension:
- Work your stitches slightly tighter than you would for typical crochet projects to prevent stuffing from showing through.
- If you naturally crochet loosely, consider using a hook one or two sizes smaller than recommended for your yarn.
- Maintain even tension throughout the project for a professional finish.
Color Change Techniques
Smooth color transitions create a polished look:
- When changing colors, complete the last stitch of the previous color until two loops remain on your hook.
- Yarn over with the new color to complete the stitch.
- Secure the color change with a knot on the inside of your work.
- Weave in ends as you go or hide them inside the stuffed body.
Safety Considerations
If making the bee for young children:
- Embroider features rather than using safety eyes or small attachable parts.
- Ensure all pipe cleaners are completely covered or use alternative materials for antennae.
- Check that all yarn ends are securely woven in and any knots are firmly tied.
Customizing Your Crocheted Bee
Once you’ve mastered the basic pattern, consider these creative variations:
Size Adjustments
- Mini Bee: Use a thinner yarn (sport or DK weight) and smaller hook (3.5-4.0mm) while following the same pattern.
- Jumbo Bee: Double-strand your yarn or use super bulky yarn with a larger hook (7.0-8.0mm).
Decorative Add-ons
- Flower Crown: Create a small garland of crocheted flowers to adorn your bee’s head.
- Honey Pot Accessory: Crochet a small honey pot for your bee to hold.
- Tiny Crochet Heart: Add a small heart to the bee’s hands for a loving touch.
Texture Variations
- Fuzzy Bee: Use mohair or eyelash yarn for parts of the bee to create a fuzzy texture.
- Textured Stripes: Work the black sections in a textured stitch like moss stitch for added dimension.
Common Challenges When Crocheting a Bee
Maintaining Shape
If your bee seems misshapen:
- Ensure you’re tracking rounds correctly with stitch markers.
- Count stitches at the end of each round to verify you haven’t accidentally added or dropped any.
- Stuff firmly but not so tightly that the stitches stretch apart.
Dealing with Velvet Yarn
Velvet yarn can be challenging to work with because:
- Stitches can be difficult to see. Use good lighting and consider using stitch markers more frequently.
- The yarn may slide on your hook. Choose a hook with a deeper throat to help grip the yarn.
- Frogging (undoing stitches) can be challenging. Work slowly and carefully to minimize mistakes.
Attaching Parts Securely
For parts that stay firmly in place:
- Use the same color yarn as the part being attached for invisible seams.
- Sew with small, close stitches in a consistent pattern.
- For antennae, ensure the pipe cleaner base is inserted deeply enough into the head for stability.
Displaying Your Finished Bee
Your beautifully crocheted bee deserves to be showcased:
- As a Shelf Decoration: Position your bee among books or plants for a whimsical touch.
- In a Child’s Room: Place on a dresser or attach a hanging loop to create a mobile element.
- As Part of a Garden Theme: Combine with other crocheted flowers or insects for a handmade garden scene.
- Gift Presentation: Package in a decorative box with tissue paper for a thoughtful handmade gift.
Why Crocheting Bees Has Become So Popular
The rise in popularity of crocheted bees connects to several current trends:
- Environmental Awareness: Bees play a crucial role in our ecosystem, and handmade bee items celebrate these important pollinators.
- Cottagecore Aesthetic: The wholesome, nature-inspired cottagecore trend embraces handcrafted items like amigurumi bees.
- Stress Relief: The repetitive nature of crochet provides meditative benefits, making bee-making a soothing hobby.
- Personalized Gifting: Handmade items carry special significance in our mass-produced world.
Conclusion
Learning how to crochet a bee creates more than just a cute stuffed toy—it develops valuable crafting skills while producing a charming creation that brings joy. The combination of basic stitches and simple construction makes this an accessible project even for those relatively new to crochet.
Whether you stick with traditional yellow and black or experiment with unconventional colors like pink, your handcrafted bee will showcase your creativity and attention to detail. The most important aspect is enjoying the process and feeling proud of your finished creation.
As you become more comfortable with the pattern, you might find yourself creating an entire buzzing hive of bees, each with its own personality and style. Happy crocheting, and may your handmade bee bring a smile to everyone who sees it!




Leave a Reply