Table of Contents
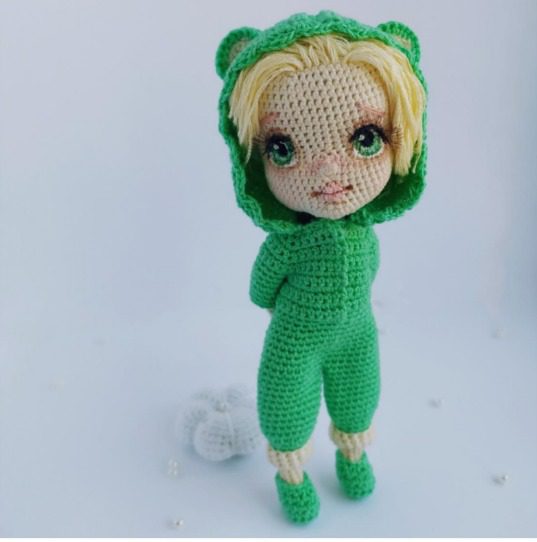
Creating Pajama Sets handmade clothing for dolls allows you to personalize your collection and develop valuable crafting skills. Crocheted pajama sets are particularly charming, offering a cozy appearance that brings dolls to life. This comprehensive guide will walk you through creating a complete bedtime-themed outfit for 15cm dolls, including a hooded pajama, booties, and a decorative pillow.
Essential Materials for You Pajama Sets
Before beginning this crochet project, gather all necessary supplies:
- Cotton yarn: Any 100% cotton yarn works well. We recommend lightweight options like Sofia (50g/283m) for delicate, detailed work
- Crochet hook: Select a size that matches your yarn weight (a 0.8mm hook works with the recommended yarn)
- Fine needle: For sewing components together
- Thread: For securing elements
- Small closure: Button, snap fastener, or Velcro piece
- Scissors: For trimming excess yarn
- Stuffing: For the pillow accessory
Pajama Sets Understanding Crochet Terminology
Familiarize yourself with these common crochet terms used throughout the pattern:
- Single crochet (sc): Basic stitch forming the majority of this project
- Slip stitch (ss): Used to join rounds or move position without adding height
- Increase (inc): Working two single crochets into one stitch
- Decrease (dec): Working two stitches together to reduce count
- Chain (ch): Creates foundation row and turning chains
- Turning chain (tc): Chain stitch(es) at beginning of rows for proper height
Creating the Hooded Pajama Sets Onesie
The pajama is worked from top to bottom in one piece, creating a seamless and comfortable garment.
Starting the Neckline and Shoulders
- With green yarn, chain 26 stitches, work 1 turning chain
- Row 1: 5 sc, 3 sc in one stitch, 3 sc, 3 sc in one stitch, 6 sc, 3 sc in one stitch, 3 sc, 3 sc in one stitch, 5 sc (34 total)
- Row 2: Work 34 sc across
- Row 3: 6 sc, 3 sc in one stitch, 5 sc, 3 sc in one stitch, 8 sc, 3 sc in one stitch, 5 sc, 3 sc in one stitch, 6 sc (42 total)
- Row 4: Work 42 sc across
- Row 5: 7 sc, 3 sc in one stitch, 7 sc, 3 sc in one stitch, 10 sc, 3 sc in one stitch, 7 sc, 3 sc in one stitch, 7 sc (50 total)
- Row 6: Work 50 sc across
Pajama Sets Creating Armholes
- Row 7: 9 sc, 3 chain stitches (skip 9 stitches from previous row), 14 sc, 3 chain stitches (skip 9 stitches from previous row), 9 sc (38 total)
- Row 8: 9 sc, 3 sc along the chain, 14 sc, 3 sc along the chain, 9 sc (38 total)
- Rows 9-13: Work 38 sc across each row
Pajama Sets Forming the Body
- Row 14: Join into a round (not at the last stitch, but at the fourth stitch); work 35 sc, joining the edges with 3 sc (35 total)
- Row 15: Work 35 sc around
- Row 16: 4 sc, inc, 8 sc, inc, 7 sc, inc, 8 sc, inc, 4 sc (39 total)
- Rows 17-19: Work 39 sc across each row
- Row 20: 4 sc, inc, (9 sc, inc) three times, 4 sc (43 total)
- Row 21: 21 sc, inc, 21 sc (44 total)
- Rows 22-23: Work 44 sc across each row
Pajama Sets Creating the Legs
For the first leg:
- Skip 22 stitches and work the next 22 stitches, joining to form a circle
- Work 8 rounds of 22 sc
- Round 9: (1 sc, dec) seven times, 1 sc (15 total)
- Rounds 10-11: Work 15 sc around
- Switch to white yarn
- Rounds 12-16: Work 15 sc around
- Cut yarn and secure. Create a folded cuff at the bottom.
For the second leg:
- Attach yarn to the remaining 22 stitches from the body and form a circle
- Work 9 rounds of 22 sc
- Round 10: (1 sc, dec) seven times, 1 sc (15 total)
- Rounds 11-12: Work 15 sc around
- Switch to white yarn
- Rounds 13-17: Work 15 sc around
- Cut yarn and secure. Create a folded cuff at the bottom.
Pajama Sets Adding Sleeves
For each sleeve:
- Join 12 sc around the armhole opening
- Work 7 rounds of 12 sc
- Cut yarn and secure
Crafting the Hood
- Starting at the fourth stitch of the neckline edge, work 20 increases into the edge, skipping the last 3 stitches of the neckline (40 total)
- Work 24 rows of 40 sc back and forth
- Row 25: 18 sc, 2 dec, 18 sc (38 total)
- Row 26: 17 sc, 2 dec, 17 sc (36 total)
- Row 27: 16 sc, 2 dec, 16 sc (34 total)
- Row 28: 15 sc, 2 dec, 15 sc (32 total)
- Row 29: 14 sc, 2 dec, 14 sc (30 total)
- Row 30: 13 sc, 2 dec, 13 sc (28 total)
- Row 31: 12 sc, 2 dec, 12 sc (26 total)
- Row 32: 11 sc, 2 dec, 11 sc (24 total)
- Row 33: 10 sc, 2 dec, 10 sc (22 total)
- Row 34: 9 sc, 2 dec, 9 sc (20 total)
- Fold the hood and join the top with slip stitches
Hood Trim Edging
To create a decorative edge around the face opening:
- Insert hook at the corner stitch of the hood opening
- Chain 3, work 1 double crochet into the same stitch
- Skip one stitch, work 1 sc into the next stitch
- Repeat pattern: chain 3, double crochet in same stitch, skip one stitch, sc in next
- Continue around the entire hood opening
Creating Cute Animal Ears
White Inner Ears (Make 2)
- Round 1: 4 sc in magic ring (4 total)
- Round 2: Inc in each stitch (8 total)
- Round 3: (1 sc, inc) four times (12 total)
Green Outer Ears (Make 2)
- Round 1: 4 sc in magic ring (4 total)
- Round 2: Inc in each stitch (8 total)
- Round 3: (1 sc, inc) four times (12 total)
- Round 4: (2 sc, inc) four times (16 total)
Assembling Ears
- Place white piece inside green piece
- Join together by working sc around the top edge
- Sew ears to the hood
Making Cozy Booties
The pattern creates a right and left bootie for a perfect fit.
Left Bootie
- Chain 6
- Row 1: Starting with second chain from hook, work 4 sc, 3 sc in one stitch, 4 sc on the opposite side of chain, inc (13 total)
- Row 2: Inc, 3 sc, 3 inc, 5 sc, slip stitch (17 total)
- Row 3: Working in back loops only, 17 sc
- Row 4: 17 sc
- Row 5: 5 sc, 4 dec, 4 sc (13 total)
- Row 6: 4 sc, (dec, 1 sc) twice, 3 sc (11 total)
- Cut yarn and secure
Right Bootie
- Chain 6
- Row 1: Starting with second chain from hook, work 4 sc, 3 sc in one stitch, 4 sc on the opposite side of chain, inc (13 total)
- Row 2: Inc, 3 sc, 3 inc, 5 sc, slip stitch (17 total)
- Row 3: Working in back loops only, 17 sc
- Row 4: 17 sc
- Row 5: 4 sc, 4 dec, 5 sc (13 total)
- Row 6: 3 sc, (dec, 1 sc) twice, 4 sc (11 total)
- Cut yarn and secure
Creating the Decorative Pillow
This small accessory enhances the bedtime theme.
- Make two identical white circles:
- Round 1: 6 sc in magic ring
- Round 2: Inc in all stitches (12 total)
- Round 3: (1 sc, inc) six times (18 total)
- Work 2 sc shift
- Round 4: (2 sc, inc) six times (24 total)
- Work 2 sc shift
- Round 5: (3 sc, inc) six times (30 total)
- Work 2 sc shift
- Round 6: (4 sc, inc) six times (36 total)
- Work 2 sc shift
- Round 7: (5 sc, inc) six times (42 total)
- Work 2 sc shift
- Round 8: (6 sc, inc) six times (48 total)
- Work 2 sc shift
- Round 9: (7 sc, inc) six times (54 total)
- Join the two circles:
- Place circles together
- Join with sc stitches around the edge
- Stuff with filling before closing completely
- Creating quilted effect:
- Using long tail, insert needle as shown in diagrams
- Pass through center from one side to other
- Reinsert from back and pull through same opening
- Gently tighten thread
- Repeat process six times total
- Sew a small bead to center for decoration
Check this out :Crocheting Granny Grace Doll
Final Assembly and Finishing Touches
- Attach the ears to the hood securely
- Sew a button or snap fastener to the pajama neck
- Insert doll into pajama
- Add booties to feet
- Place pillow next to doll for a complete bedtime scene
With patience and attention to detail, you’ll create an adorable sleepwear set that transforms your doll into a cuddly bedtime companion. This project combines essential crochet techniques with creative design elements, making it both educational and rewarding for crafters of all skill levels.


Leave a Reply