Table of Contents
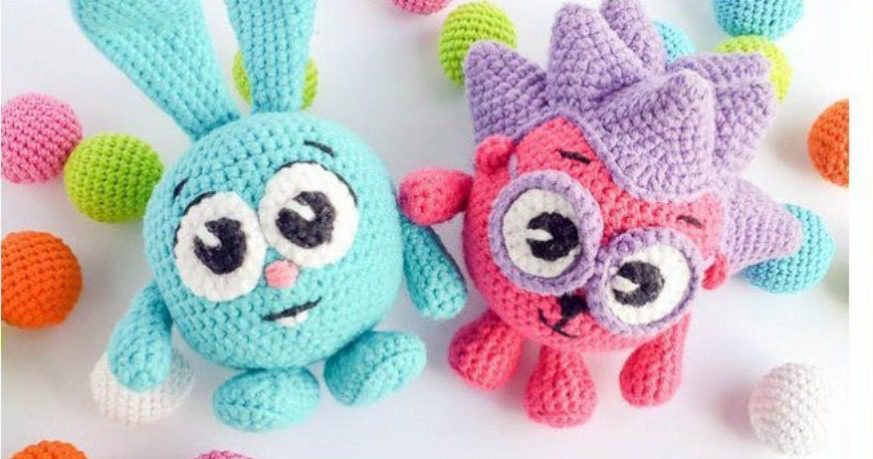
Creating adorable amigurumi toys brings joy to both crafters and recipients. This comprehensive guide will walk you through the steps to create charming Smeshariki-inspired characters – a blue bunny named Krosh and a pink star character. These colorful, expressive toys are perfect for gifting to children or adding to your amigurumi collection.
Krosh Materials Needed
- Size 2 crochet hook
- Scissors
- Marker for stitch counting
- Polyester stuffing
- YarnArt Jeans yarn in:
- Blue (for Krosh’s body)
- Black (for eyes and embroidery)
- White (for eye whites)
- Pink (for nose and star body)
- Purple (for star crown)
Abbreviations
- СБН – Single crochet (sc)
- ПР – Increase (inc): 2 single crochets in one stitch
- УБ – Decrease (dec): crocheting 2 stitches together
- СС – Slip stitch
- В.П. – Chain stitch (ch)
- КА – Magic ring
Creating Krosh (Blue Bunny)
Krosh Body
Use blue yarn:
- 6 sc in magic ring (6)
- 6 increases (12)
- (sc, inc) x6 (18)
- (2 sc, inc) x6 (24)
- (3 sc, inc) x6 (30)
- (4 sc, inc) x6 (36)
- (5 sc, inc) x6 (42)
- (6 sc, inc) x6 (48)
- (7 sc, inc) x6 (54) 10-19. 54 sc for 10 rounds
- (7 sc, dec) x6 (48)
- (6 sc, dec) x6 (42)
- (5 sc, dec) x6 (36)
- (4 sc, dec) x6 (30)
Stuff the body firmly.
- (3 sc, dec) x6 (24)
- (2 sc, dec) x6 (18)
- (sc, dec) x6 (12)
- 6 decreases (6)
Fasten off, cut the yarn and weave in the end.
Ears (Make 2)
- 6 sc in magic ring (6)
- 6 increases (12)
- (3 sc, inc) x3 (15)
- (4 sc, inc) x3 (18) 5-9. 18 sc for 5 rounds
- (7 sc, dec) x2 (16)
- 16 sc
- (6 sc, dec) x2 (14)
- 14 sc
- (5 sc, dec) x2 (12)
- 12 sc
- (4 sc, dec) x2 (10)
- 10 sc
- (3 sc, dec) x2 (8)
- 8 sc
Crochet the sides together to close the bottom of the ear. Cut the yarn, leaving enough length for sewing to the head.
Arms (Make 2)
- 6 sc in magic ring (6)
- 6 increases (12) 3-4. 12 sc for 2 rounds
- (2 sc, dec) x3 (9) 6-10. 9 sc for 5 rounds
- (sc, dec) x3 (6)
Fasten off, cut the yarn and weave in the end.
Feet (Make 2)
- Chain 6. Starting in the second chain from hook: 1 sc, then 3 sc, 5 sc in last stitch. Turn your work, 3 sc, 4 sc in first stitch (16)
- Inc, 3 sc, 5 inc, 3 sc, 4 inc (26)
- You can slip stitch or not as preferred, then work 26 sc in back loops only
- 26 sc through both loops (26)
- 5 sc, 5 dec (in the toe area), 11 sc (21)
- 4 sc, 3 dec (continuing decreases from previous row), 11 sc (18)
- 9 dec (9)
Fasten off, leaving enough yarn for sewing.
Eye Components
Black Eye Centers
- 9 sc in magic ring (9) Fasten off, leaving enough yarn for sewing.
White Eye Backgrounds
- 6 sc in magic ring (6)
- 6 increases (12)
- (sc, inc) x6 (18) Fasten off, leaving enough yarn for sewing.
Krosh Assembly
- Sew the ears to the top of the head.
- Attach the arms using yarn joinings or sew them as preferred.
- Attach the feet (they will not be movable).
- Create and attach the eye components:
- Sew the white eye backgrounds to the face
- Attach the black eye centers
- Add contrast with black embroidery for eyelashes and eye highlights
- Embroider the nose, mouth, and teeth using appropriate colors.
Finishing Touches
Complete your amigurumi by adding any final embroidery details like the nose and facial features. Ensure all pieces are securely attached and stuffing is evenly distributed.
Creating the Star Character
Follow the same basic techniques, using pink yarn for the body and purple for the crown points. Adjust the basic body pattern by adding pointed projections for the star shape. Reference the photo for proper color placement and facial expression.
Tips for Best Results
- Keep tension consistent throughout for a professional finish
- Stuff firmly but not overly tight to maintain shape
- Use safety eyes or embroider eyes securely for child-safe toys
- Add personality with simple embroidered details
- Consider using stitch markers to keep track of round beginnings
Check this out :Crochet an Adorable Giraffe Baby Rattle
Conclusion
The art of amigurumi crochet offers endless possibilities for creating charming characters that capture hearts with their expressive features and playful designs. By following the detailed patterns provided in this guide, you’ve learned how to create adorable toys that showcase both your crafting skills and creativity.
These Smeshariki-inspired characters—the blue bunny Krosh and the pink star—represent more than just toys; they’re handmade treasures that carry the personal touch of their creator. The step-by-step instructions ensure that even those new to amigurumi can successfully complete these projects while developing valuable crochet techniques.
Remember that each amigurumi you create can be customized with unique color combinations, facial expressions, and additional details that reflect your personal style. Don’t be afraid to experiment with different yarns, embellishments, or minor pattern modifications to make each character truly your own.
Whether you’re creating these characters for children, collectors, or as decorative items, the joy of watching these adorable figures take shape stitch by stitch makes amigurumi one of the most rewarding forms of crochet. With practice, patience, and the foundation provided by these patterns, you’re well-equipped to explore the delightful world of amigurumi character creation.


Leave a Reply