Table of Contents
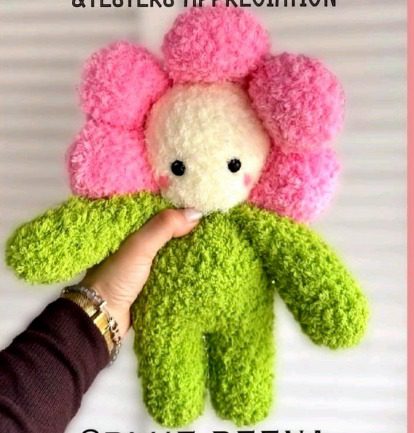
Creating a handmade daisy plush doll brings joy to both crafters and recipients alike. This whimsical flower character, with its bright petals and charming face, makes a perfect gift or delightful addition to any collection. The pattern combines simple crochet techniques with a fluffy yarn texture to create a uniquely huggable toy that appeals to crafters of all skill levels.
Understanding the Daisy Doll Pattern
This pattern, designed by @blue.beena, creates a cute humanoid flower character with a distinctive daisy head, complete with vibrant petals and a sweet face. The pattern works in continuous rounds (no joining required) and uses fuzzy yarn for a soft, plush texture that enhances the visual appeal of the finished doll.
Daisy Materials Needed
For this project, you’ll need:
- Fuzzy/faux yarn in three colors:
- Color 1: Pink (for petals)
- Color 2: Yellow (for head/face)
- Color 3: Green (for body/arms)
- Crochet hook appropriate for your yarn (the designer used 6mm)
- Safety eyes (8mm recommended, though 16-20mm would also work)
- Yarn needle for assembly
- Polyester filling for stuffing
The designer recommends thick fuzzy yarn for the best appearance, but you’re free to use any yarn you prefer, understanding this may alter the finished look of your plushie.
Crochet Abbreviations
The pattern uses standard crochet terminology:
- MR: Magic ring
- SC: Single crochet
- Inc: Increase (2 stitches in one stitch)
- Dec: Decrease (2 stitches worked together)
- St: Stitch
- F.O: Fasten off
- Slst: Slip stitch
- R: Round
- Rnds: Rounds
Creating the Flower Components
Petals (Make 5 in Color 1)
- R1: 7 sc in magic ring
- R2: Increase around (14 stitches)
- R3: (sc, inc) ×7 (21 stitches)
- R4-6: sc around (21 stitches) for 3 rounds
- R7: (sc, dec) ×7 (14 stitches)
- R8: sc around (14 stitches)
Lightly stuff each petal (or stuff firmly if you want the petals to remain upright), then fold and make 7 slip stitches across both sides to close.
Daisy Head (In Color 2)
- R1: 7 sc in magic ring
- R2: Increase around (14 stitches)
- R3: (sc, inc) ×7 (21 stitches)
- R4: (2sc, inc) ×7 (28 stitches)
- R5: (3sc, inc) ×7 (35 stitches)
- R6: (4sc, inc) ×6, 4slst, inc (42 stitches)
Add safety eyes between rounds 3/4 (placement may vary depending on eye size) opposite to each other
- R7: Attach petals as follows – attach petal 1 with 7 slip stitches, attach petal 2 with 7 slip stitches, repeat for petals 3, 4, and 5. Chain 7 and skip 6 stitches from the head, slip stitch into the next stitch.
- R8: sc around (42 stitches)
- R9: (4sc, dec) ×7 (35 stitches)
- R10: (3sc, dec) ×7 (28 stitches)
Add stuffing.
- R11: (2sc, dec) ×7 (21 stitches)
- R12: (sc, dec) ×7 (14 stitches)
- R13: decrease around (7 stitches) – Note: You can skip this round and close after the previous one if preferred
Daisy Arms (Make 2 in Color 3)
- R1: 6 sc in magic ring
- R2: Increase around (12 stitches)
- R3-7: sc around (12 stitches) for 5 rounds
- R8: (4sc, dec) ×2 (10 stitches)
- R9-12: sc around (10 stitches) for 4 rounds
Add stuffing, fold both sides and make 5 slip stitches across. Fasten off, leaving a long tail for sewing.
Legs/Body (In Color 3)
- R1: 7 sc in magic ring
- R2: Increase around (14 stitches)
- R3-10: sc around (14 stitches) for 8 rounds
Fasten off for the first leg. For the second leg, do not fasten off, but instead continue to create the body:
- R11: 14sc, sc in the chain, 14sc, sc in the chain (30 stitches)
- R12: (4sc, inc) ×6 (36 stitches)
Stuff legs.
- R13-16: sc around (36 stitches) for 4 rounds
- R17: (7sc, dec) ×4 (32 stitches)
- R18: (6sc, dec) ×4 (28 stitches)
- R19: sc around (28 stitches)
Add more stuffing.
- R20: (2sc, dec) ×7 (21 stitches)
- R21: (sc, dec) ×7 (14 stitches)
Add final stuffing, slip stitch, fasten off, and leave a long tail to attach the head.
Daisy Assembly
- Attach the head to the body using the tail you left on the body. The stitches of the last rows of both parts match each other, making it easy to connect them.
- Sew the arms between the body and the head on each side of the plushie, positioning them under the petals.
- Optional: Embroider some blush on the cheeks to make your plushie even cuter.
Customization Options
As seen in the pattern’s photos, there are numerous ways to customize your daisy doll:
- Try different color combinations for the petals, body, and head
- Experiment with various fuzzy yarns for different textures
- Add accessories like small bows or embroidered details
- Create daisy dolls in different sizes by changing your yarn and hook size
Care Instructions
Because of the fuzzy yarn texture, it’s recommended to hand wash your finished plushie if necessary. Avoid machine washing as it could damage the delicate features and cause the stuffing to shift.
Check this out :Crochet a Stunning Van Gogh Inspired Sunflower Arrangement
Conclusion
The completed daisy doll measures approximately 6-8 inches tall, depending on your yarn and tension. This adorable flower character makes a delightful handmade gift that brings smiles to people of all ages. The versatile pattern allows for personal creativity while creating a consistently charming result.
Remember, while you can sell plushies made from this pattern, the pattern itself is copyright protected and cannot be sold, distributed, or modified. If you share your creations on social media, please tag the designer (@blue.beena) so they can see and share your wonderful work!
Happy crocheting, and enjoy your new flower friend!


Leave a Reply