Table of Contents
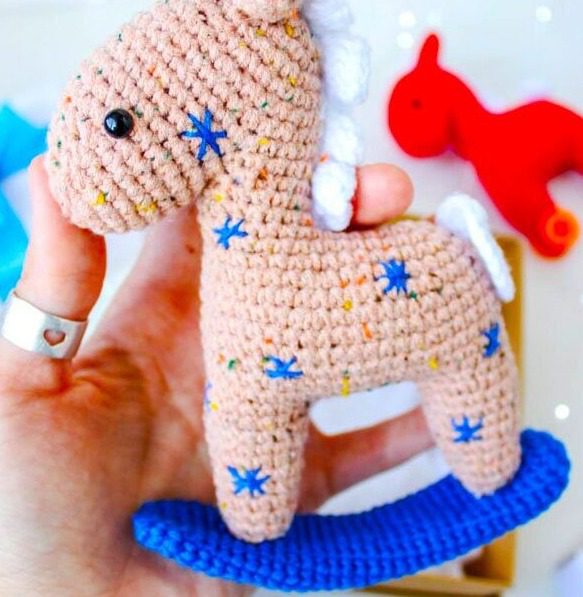
Amigurumi, the Rocking Horse Japanese art of creating adorable stuffed toys through crochet, allows crafters to bring charming characters to life with just yarn and a hook. This comprehensive guide will walk you through creating a delightful rocking horse amigurumi that combines classic toy charm with modern crochet techniques. Perfect for nursery decorations, children’s gifts, or your own handmade collection, this rocking horse design features a sweet expression and functional rocking base.
Whether you’re a seasoned crocheter looking for your next project or relatively new to amigurumi, this pattern provides clear instructions for creating a finished piece approximately 20cm tall. The techniques used create a sturdy, huggable toy that will delight recipients of all ages while showcasing your crochet skills. Let’s begin crafting this nostalgic toy with a modern amigurumi twist!
Rocking Horse Essential Materials
Before beginning your rocking horse amigurumi project, gather these supplies:
- Worsted weight yarn in your chosen colors (main color for horse body, contrasting color for mane and tail)
- Appropriate size crochet hook (typically 3.5mm-4mm)
- Stuffing material (polyester fiberfill recommended)
- Yarn needle for assembly
- Scissors for trimming yarn
- Safety eyes (size 8-12mm recommended)
- Small pieces of felt for accents (optional)
- Embroidery thread for facial details (optional)
- Paint for rocking base details (optional)
- 4 small buttons for attaching rocking base (optional)
Understanding Rocking Horse Terminology
For a smooth crafting experience, familiarize yourself with these techniques used throughout the pattern:
- Magic Ring: A technique to begin crocheting in the round without leaving a hole
- Single Crochet: The basic stitch used throughout most of this pattern
- Increase: Working two single crochets in one stitch to expand the piece
- Decrease: Invisibly combining two stitches into one to reduce the circumference
- Chain: Creating a foundation of linked stitches
- Double Crochet: A taller stitch used for mane and tail details
- Triple/Treble Crochet: An even taller stitch occasionally used for texture
- Front/Back Loops Only: Working through only one loop of each stitch for texture
- Slip Stitch: Used to join rounds or move positions
Creating the Horse Head
The expressive head forms the foundation of your rocking horse’s personality:
Round 1: Create a magic ring and work 6 single crochets into it (6 stitches total) Round 2: Work an increase in each stitch around (12 stitches total) Round 3: Work “1 single crochet, increase” repeated 6 times (18 stitches total) Round 4: Work “2 single crochets, increase” repeated 6 times (24 stitches total) Round 5: Work 24 single crochets around (24 stitches total) Round 6: Work “increase, 3 single crochets” repeated 6 times (30 stitches total) Rounds 7-9: Work 30 single crochets for three complete rounds (30 stitches in each round) Round 10: Work 20 single crochets, then chain 4 (leaving 10 stitches unworked for the muzzle opening) Round 11: Work 24 single crochets (20 stitches around the head plus 4 stitches along the chain) (24 stitches total) Rounds 12-14: Work 24 single crochets for three complete rounds (24 stitches in each round)
Position the safety eyes between rounds 13 and 14, with approximately 10 stitches between them.
Round 15: Work 4 single crochets, “decrease, 3 single crochets” repeated twice, decrease, 8 single crochets (21 stitches total) Round 16: Work 4 single crochets, “decrease, 2 single crochets” repeated twice, decrease, 7 single crochets (18 stitches total) Round 17: Work 18 single crochets around (18 stitches total) Round 18: Work “1 single crochet, decrease” repeated 6 times (12 stitches total) Round 19: Work 6 decreases to close the opening (6 stitches total)
Fasten off, pulling the final loop tight to close the remaining hole. Weave in end securely.
Forming the Neck
The neck connects the head to the body with proper proportions:
Round 11: Attach yarn to the left side of Round 10 (where you began the muzzle opening). Work 14 single crochets (10 stitches around the neck area plus 4 stitches across the chain) (14 stitches total) Round 12: Work 4 single crochets, increase once, 7 single crochets, increase once, 1 single crochet (16 stitches total) Round 13: Work 16 single crochets around (16 stitches total)
Creating the Body
The horse’s body provides structure and connects to the rocking base:
Round 14: Work 6 single crochets, chain 7, increase in second chain from hook, work 15 single crochets (30 stitches total) Round 15: Work 11 single crochets, “increase, single crochet” repeated twice, 15 single crochets (32 stitches total) Round 16: Work 11 single crochets, “increase, single crochet” repeated three times, 15 single crochets (35 stitches total) Round 17: Work 11 single crochets, “2 single crochets, increase” repeated three times, 15 single crochets (38 stitches total) Round 18: Work 6 single crochets, “increase, 4 single crochets, increase, 10 single crochets, increase” repeated twice (42 stitches total) Round 19: Work 42 single crochets around (42 stitches total) Round 20: Work 6 single crochets, increase once, 6 single crochets, increase once, 10 single crochets, increase once, 6 single crochets, increase once, 10 single crochets (46 stitches total) Rounds 21-26: Work 46 single crochets for six complete rounds (46 stitches in each round)
Forming the Legs
The legs will connect to the rocking base:
Round 27: Work 8 single crochets, skip 30 stitches (to create the gap between legs), work 8 single crochets (16 stitches total) Round 28: Work 16 single crochets around (16 stitches total) Round 29: Work “6 single crochets, decrease” repeated twice (14 stitches total) Rounds 30-31: Work 14 single crochets for two complete rounds (14 stitches in each round) Round 32: Work “5 single crochets, decrease” repeated twice (12 stitches total) Rounds 33-34: Work 12 single crochets for two complete rounds (12 stitches in each round) Round 35: Work 2 single crochets, decrease once, repeated 3 times (9 stitches total) Round 36: Work 1 single crochet, decrease once, repeated 3 times (6 stitches total)
Fasten off, pulling the final loop tight to close the remaining hole. Weave in end securely.
For the second leg: Follow the same pattern, beginning by attaching yarn 7 stitches away from the first leg, at the 8th stitch position. Complete Rounds 27-36 as for the first leg.
After completing both legs, sew the gap between them closed with yarn to create a finished appearance.
Crafting the Ears
Make two identical ears:
Round 1: Create a magic ring and work 6 single crochets into it (6 stitches total) Round 2: Work “1 single crochet, increase” repeated 3 times (9 stitches total) Round 3: Work “2 single crochets, increase” repeated 3 times (12 stitches total) Rounds 4-6: Work 12 single crochets for three complete rounds (12 stitches in each round)
Fold each ear in half and secure in this position with a few stitches. Sew the ears to the head, positioning them symmetrically at the top.
Creating the Mane
The mane adds character and movement to your horse:
Chain 25 stitches to begin Starting from the third chain from hook, work the pattern “increase using 2 double crochets, increase using 3 double crochets” repeated 11 times, finish with an increase using 2 double crochets
Fasten off, leaving a long tail for sewing. Attach the mane along the top of the head and down the neck for a flowing effect.
Adding the Tail
The tail complements the mane and completes the horse appearance:
Chain 8 stitches to begin Starting from the third chain from hook, work “increase using 2 double crochets” repeated 5 times
Fasten off, leaving a long tail for sewing. Attach the completed tail to the back of the horse body.
Crafting the Rocking Base
The distinctive rocking base transforms your amigurumi into a functional rocking horse:
Round 1: Create a magic ring and work 6 single crochets into it (6 stitches total) Round 2: Work an increase in each stitch around (12 stitches total) Round 3: Work “2 single crochets, increase” repeated 4 times (16 stitches total) Rounds 4-33: Work 16 single crochets for thirty complete rounds (16 stitches in each round) Round 34: Work “2 single crochets, decrease” repeated 4 times (12 stitches total) Round 35: Work 6 decreases to close the opening (6 stitches total)
Fasten off, pulling the final loop tight to close the remaining hole. Weave in end securely.
Create a second identical rocking base piece using the same pattern (Rounds 1-35).
Final Assembly
With all components ready, bring your rocking horse to life:
- Stuff the head firmly with fiberfill before closing completely
- Add stuffing to the neck and body, ensuring even distribution
- Stuff the legs lightly, focusing on maintaining shape
- Attach the ears to the top of the head
- Sew the mane along the top of the head and down the neck
- Attach the tail to the back of the body
- Position the rocking base pieces against the bottoms of the legs
- Sew the rocking base pieces securely to the legs
- If desired, add buttons at connection points between legs and rocking base for decoration and reinforcement
- Add any additional embroidered details to the face, such as nostrils or a smiling mouth
- Check all seams and connections for security
Customizing Your Rocking Horse
While following the pattern creates a classic rocking horse, consider these creative variations:
- Use variegated yarn for a multicolored mane and tail
- Add embroidered details like hearts or stars to the body
- Create a unicorn version by adding a horn to the forehead
- Use different colored yarn for the rocking base for contrast
- Add small bells or ribbon accents to the mane
- Embroider a name or initials on the side of the body
- Create a zebra version with striped details
- Scale the pattern up or down by changing yarn weight and hook size
Caring for Your Amigurumi
To keep your rocking horse looking its best:
- Spot clean with mild soap and water as needed
- Allow to air dry completely if washing becomes necessary
- Display away from direct sunlight to prevent color fading
- Dust occasionally with a soft brush
- Inspect connections between rocking base and legs periodically to ensure security
- Store in a clean, dry place when not being displayed
Perfect Gift Ideas
Your handmade rocking horse amigurumi makes an excellent gift for:
- Baby showers or nursery decor
- Children’s birthdays
- Collectors of handmade toys
- Western or equestrian enthusiasts
- Housewarming gifts for families
- Holiday presents with nostalgic appeal
- Display pieces for craft fairs or sales

Check this out :Sleeping Bunny Crochet Pattern
Conclusion
Congratulations on completing your rocking horse amigurumi! This charming creation combines the appeal of a classic children’s toy with the handcrafted touch that only amigurumi can provide. The combination of the horse’s sweet expression, flowing mane and tail, and functional rocking base creates a piece that’s both decorative and playful.
Whether created as a gift or kept for yourself, this rocking horse brings joy through both the creation process and as a finished piece. The skills you’ve practiced—working in rounds, creating three-dimensional shapes, and assembly—will serve you well in future crochet projects.
Remember that each handmade creation has its own unique character, making your rocking horse truly one-of-a-kind. Enjoy the process of bringing this nostalgic toy to life, and consider creating companion pieces in your future crochet adventures.
Your completed rocking horse stands as a testament to your crafting skills and will delight all who see it. With proper care, this handmade treasure can become a keepsake to be enjoyed for many years to come.


Leave a Reply