Table of Contents
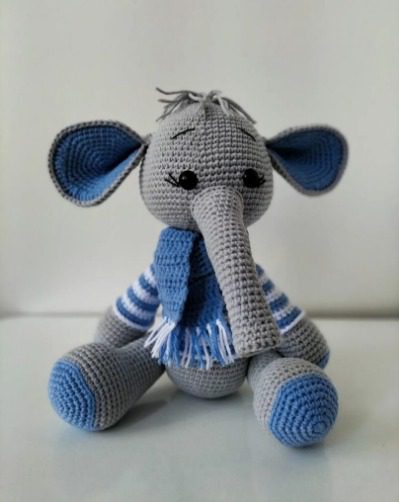
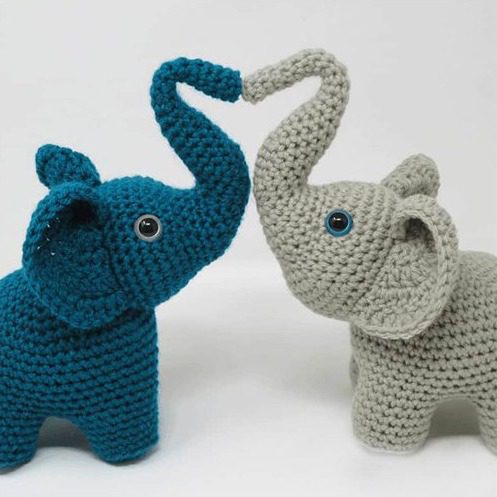
Create your own charming pair of elephant amigurumi with this comprehensive pattern guide. Standing 9 inches tall and 6 inches long, these sweet elephants feature distinctive trunks, floppy ears, and chubby bodies that capture the lovable essence of these magnificent creatures. Perfect for intermediate crocheters, this project introduces seamless attachment techniques while creating adorable companions that can be customized in your favorite colors.
Introduction to Elephant Amigurumi Design
Elephants make perfect subjects for amigurumi with their distinctive physical features—expressive trunks, large floppy ears, and round bodies. This pattern creates elephants with proper proportions and characteristic details while maintaining the cute, chunky aesthetic that makes amigurumi so appealing. The design allows for creating matching pairs, perfect for gifts or home décor.
Essential Materials for Your Elephant Project
Before starting your elephant amigurumi, gather these supplies:
- Yarn: One skein of Red Heart Super Saver 100% acrylic worsted weight yarn (364 yards) in your chosen color. The sample elephants are created in Light Grey and Real Teal, but any color works beautifully
- Hook: Furls Odyssey G+ (4.5mm) crochet hook
- Eyes: Two 15mm colored safety eyes per elephant
- Notions: Yarn needle, straight pins, stitch marker or stitch saver (safety pins work well too)
- Stuffing: Polyester fiberfill (not explicitly mentioned in the pattern but essential)
Understanding Crochet Terminology
This pattern uses standard US crochet terms:
- ch – chain stitch
- sc – single crochet (the primary stitch for amigurumi)
- dc – double crochet (used for the elephant ears)
- sl st – slip stitch
- inc – increase (2 single crochets in one stitch)
- dec – decrease (single crochet 2 stitches together)
- BLO – back loops only
Special Stitches
- Single Crochet Join (sc join): Put slip knot over hook, insert hook through stitch, yarn over, pull through stitch, yarn over, pull through both loops on hook
Pattern Notes for Success
- Work in continuous rounds (spiral) without joining rounds with slip stitches
- Chain-3 at beginning of rows counts as a double crochet
- Assemble parts in the order directed for best positioning results
- Mark your rounds with stitch markers to track your progress easily
Creating the Elephant Body
The body is worked from the bottom up, with leg openings created toward the end:
Setup: Chain 4 Foundation: Single crochet in second chain from hook, 2 single crochets, turn (3 stitches)
Round 1: Increase in next 3 single crochets, do not turn, then working on the bottom of the starting chain, increase in 3 chains (12 stitches) Round 2: Work [single crochet, increase] 6 times (18 stitches) Round 3: Work [2 single crochets, increase] 6 times (24 stitches) Round 4: Work [3 single crochets, increase] 6 times (30 stitches) Round 5: Work [4 single crochets, increase] 6 times (36 stitches) Round 6: Work [5 single crochets, increase] 6 times (42 stitches) Round 7: Work [6 single crochets, increase] 6 times (48 stitches) Round 8: Work [7 single crochets, increase] 6 times (54 stitches) Rounds 9-16: Single crochet evenly around for eight rounds (54 stitches)
Creating Leg Openings
Round 17: Chain 6, skip 12 stitches, 2 single crochets, chain 6, skip 12 stitches, single crochet, chain 6, skip 12 stitches, 2 single crochets, chain 6, skip 12 stitches, single crochet. You’ve now created four leg openings. (24 chains, 6 single crochets)
Closing the Belly
Round 18: Working in chains and single crochets between leg holes, work [3 single crochets, decrease] 6 times (24 stitches) Round 19: Work [2 single crochets, decrease] 6 times (18 stitches)
Begin stuffing the body at this point.
Round 20: Work [single crochet, decrease] 6 times (12 stitches) Round 21: Decrease 6 times (6 stitches)
Fasten off, leaving a long tail for sewing. Thread yarn through the remaining 6 stitches and pull tight to close.
Finish stuffing the body through the leg openings, ensuring even distribution for a plump shape.
Forming the Legs
Create four identical legs, working at each leg opening:
Round 1: Join with a single crochet in any stitch around a leg hole. Working clockwise, single crochet in each single crochet and chain around the leg hole (18 stitches) Rounds 2-6: Single crochet evenly around for five rounds (18 stitches) Round 7: Working in back loops only, work [single crochet, decrease] 6 times (12 stitches)
Stuff the leg firmly at this point.
Round 8: Working through both loops, decrease 6 times (6 stitches)
Fasten off, leaving a long tail for sewing. Thread yarn through the remaining 6 stitches and pull tight to close.
Repeat this process on the other three leg openings.
Crafting the Expressive Head
The head includes the beginning of the trunk, which will be extended later:
Setup: Chain 2
Round 1: Work 6 single crochets in the second chain from hook (6 stitches) Round 2: Increase in each stitch around (12 stitches) Round 3: Work [single crochet, increase] 6 times (18 stitches) Round 4: Work [2 single crochets, increase] 6 times (24 stitches) Round 5: Work [3 single crochets, increase] 6 times (30 stitches) Round 6: Skip 12 stitches, work 18 single crochets. The skipped stitches create the opening for the trunk (18 stitches)
Shaping the Head
Rounds 7-8: Single crochet evenly around (18 stitches) Round 9: Work [2 single crochets, increase] 6 times (24 stitches) Round 10: Work [3 single crochets, increase] 6 times (30 stitches) Round 11: Work [4 single crochets, increase] 6 times (36 stitches) Rounds 12-17: Single crochet evenly around for six rounds (36 stitches)
Insert safety eyes between Rounds 11 and 12, with 9 stitches between them, centered on either side of the trunk opening.
Decreasing for the Back of the Head
Round 18: Work [4 single crochets, decrease] 6 times (30 stitches) Round 19: Work [3 single crochets, decrease] 6 times (24 stitches) Round 20: Work [2 single crochets, decrease] 6 times (18 stitches)
Stuff the head firmly to the trunk opening at this point.
Round 21: Work [single crochet, decrease] 6 times (12 stitches) Round 22: Decrease 6 times (6 stitches)
Fasten off, leaving a long tail for sewing. Thread yarn through the front loops of the remaining 6 stitches and pull tight to close.
Creating the Distinctive Trunk
The trunk emerges from the opening created in the head:
Round 1: Join with a single crochet in the 7th stitch from the face, working clockwise around the trunk opening, single crochet evenly around (12 stitches) Round 2: Single crochet evenly around (12 stitches) Round 3: Work 5 single crochets, decrease, 5 single crochets (11 stitches) Round 4: Single crochet evenly around (11 stitches)
Begin stuffing the trunk as you go from this point forward.
Round 5: Work 5 single crochets, decrease, 4 single crochets (10 stitches) Round 6: Single crochet evenly around (10 stitches) Round 7: Work 5 single crochets, decrease, 3 single crochets (9 stitches) Round 8: Work 5 single crochets, decrease, single crochet (8 stitches) Round 9: Work 5 single crochets, decrease, single crochet (7 stitches) Round 10: Work 5 single crochets, decrease (6 stitches) Rounds 11-12: Single crochet evenly around for two rounds (6 stitches)
Creating the Trunk Curve
Rounds 13-15: Work decrease, 2 single crochets, increase, single crochet for three rounds (6 stitches) Round 16: Single crochet evenly around (6 stitches) Round 17: Work 3 single crochets, increase, 2 single crochets (7 stitches) Round 18: Single crochet evenly around (7 stitches)
Fasten off, leaving a long tail for sewing. Thread yarn through the back loops of the remaining 7 stitches and pull tight to close. Weave in ends.
Forming the Floppy Ears
Make two identical ears:
Row 1: Chain 4, work 5 double crochets in 4th chain from hook, turn (6 stitches total including the chain-3) Row 2: Chain 3 (counts as double crochet), double crochet in same stitch, double crochet increase in next 5 stitches, turn (12 stitches) Row 3: Chain 3, double crochet in same stitch, double crochet, work [double crochet increase, double crochet] 5 times, turn (18 stitches) Row 4: Chain 3, double crochet in same stitch, 2 double crochets, work [double crochet increase, 2 double crochets] 5 times (24 stitches)
Slip stitch into the starting chain of the ear to create the curved shape.
Fasten off, leaving a long tail for sewing.
Using the tail, sew the folded part of the ear along the long edge to maintain the curve.
Attach the ears to the head along Round 17 (the last round worked evenly around). Each ear should be sewn along 12 stitches, with 3 stitches between them at the top of the head.
Assembling Your Elephant
Attaching the Head to the Body
Mark a 6 stitch × 6 stitch square on the body between Rounds 2 and 7, centered between the legs on either end of the body. Be sure to attach the head between legs with only one single crochet between them.
Position the head with the center point centered on Round 2 of the body. Mark the head where it touches the pins, then sew securely.
Adding the Tail
Chain 5, then fasten off. Pull both ends tight to create a slight curve.
Use one end to sew the tail to the body at Round 5. Weave in one end, then cut the other end about ¾ inch long and fray the yarn to create a tassel effect.
Tips for Amigurumi Success
- Even Tension: Maintain consistent tension throughout for a professional finish
- Secure Stuffing: Pack stuffing firmly but evenly, especially in the trunk and legs
- Seamless Joining: Take time to position parts precisely with pins before attaching
- Expression Creation: The placement of safety eyes significantly affects your elephant’s expression
- Color Selection: Choose colors that complement each other for a pair of elephants
Creative Variations
Once you’ve mastered the basic pattern, consider these creative adaptations:
- Baby Elephant: Reduce the number of increase rounds for a smaller version
- Elephant Family: Create a range of sizes by adjusting hook size
- Decorative Touches: Add simple embroidery details like eyelashes or cheek blush
- African vs. Asian: Modify the ears slightly (larger for African, smaller for Asian elephants)
- Textured Trunk: Use a different stitch pattern for the trunk for added interest
- Seasonal Elephants: Add tiny accessories like scarves or holiday hats
Why Elephant Amigurumi Make Perfect Gifts
These adorable elephant amigurumi make meaningful gifts for several reasons:
- Universal Appeal: Elephants are beloved across cultures and age groups
- Symbolism: Elephants represent wisdom, strength, and good luck in many traditions
- Customization: Can be made in colors to match the recipient’s preferences
- Thoughtfulness: Handmade gifts show care and consideration
- Pairing Potential: Create matching sets for couples, siblings, or parent-child duos
Display Ideas for Your Elephant Amigurumi
- Position your elephants with trunks touching to create a heart shape
- Create a small jungle scene with other amigurumi animals
- Display on a bookshelf with children’s elephant-themed books
- Incorporate into a nursery as decorative accents
- Use as unique cake toppers for special celebrations

Check this out :Crochet a Fantasy Dragon Amigurumi
Conclusion
Creating these adorable elephant amigurumi allows you to combine basic crochet techniques with dimensional shaping to produce charming, personality-filled creatures. The distinctive trunk, floppy ears, and plump body capture the essence of these magnificent animals in an approachable, huggable form.
Whether you’re making this elephant for yourself, as a gift, or as a decorative piece, the process of creating each stitch contributes to a character-filled finished project that’s sure to bring smiles. Happy crocheting, and may your elephant companions bring joy to your home or the home of a lucky recipient!


Leave a Reply