Table of Contents
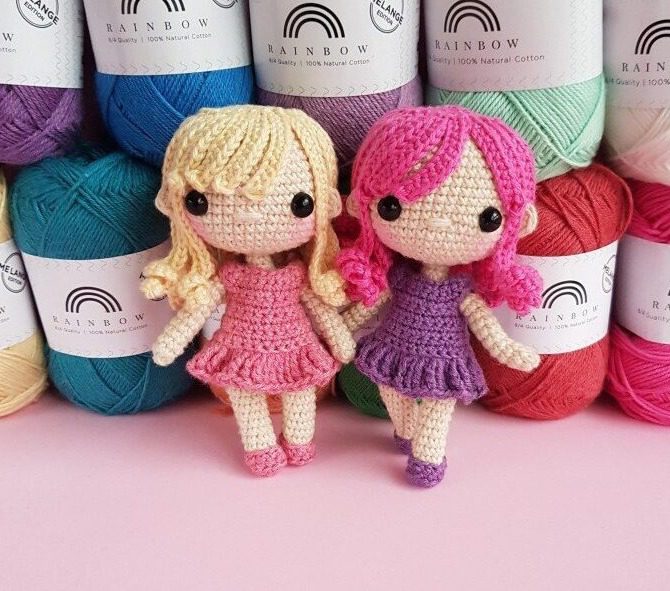
Create Amigurumi Sister a charming pair of amigurumi sister dolls with this comprehensive crochet pattern. Standing approximately 12 centimeters tall, these adorable companions named Ada and Kat feature customizable outfits, cute hairstyles, and endearing expressions. Perfect for intermediate crocheters, these dolls make wonderful gifts, collectibles, or sweet decorative pieces that showcase your handcrafting skills.
Materials Needed for Your Amigurumi Sister Dolls
Before beginning your crochet project, gather these essential supplies:
- 2.0 mm crochet hook
- Rainbow Cotton 8/4 and Rainbow Cotton 8/4 Melange yarn in the following colors:
- For Doll 1 (Ada):
- Nude (003) – 1 skein
- Pink (045) – 1 skein
- Purple Melange (20) – 1 skein
- For Doll 2 (Kat):
- Nude (003) – 1 skein
- Pink Melange (15) – 1 skein
- Pastel Yellow Melange (12) – 1 skein
- For Doll 1 (Ada):
- Safety eyes (8 mm) – 2 pairs
- Fiberfill stuffing
- Sewing needle
- Optional: wooden stick, silicone rod, or wire for neck support
- Pink blush for cheeks
Understanding Amigurumi Sister Terminology
To follow this Amigurumi Sister successfully, familiarize yourself with these terms:
- Magic Ring (mr): The starting point for crocheting in the round
- Single Crochet (sc): The basic stitch used throughout most of the pattern
- Increase (inc): Working two single crochet stitches in the same stitch
- Decrease (dec): Working two stitches together to reduce count
- Chain (ch): The foundation stitch for starting rows
- Slip Stitch (sl st): Used to join rounds
- Back Loops Only (BLO): Working through only the back loop of a stitch
- Double Treble (dtr): A very tall stitch used for the dress
Amigurumi Sister Creating the Legs, Body, and Head
Using nude-colored yarn:
Round 1: Create a magic ring and work 6 single crochet stitches into it [6 stitches] Round 2: Work 2 single crochet, then increase repeat twice [8 stitches] Rounds 3-11: Work 8 single crochet around for 9 rounds [8 stitches]
Stuff the first leg firmly. Fasten off and weave in the end. Make a second leg but do not fasten off, as you will join the legs to create the body.
Round 12: Chain 3, work 8 single crochet in the first leg, work 3 single crochet in the chain row, work 8 single crochet in the second leg, work 3 single crochet in the chain row [22 stitches total] Rounds 13-17: Work 22 single crochet around for 5 rounds [22 stitches] Round 18: Work 3 single crochet, decrease once, work 4 single crochet, decrease once repeat twice, work 3 single crochet, decrease once [18 stitches] Round 19: Work 18 single crochet around [18 stitches] Round 20: Work 4 single crochet, decrease once repeat 3 times [15 stitches] Round 21: Work 15 single crochet around [15 stitches] Round 22: Work 3 single crochet, decrease once repeat 3 times [12 stitches] Round 23: Decrease once, work 4 single crochet repeat twice [10 stitches] Round 24: Work 3 single crochet, decrease once repeat twice [8 stitches] Round 25: Decrease once, work 2 single crochet repeat twice [6 stitches] Round 26: Work 6 single crochet around [6 stitches]
Now we begin to increase to form the head:
Round 27: Work 2 single crochet, increase repeat twice [8 stitches] Round 28: Increase in each stitch around [16 stitches] Round 29: Work 1 single crochet, increase repeat 8 times [24 stitches] Round 30: Work 2 single crochet, increase repeat 8 times [32 stitches] Round 31: Work 3 single crochet, increase repeat 8 times [40 stitches] Round 32: Work 4 single crochet, increase repeat 8 times [48 stitches] Rounds 33-43: Work 48 single crochet around for 11 rounds [48 stitches]
At this point, attach the safety eyes between rounds 36 and 37, with approximately 9 stitches between them. Consider inserting a wooden stick, silicone rod, or metal wire into the neck for better head stability.
Round 44: Work 6 single crochet, decrease once repeat 6 times [42 stitches] Round 45: Work 5 single crochet, decrease once repeat 6 times [36 stitches] Round 46: Work 4 single crochet, decrease once repeat 6 times [30 stitches] Round 47: Work 3 single crochet, decrease once repeat 6 times [24 stitches] Round 48: Work 2 single crochet, decrease once repeat 6 times [18 stitches] Round 49: Work 1 single crochet, decrease once repeat 6 times [12 stitches] Round 50: Decrease 6 times [6 stitches]
Fasten off and weave in the end, pulling the thread through the front loops of the remaining stitches to close the hole neatly.
Amigurumi Sister Making the Arms
Using nude-colored yarn, make two arms:
Round 1: Create a magic ring and work 7 single crochet stitches into it [7 stitches] Rounds 2-13: Work 7 single crochet around for 12 rounds [7 stitches]
Do not stuff the arms. Fasten off, leaving a tail of yarn approximately 15 cm long for attaching the arms to the body between rounds 23 and 24.
Amigurumi Sister Crafting the Ears
Using nude-colored yarn, make two ears:
Round 1: Create a magic ring and work 5 single crochet stitches into it [5 stitches]
Fasten off, leaving a tail of yarn approximately 10 cm long for attaching the ears to the head between rounds 35 and 37. Position the ears on opposite sides of the head for a balanced look.
Amigurumi Sister Creating the Hair
For Ada, use Pink Melange yarn. For Kat, use Pastel Yellow Melange yarn:
Round 1: Create a magic ring and work 6 single crochet stitches into it [6 stitches] Round 2: Increase in each stitch around [12 stitches] Round 3: Work 1 single crochet, increase repeat 6 times [18 stitches] Round 4: Work 2 single crochet, increase repeat 6 times [24 stitches] Round 5: Create hair strands as follows:
- For 20 long strands: Chain 28, then beginning in the 2nd chain from hook, work 9 increases, 18 single crochet, and 1 slip stitch
- For 4 short strands: Chain 13, then beginning in the 2nd chain from hook, work 12 single crochet, and 1 slip stitch
When all strands are complete, fasten off, leaving a tail of yarn approximately 20 cm long for attaching the hair to the head. Position the four shorter strands directly over the eyes, with the longer strands distributed evenly around the head.
Amigurumi Sister Sewing the Dress
For Ada, use Purple Melange yarn. For Kat, use Pink Melange yarn:
Row 1: Chain 21, begin in the 2nd chain from hook. Work 2 single crochet, 2 increases repeat twice, work 4 single crochet, work 2 increases, 2 single crochet repeat twice, chain 1, turn [28 stitches] Row 2: Work 28 single crochet, chain 1, turn [28 stitches] Row 3: Work 4 single crochet, chain 2, skip 5 stitches, work 9 single crochet, chain 2, skip 5 stitches, work 5 single crochet, chain 1, turn [22 stitches] Rows 4-5: Work 22 single crochet, chain 1, turn [22 stitches] Row 6: Work 5 single crochet, increase once, work 10 single crochet, increase once, work 5 single crochet, chain 1, turn [24 stitches] Row 7: Work 5 single crochet, increase once, work 11 single crochet, increase once, work 6 single crochet, chain 1, turn [26 stitches] Row 8: Work 26 single crochet, turn [26 stitches] Row 9: Chain 4, work 52 double treble stitches in back loops only [52 stitches]
Fasten off, leaving a tail of yarn approximately 25 cm long for assembly. The dress forms a flat piece that will wrap around the doll. Place the dress on the doll’s body, ensuring the front is centered, then wrap it around and sew the back closed using small, neat stitches.
Creating the Shoes
For Ada, use Purple Melange yarn. For Kat, use Pink Melange yarn:
Round 1: Create a magic ring and work 8 single crochet stitches into it [8 stitches] Round 2: Work 3 single crochet, increase once repeat twice [10 stitches] Round 3: Work 10 single crochet in back loops only [10 stitches] Round 4: Work 10 single crochet around [10 stitches]
Fasten off, leaving a tail of yarn approximately 10 cm long. The shoes form small cup shapes that fit over the doll’s feet. Slide the shoes onto the feet and secure them with small stitches, making sure they are positioned evenly.
Final Assembly and Finishing Touches
Follow these steps to complete your sister dolls:
- First, attach the hair to the head by sewing around the base of the scalp, ensuring all strands are securely fastened
- Position and sew the ears to the sides of the head between rounds 35 and 37
- Carefully embroider a small nose between rounds 35 and 36, centered between the eyes
- Apply a touch of pink blush to the cheeks for a sweet, lifelike expression
- Attach the arms to the body between rounds 23 and 24, positioning them slightly angled forward
- Place the dress on the doll and sew the back closed with neat, invisible stitches
- Slide the shoes onto the feet and secure them with small stitches
Take your time with each step, especially facial features, as they bring personality to your dolls. Ensure all parts are sewn securely for durability.

Check this out :Crochet an Adorable Amigurumi Elephant
Creating Your Own Amigurumi Sister Dolls Collection
Congratulations on completing your Ada and Kat amigurumi dolls! These adorable sisters stand as a testament to your crochet skills and patience. Each tiny stitch contributes to creating characters full of personality and charm that will be treasured for years to come.
These 12-centimeter dolls are perfect additions to any amigurumi collection or as special handmade gifts. Their small size makes them ideal desk companions, decorative pieces for a child’s room, or delightful toys for gentle play. The detailed design—from their expressive faces to their colorful outfits—showcases the beauty of handcrafted amigurumi.
The sister dolls concept offers endless opportunities for creativity. Consider creating a whole family by designing parents, brothers, or even pets using the same basic techniques. Each new character can have unique hairstyles, clothing colors, and accessories that tell their own story. You might create seasonal outfits for your dolls, design tiny furniture for them, or craft miniature scenes for them to inhabit.
Amigurumi doll making combines artistic expression with technical skill. As you become more comfortable with these techniques, experiment with adjusting proportions, creating different expressions, or designing completely new clothing styles. Each modification makes your creations uniquely yours.
For those new to amigurumi, these sister dolls represent an excellent intermediate project that teaches valuable skills: creating seamless rounds, shaping with increases and decreases, constructing garments, and adding fine details. These techniques transfer to many other amigurumi projects and will serve you well as you continue your crochet journey.
Remember that the most special aspect of handmade items is the love and care put into each stitch. Your amigurumi dolls carry that energy, whether they’re made as gifts or kept for yourself. The time you’ve invested creates something truly unique in our mass-produced world—a handcrafted item made with attention and affection.
Display your finished dolls proudly, knowing you’ve created something special with your own two hands. Share photos of your creations with fellow crafters to inspire others and celebrate your achievement. Each amigurumi project completed builds your skills and confidence for the next creative adventure.
Happy crocheting, and may your amigurumi sister dolls bring joy to all who encounter them!


Leave a Reply