Table of Contents
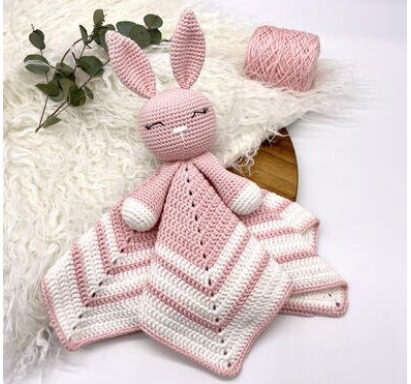
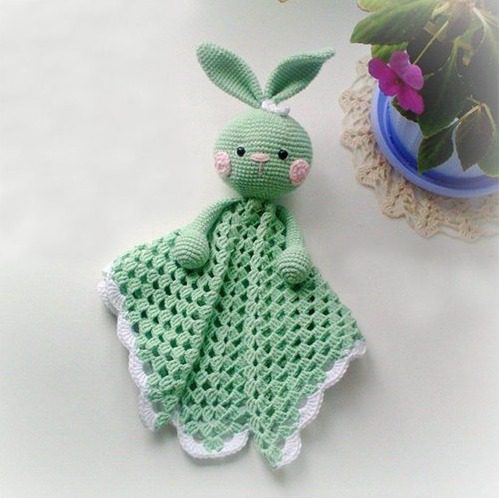
Looking for the perfect Bedmate Rabbit handmade gift for a little one? This adorable Bedmate Rabbit amigurumi lovey combines the comfort of a security blanket with the charm of a cuddly bunny toy. This comprehensive pattern guide will walk you through creating this special comfort item step-by-step, from the granny square blanket base to the sweet rabbit head and appendages. Whether you’re crocheting for your own child or creating a thoughtful baby shower gift, this lovey will become a treasured companion.
Materials Needed for Your Bedmate Rabbit Lovey
Before beginning your Bedmate Rabbit, gather these essential supplies:
- Alize Bella yarn (or similar soft cotton yarn) for the main color
- Small amount of pink yarn for the cheeks
- Small amount of white yarn for edging the blanket
- 1.75mm crochet hook (or size needed to achieve correct tension)
- Safety eyes appropriate for toys
- Polyester fiberfill stuffing
- Tapestry needle for assembly
- Stitch markers
- Scissors
Understanding the Pattern Terminology
This pattern Bedmate Rabbit uses the following abbreviations:
- KA: Amigurumi ring (magic ring)
- sc/sbn: Single crochet
- inc/pr: Increase (two single crochets in the same stitch)
- dec: Decrease (combining two stitches into one)
- … x6: Repeat the instructions between asterisks 6 times
Creating the Granny Square Comfort Blanket
The foundation of your lovey is a classic granny square worked to approximately 40cm (16 inches) square. This provides the perfect size for little hands to grasp while offering enough blanket to provide comfort.
Basic Granny Square Bedmate Rabbit:
- Start with a magic ring
- Round 1: Chain 3 (counts as first double crochet), work 2 double crochets into the ring, chain 2, work 3 double crochets into the ring, repeat from * to * 3 more times, chain 2, slip stitch to the top of the beginning chain 3 to join
- Round 2: Slip stitch to the first chain-2 space, chain 3 (counts as first double crochet), work 2 double crochets into the same space, chain 1, work 3 double crochets into the next chain-2 space, chain 2, work 3 double crochets into the same space, repeat from * to * at each corner, ending with chain 1, slip stitch to the top of the beginning chain 3
- Continue in this manner, increasing at the corners, until your square reaches approximately 40cm (16 inches)
For the edging, work 7 single crochets in each arch, with 1 single crochet in between arches. You can customize this edging to your preference for a more or less decorative border.
Crafting the Bedmate Rabbit Head
The rabbit head forms the focal point of your lovey and requires careful attention to shaping:
Round 1: Create a magic ring and work 6 single crochets into it (6 stitches) Round 2: Increase in each stitch around (12 stitches) Round 3: Work (1 single crochet, increase) 6 times (18 stitches) Round 4: Work (2 single crochets, increase) 6 times (24 stitches) Round 5: Work (3 single crochets, increase) 6 times (30 stitches) Round 6: Work (4 single crochets, increase) 6 times (36 stitches) Round 7: Work (5 single crochets, increase) 6 times (42 stitches) Round 8: Work (6 single crochets, increase) 6 times (48 stitches) Round 9: Work (7 single crochets, increase) 6 times (54 stitches) Round 10: Work (8 single crochets, increase) 6 times (60 stitches) Round 11: Work (9 single crochets, increase) 6 times (66 stitches) Rounds 12-21: Work 66 single crochets for 10 complete rounds (66 stitches) Round 22: Work (9 single crochets, decrease) 6 times (60 stitches) Round 23: Work (8 single crochets, decrease) 6 times (54 stitches) Round 24: Work (7 single crochets, decrease) 6 times (48 stitches) Round 25: Work (6 single crochets, decrease) 6 times (42 stitches) Round 26: Work (5 single crochets, decrease) 6 times (36 stitches) Round 27: Work (4 single crochets, decrease) 6 times (30 stitches) Round 28: Work (3 single crochets, decrease) 6 times (24 stitches) Round 29: Work (2 single crochets, decrease) 6 times (18 stitches) Round 30: Work (1 single crochet, decrease) 6 times (12 stitches) Round 31: Decrease 6 times (6 stitches)
After completing the final round, use a tapestry needle to close the remaining hole by weaving through the front loops of the last round and pulling tight. Leave a length of yarn for attaching the head to the blanket.
Position the safety eyes between rounds 15 and 16, with approximately 10 single crochets between them. Secure the safety eyes according to the manufacturer’s instructions before closing up the head.
Bedmate Rabbit Forming the Arms
Create two identical arms that will add dimension and give your little one something extra to hold:
Round 1: Create a magic ring and work 6 single crochets into it (6 stitches) Round 2: Increase in each stitch around (12 stitches) Round 3: Work (1 single crochet, increase) 6 times (18 stitches) Round 4: Work (2 single crochets, increase) 6 times (24 stitches) Rounds 5-8: Work 24 single crochets for 4 complete rounds (24 stitches) Round 9: Work (2 single crochets, decrease) 6 times (18 stitches) Round 10: Work (1 single crochet, decrease) 6 times (12 stitches) Rounds 11-25: Work 12 single crochets for 15 complete rounds (12 stitches)
Add stuffing only to the rounded bottom part of each arm, leaving the long section unstuffed for a more flexible, floppy feel. After completing the final round, fold the top edge flat and join the edges with single crochet stitches to close. Leave a length of yarn for attaching to the blanket.
Creating the Distinctive Ears
The long, floppy ears are a signature feature of your rabbit lovey:
Round 1: Create a magic ring and work 6 single crochets into it (6 stitches) Round 2: Work (1 single crochet, increase) 3 times (9 stitches) Round 3: Work (2 single crochets, increase) 3 times (12 stitches) Round 4: Work 12 single crochets around (12 stitches) Round 5: Work (3 single crochets, increase) 3 times (15 stitches) Round 6: Work 15 single crochets around (15 stitches) Round 7: Work (4 single crochets, increase) 3 times (18 stitches) Round 8: Work 18 single crochets around (18 stitches) Round 9: Work (5 single crochets, increase) 3 times (21 stitches) Rounds 10-23: Work 21 single crochets for 14 complete rounds (21 stitches) Round 24: Work (5 single crochets, decrease) 3 times (18 stitches)
Do not stuff the ears, as they should remain flat and floppy. After the final round, fold the ear flat and join the edges with single crochet stitches to close. Leave a length of yarn for attaching to the head.
Adding the Adorable Cheeks
These small pink circles add a sweet, rosy-cheeked look to your rabbit:
Round 1: Using pink yarn, create a magic ring and work 7 single crochets into it (7 stitches) Round 2: Increase in each stitch around (14 stitches)
Fasten off, leaving a length of yarn for attaching to the face.
Assembly and Finishing Touches
Now it’s time to bring all the elements together:
- Position the head: Center the rabbit head on one edge of the granny square blanket. The bottom of the head should overlap slightly with the blanket. Sew the head securely to the blanket using the yarn tail and a whip stitch.
- Attach the arms: Position the arms on either side of the head, slightly overlapping both the head and the blanket. Sew them securely in place.
- Add the ears: Attach the ears to the top of the head, positioning them to stand up slightly before falling to the sides in a natural-looking drape. The placement should be symmetrical on either side of the head.
- Apply the cheeks: Position the pink circles on the face, below and slightly to the sides of the eyes. Sew them in place with small, neat stitches.
- Embroider final details: If desired, add additional facial details such as a small nose, mouth, or eyebrows using simple embroidery stitches.
Tips for the Perfect Bedmate Rabbit Lovey
- Use a high-quality, washable yarn as this lovey will likely need frequent cleaning
- Keep your tension consistent throughout the project for a professional finish
- When joining the head to the blanket, make sure your stitches are secure but not so tight that they pucker the fabric
- Consider adding a small amount of crinkling material (like plastic from a water bottle) inside the blanket portion for added sensory appeal
- For added security, double-check that all parts are firmly attached and that safety eyes are properly secured
- If creating this for a very young baby, consider embroidering the eyes rather than using safety eyes
Creative Variations for Your Lovey
Make your Bedmate Rabbit unique with these creative ideas:
- Change the main color for a personalized look
- Add embroidered details like sleeping eyes or a smiling mouth
- Use variegated or textured yarn for the blanket portion
- Add a small pocket to the blanket for tiny treasures
- Incorporate ribbon tags around the edges for additional tactile interest
- Create a mini version as a travel companion
- Add a small bell or crinkle material inside for sensory stimulation
Care Instructions for Your Handmade Lovey
To keep your Bedmate Rabbit looking its best through many nights of loving:
- Machine wash on gentle cycle in a mesh laundry bag
- Lay flat to dry or tumble dry on low heat
- Reshape ears and arms gently while damp if needed
- Spot clean when possible to extend time between washings
- If security eyes become loose, reinforce immediately to prevent choking hazards

Check this out :Crochet Adorable Chibi Totoro Amigurumi
The Special Value of Handmade Comfort Items
There’s something truly magical about creating a comfort item by hand. Each stitch of your Bedmate Rabbit lovey carries your intentions and care, making it far more than just a toy. For generations, handmade blankets and stuffed animals have provided children with security, comfort, and a tangible symbol of love.
Child development experts note that comfort objects like loveys serve important psychological functions, helping children navigate separation anxiety and develop independence. The combination of a soft blanket with a friendly character creates the perfect transitional object—something that provides reassurance while encouraging exploration and growth.
As you create this special lovey, know that your handwork may become a treasured childhood companion, possibly surviving into adulthood as a precious keepsake. Many adults still fondly remember their childhood “lovey” and the security it provided during thunderstorms, doctor visits, or first days of school.
Whether this Bedmate Rabbit becomes a nightly sleep companion, a car trip essential, or simply a cherished toy, it carries with it the irreplaceable quality of being handmade with love—something no store-bought item can match.
Happy crocheting, and may your Bedmate Rabbit bring comfort and joy to its lucky recipient!


Leave a Reply