Table of Contents
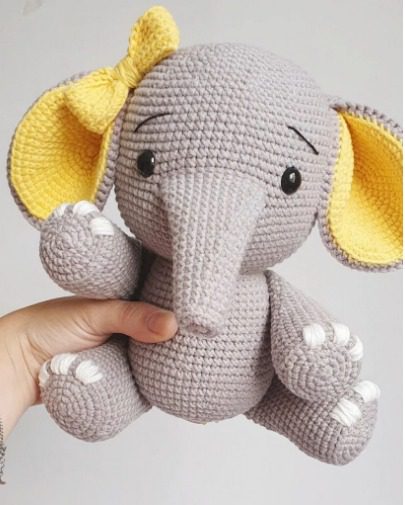
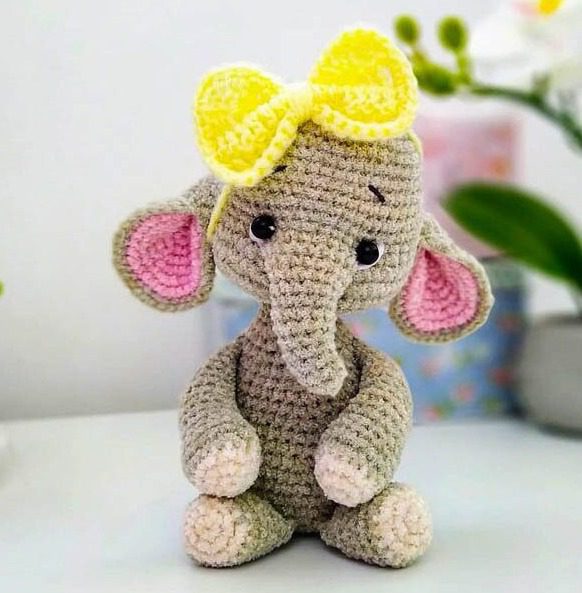
Creating Elephant your own handmade toys brings immense satisfaction and joy. Amigurumi, the Japanese art of crocheting small stuffed creatures, has gained worldwide popularity for its adorable results and accessible techniques. This comprehensive guide will walk you through creating a charming amigurumi elephant that stands approximately 13 centimeters tall when completed.
Whether you’re new to amigurumi or looking to expand your crochet skills, this elephant pattern offers the perfect balance of simplicity and detail. The result is an irresistibly cute elephant with distinctive ears, a curled trunk, and a lovable personality that will delight crafters and recipients alike.
Essential Materials
Before beginning your amigurumi elephant journey, gather these supplies:
- Thin velour yarn (50g/300m) in your preferred colors
- 2-3mm crochet hook (depending on how tight you crochet)
- Scissors for trimming yarn
- Stitch marker to track your rounds
- Craft glue for securing elements
- Safety eyes or buttons for the face
- Stuffing material for plushness
- Tapestry needle for sewing parts together
Understanding Crochet Terminology
For those new to amigurumi, here’s a quick guide to the terms used throughout this pattern:
- Magic Ring: Creates a tight center to begin your project
- Single Crochet: The fundamental stitch used extensively in amigurumi
- Increase: Adding two stitches where one existed before
- Decrease: Reducing two stitches to one
- Chain: Creates foundation links and extensions
- Slip Stitch: Used to join rounds or move positions
- Front Loops Only: Working through only the front loop of each stitch
- Back Loops Only: Working through only the back loop of each stitch
Crafting Your Elephant’s Head
The elephant pattern begins with the distinctive head shape:
Round 1: Create a magic ring and work 6 single crochets into it (6 stitches total) Round 2: Work an increase in each stitch around (12 stitches) Round 3: Work “1 single crochet, increase” repeated 6 times (18 stitches) Round 4: Work “2 single crochets, increase” repeated 6 times (24 stitches) Round 5: Work “3 single crochets, increase” repeated 6 times (30 stitches) Round 6: Work “4 single crochets, increase” repeated 6 times (36 stitches) Round 7: Work “5 single crochets, increase” repeated 6 times (42 stitches) Round 8: Work “6 single crochets, increase” repeated 6 times (48 stitches) Rounds 9-16: Work 48 single crochets for 8 rounds (48 stitches)
Now we’ll create the trunk opening: Round 17: Work 16 single crochets, increase once, work 3 single crochets, chain 8 (skipping 8 stitches from previous round), work 3 single crochets, increase once, work 16 single crochets (50 stitches) Round 18: Work 15 single crochets, increase once, work 1 single crochet, increase once, work 3 single crochets, work 8 single crochets along the chain, work 3 single crochets, increase once, work 1 single crochet, increase once, work 15 single crochets (54 stitches) Round 19: Work 54 single crochets around (54 stitches) Round 20: Work “7 single crochets, decrease” repeated 6 times (48 stitches)
Forming the Trunk
The trunk gives your elephant its distinctive character:
Round 1: Attach yarn as shown in reference photo, then work 4 single crochets, work 1 single crochet in side stitch, work 8 single crochets, work 1 single crochet in side stitch, work 4 single crochets (18 stitches) Round 2: Work 16 single crochets, decrease once (17 stitches) Round 3: Work 15 single crochets, decrease once (16 stitches) Round 4: Work 14 single crochets, decrease once (15 stitches) Round 5: Work 13 single crochets, decrease once (14 stitches) Round 6: Work 12 single crochets, decrease once (13 stitches) Round 7: Work 11 single crochets, decrease once (12 stitches) Round 8: Work 10 single crochets, decrease once (11 stitches) Round 9: Work 9 single crochets, decrease once (10 stitches) Round 10: Work 8 single crochets, decrease once (9 stitches) Round 11: Work 7 single crochets, decrease once (8 stitches) Rounds 12-13: Work 8 single crochets for 2 rounds (8 stitches)
Close the opening by pulling the yarn through and hide the end. Add light stuffing to the trunk for shape.
Completing the Head
Continue working on the head structure:
Round 21: Work “6 single crochets, decrease” repeated 6 times (42 stitches) Round 22: Work “5 single crochets, decrease” repeated 6 times (36 stitches) Round 23: Work “4 single crochets, decrease” repeated 6 times (30 stitches) Round 24: Work “3 single crochets, decrease” repeated 6 times (24 stitches) Round 25: Work “2 single crochets, decrease” repeated 6 times (18 stitches)
Secure the yarn and cut, leaving enough length for any adjustments. Stuff the elephant’s head firmly for proper shaping, focusing on filling all areas evenly.
Creating the Eye Detail
For the eyes, use this special technique:
- Insert your needle under the body and bring it out between rows 16-17 where you want the first eye positioned
- Return the needle under the body, pull to create tension, and secure
- Repeat for the second eye, ensuring symmetrical placement
- Using the same yarn, attach the trunk to the head with several secure stitches
- Add safety eyes or buttons by gluing or sewing them in position
- Embroider white highlights and black eyebrows for expressive details
Crafting the Distinctive Ears
The elephant’s ears require four matching pieces (two in each color):
For each ear piece: Round 1: Create a magic ring and work 6 single crochets into it (6 stitches) Round 2: Work an increase in each stitch around (12 stitches) Round 3: Work “1 single crochet, increase” repeated 6 times (18 stitches) Round 4: Work “2 single crochets, increase” repeated 6 times (24 stitches) Round 5: Work “3 single crochets, increase” repeated 6 times (30 stitches) Round 6: Work “4 single crochets, increase” repeated 6 times (36 stitches)
For the inner ear piece (pink or contrasting color), finish with a slip stitch, cut the yarn, and secure the end.
For the outer ear piece (main color), leave the yarn attached after the last round. Place both pieces together with wrong sides facing inward and connect them by working around the edges with “5 single crochets, increase” repeated 6 times (42 stitches). After joining, fold each ear in half and crochet together 4-5 neighboring stitches to create the ear shape.
Attach completed ears between rows 16-21 of the head, positioning them symmetrically on each side.
Making the Arms
Create two identical arms using these steps:
Round 1: Create a magic ring and work 6 single crochets into it (6 stitches) Round 2: Work an increase in each stitch around (12 stitches) Round 3: Work “1 single crochet, increase” repeated 6 times (18 stitches) Rounds 4-5: Work 18 single crochets for 2 rounds (18 stitches) Round 6: Work “2 single crochets, decrease” repeated 4 times, then work 2 single crochets (14 stitches) Rounds 7-17: Work 14 single crochets for 11 rounds (14 stitches)
Add light stuffing to each arm, fold in half, and join the edges together with 6 single crochets. Secure and cut the yarn.
Creating the Legs
For two identical legs:
Round 1: Create a magic ring and work 6 single crochets into it (6 stitches) Round 2: Work an increase in each stitch around (12 stitches) Round 3: Work “1 single crochet, increase” repeated 6 times (18 stitches) Rounds 4-8: Work 18 single crochets for 5 rounds (18 stitches) Round 9: Work “2 single crochets, decrease” repeated 4 times, then work 2 single crochets (14 stitches) Round 10: Work 14 single crochets around (14 stitches)
Add light stuffing to each leg, fold in half, and join the edges with 6 single crochets. Secure and cut the yarn.
Forming the Body
The body creates the foundation for attaching all limbs:
Round 1: Create a magic ring and work 6 single crochets into it (6 stitches) Round 2: Work an increase in each stitch around (12 stitches) Round 3: Work “1 single crochet, increase” repeated 6 times (18 stitches) Round 4: Work “2 single crochets, increase” repeated 6 times (24 stitches) Round 5: Work “3 single crochets, increase” repeated 6 times (30 stitches) Round 6: Work “4 single crochets, increase” repeated 6 times (36 stitches) Round 7: Work “5 single crochets, increase” repeated 6 times (42 stitches)
Now we’ll add the tail and attach the legs: Round 8: Chain 10 for the tail. Working from the second chain from hook, make 8 single crochets along the chain, slip stitch to connect. Continue around the body with: 6 single crochets, increase once, 6 single crochets, increase once, then crochet the legs into the work as follows: 6 single crochets connecting body and first leg (for 2 sides), increase once, 6 single crochets connecting body and second leg, increase once, 6 single crochets, increase once, 6 single crochets, increase once (48 stitches total)
Rounds 9-12: Work 48 single crochets for 4 rounds (48 stitches) Round 13: Work “6 single crochets, decrease” repeated 6 times (42 stitches) Rounds 14-15: Work 42 single crochets for 2 rounds (42 stitches) Round 16: Work “5 single crochets, decrease” repeated 6 times (36 stitches) Round 17: Work 36 single crochets around (36 stitches) Round 18: Work “4 single crochets, decrease” repeated 6 times (30 stitches) Rounds 19-20: Work 30 single crochets for 2 rounds (30 stitches) Round 21: Work “3 single crochets, decrease” repeated 6 times (24 stitches) Round 22: Work 24 single crochets around (24 stitches) Round 23: Work “2 single crochets, decrease” repeated 6 times (18 stitches) Rounds 24-26: Work 18 single crochets for 3 rounds (18 stitches)
Secure the yarn with enough length to attach the body to the head. Sew the arms between rows 16-21 of the body, positioning them symmetrically on each side.
Assembling Your Elephant
Now that all components are complete, follow these final assembly steps:
- Attach the body to the head using the yarn tail from the body, ensuring alignment
- Sew securely with several stitches to create a solid connection
- Check that all limbs are properly positioned and securely attached
- Add any additional embroidery or features as desired
- Verify that all openings are closed and stuffing is contained
- Adjust overall shape as needed for the perfect presentation
Customizing Your Creation
The wonderful aspect of amigurumi is the ability to personalize your creation. Consider these variations:
- Experiment with different color combinations for a unique appearance
- Adjust the size by using thicker yarn and a larger hook for a bigger elephant
- Add accessories like a tiny hat, scarf, or flower behind the ear
- Create a family by making additional elephants in different sizes
- Use variegated yarn for a multi-colored effect
- Embroider additional details like wrinkles or patterns
Caring for Your Amigurumi Elephant
To keep your handmade creation looking its best:
- Spot clean with mild soap and water as needed
- Air dry completely if washing becomes necessary
- Display away from direct sunlight to prevent color fading
- Dust occasionally with a soft brush or cloth
- Store in a clean, dry place when not being displayed

Check this out :Cheeky Egg Amigurumi Free Crochet Pattern
Conclusion
Congratulations on completing your adorable amigurumi elephant! This charming creation showcases your crochet skills and patience. The distinctive trunk, expressive face, and floppy ears give this elephant a personality all its own. Whether made as a gift or kept for your collection, this handcrafted creature brings joy through both the creation process and as a finished toy.
Amigurumi is a wonderful craft that combines creativity with the satisfaction of making something by hand. Each stitch contributes to a creation that can be treasured for years to come. The skills you’ve practiced while making this elephant will serve you well in future crochet projects, opening the door to an entire world of handmade possibilities.
If you’ve enjoyed creating this elephant, consider exploring other amigurumi patterns to expand your collection and refine your techniques. From bears to bunnies, cats to creatures of fantasy, the amigurumi universe offers endless opportunities for creative expression through crochet.


Leave a Reply