Table of Contents
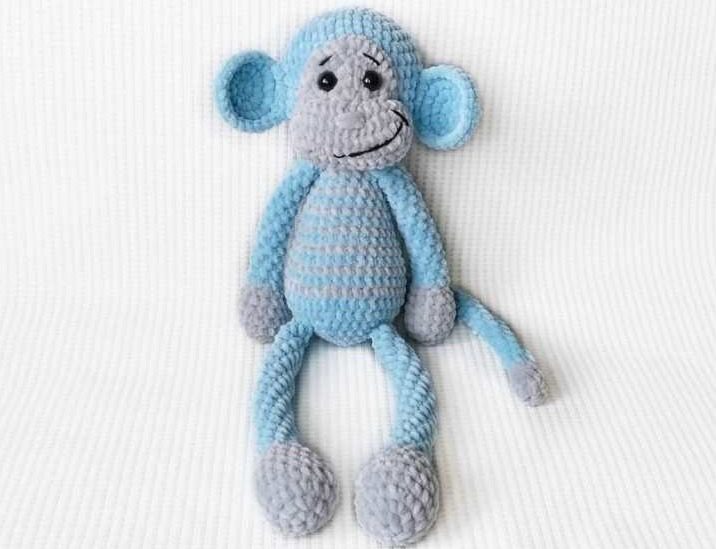
Looking for a playful and huggable crochet project? This plush monkey amigurumi pattern creates an adorable stuffed companion that stands approximately 17.5 inches (45 cm) tall. Perfect for intermediate crocheters, this detailed guide walks you through creating a charming monkey with distinctive features and a delightful striped pattern. Whether made as a gift or a personal keepsake, this cuddly monkey is sure to bring smiles to faces of all ages.
Essential Materials for Your Monkey Amigurumi
Before beginning this delightful Monkey Amigurumi project, gather these supplies:
- Yarn:
- Himalaya Dolphin Baby or YarnArt Dolce in blue and grey
- Black embroidery floss (for facial features)
- Hook: 4.0-4.5 mm crochet hook
- Notions:
- 12 mm safety eyes
- Yarn needle
- Polyester fiberfill stuffing
- Scissors
- Stitch markers
Monkey Amigurumi Crochet Terminology Used (US Terms)
- R: Row
- ch: Chain stitch
- st: Stitch
- sl st: Slip stitch
- sc: Single crochet
- inc: Increase (2 sc in one stitch)
- dec: Decrease (2 sc together)
- […]: Number of stitches you should have at the end of the row
- (…): Repeat whatever is between the brackets the given number of times
Step-by-Step Monkey Amigurumi Pattern Instructions
Creating the Head (Blue Yarn)
Round 1: 6 sc in magic ring (6) Round 2: Inc in each st around (12) Round 3: (1 sc, inc) repeat 6 times (18) Round 4: (2 sc, inc) repeat 6 times (24) Round 5: (3 sc, inc) repeat 6 times (30) Round 6: (4 sc, inc) repeat 6 times (36) Round 7: (5 sc, inc) repeat 6 times (42) Rounds 8-11: 42 sc (4 rows) Round 12: (13 sc, inc) repeat 3 times (45) Round 13: 45 sc (45) Round 14: (13 sc, dec) repeat 3 times (42) Round 15: (5 sc, dec) repeat 6 times (36) Round 16: (4 sc, dec) repeat 6 times (30) Round 17: (3 sc, dec) repeat 6 times (24) Round 18: (2 sc, dec) repeat 6 times (18) Round 19: (1 sc, dec) repeat 6 times (12)
Stuff the head firmly with fiberfill.
Round 20: Dec repeat 6 times (6)
Fasten off and weave in end.
Monkey Amigurumi Forming the Body (Blue and Grey Yarn)
Round 1: 6 sc in magic ring (6) Round 2: Inc in each st around (12) Round 3: (1 sc, inc) repeat 6 times (18) Round 4: (2 sc, inc) repeat 6 times (24) Round 5: (3 sc, inc) repeat 6 times (30) Round 6: (4 sc, inc) repeat 6 times (36) Round 7: (11 sc, inc) repeat 3 times (39)
Begin alternating grey and blue yarns to create stripes. You can change color every row or as desired.
Rounds 8-9: 39 sc (2 rows) Round 10: (11 sc, dec) repeat 3 times (36) Round 11: 36 sc (36) Round 12: (10 sc, dec) repeat 3 times (33) Round 13: 33 sc (33) Round 14: (9 sc, dec) repeat 3 times (30) Round 15: 30 sc (30) Round 16: (8 sc, dec) repeat 3 times (27) Round 17: 27 sc (27) Round 18: (7 sc, dec) repeat 3 times (24) Round 19: 24 sc (24) Round 20: (6 sc, dec) repeat 3 times (21) Round 21: 21 sc (21) Round 22: (5 sc, dec) repeat 3 times (18) Round 23: (4 sc, dec) repeat 3 times (15)
Stuff the body firmly with fiberfill. Fasten off, leaving a long tail for sewing.
Monkey Amigurumi Crafting the Arms (Make 2)
Start with grey yarn:
Round 1: 6 sc in magic ring (6) Round 2: Inc in each st around (12) Round 3: (5 sc, inc) repeat 2 times (14) Rounds 4-5: 14 sc (2 rows) Round 6: (3 sc, dec) repeat 3 times (12) Round 7: (2 sc, dec) repeat 3 times (9)
Switch to blue yarn:
Round 8: 7 sc, dec (8) Round 9: 6 sc, dec (7) Rounds 10-23: 7 sc (14 rows)
Stuff the arm with fiberfill. Fold the top opening flat and sc through both sides to close. Fasten off, leaving a long tail for sewing.
Monkey Amigurumi Making the Legs (Make 2)
Start with grey yarn:
Round 1: 6 sc in magic ring (6) Round 2: Inc in each st around (12) Round 3: (1 sc, inc) repeat 6 times (18) Round 4: (5 sc, inc) repeat 3 times (21) Rounds 5-6: 21 sc (2 rows) Round 7: (5 sc, dec) repeat 3 times (18) Round 8: (4 sc, dec) repeat 3 times (15) Round 9: (1 sc, dec) repeat 5 times (10)
Switch to blue yarn:
Round 10: 10 sc (10) Round 11: (3 sc, dec) repeat 2 times (8) Rounds 12-30: 8 sc (19 rows)
Stuff the leg with fiberfill. Fold the top opening flat and sc through both sides to close. Fasten off, leaving a long tail for sewing.
Monkey Amigurumi Creating the Ears (Make 2 – Blue Yarn)
Round 1: 8 sc in magic ring (8) Round 2: Inc in each st around (16) Round 3: (1 sc, inc) repeat 8 times (24) Round 4: 20 sc, 4 sl st (24)
Fasten off, leaving a long tail for sewing.
Forming the Tail (Grey and Blue Yarn)
Start with grey yarn:
Round 1: 6 sc in magic ring (6) Rounds 2-4: 6 sc (3 rows)
Switch to blue yarn:
Rounds 5-30: 6 sc (26 rows)
Do not stuff the tail. Fasten off, leaving a long tail for sewing.
Creating the Eye Patch (Grey Yarn)
Round 1: 7 sc in magic ring (7) Round 2: Inc in each st around (14) Round 3: (1 sc, inc) repeat 7 times (21) Round 4: 1 ch, turn, (2 sc, inc) repeat 4 times (16) Round 5: 1 ch, turn, 7 sc, 2 inc, 7 sc (18)
Fasten off, leaving a long tail for sewing.
Crafting the Muzzle (Grey Yarn)
Make 11 ch. Create an oval by working on both sides of the chain.
Round 1: Starting from the 2nd ch from hook: 3 sc in one st, 8 sc, 6 sc in last st, then work on the other side: 8 sc, 3 sc in 1st st (28) Round 2: 1 sc, 2 inc, 8 sc, 2 inc, 2 sc, 2 inc, 8 sc, 2 inc, 1 sc (36) Rounds 3-4: 36 sc (2 rows)
Fasten off, leaving a long tail for sewing.
Final Assembly Instructions
- Install Safety Eyes:
- Insert the safety eyes through the eye patch piece
- Secure with the backing washers
- Attach the Eye Patch:
- Position the eye patch on the head where the eyes should be
- Sew securely in place
- Attach the Muzzle:
- Position the muzzle on the lower part of the face
- Add a small amount of fiberfill inside the muzzle before finishing the sewing
- Sew securely around the entire edge
- Add Facial Features:
- Use black embroidery floss to create eyebrows above the eyes
- Embroider a simple mouth on the muzzle
- Attach the Head to Body:
- Position the head on top of the body
- Sew securely around the neck opening
- Attach the Ears:
- Position the ears on either side of the head
- Sew in place, curving them slightly for a natural look
- Attach the Arms:
- Position the arms on either side of the upper body
- Sew securely in place
- Attach the Legs:
- Position the legs at the bottom of the body
- Sew securely in place, ensuring the monkey can sit properly
- Attach the Tail:
- Position the tail at the back of the body
- Sew securely, curving it slightly for a natural appearance
Customization Ideas for Your Monkey Amigurumi
- Color Variations: Create monkeys in different color combinations like brown and tan, pink and white, or rainbow colors
- Accessories: Add a small banana made from yellow yarn or a tiny hat for extra cuteness
- Size Adjustment: Use different yarn weights to create larger or smaller monkeys
- Expression Changes: Vary the embroidery to create different facial expressions
- Clothing: Crochet a small t-shirt, scarf, or other garments for a personalized touch

Check this out :Crochet an Adorable Bunny Amigurumi
Care Instructions for Your Crocheted Monkey
- Spot clean with mild soap and water as needed
- Air dry thoroughly away from direct heat sources
- Gently brush plush yarn to restore fluffiness if flattened
- Store in a clean, dry place when not being displayed or played with
- If heavily played with, periodically check seams and reinforce if necessary
Creating this adorable monkey amigurumi combines basic crochet techniques with detailed assembly for a charming result. The striped pattern adds visual interest, while the expressive face gives your monkey personality. Whether made as a special gift or a personal project, this plush monkey brings joy through both the crafting process and as a finished toy.
Happy crocheting!


Leave a Reply