Table of Contents
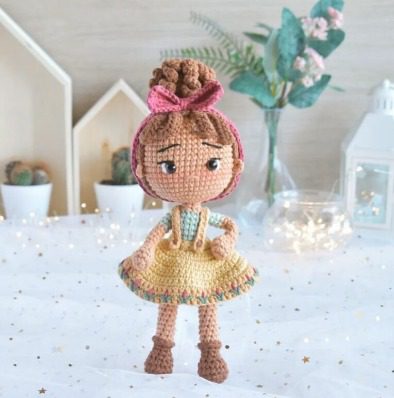
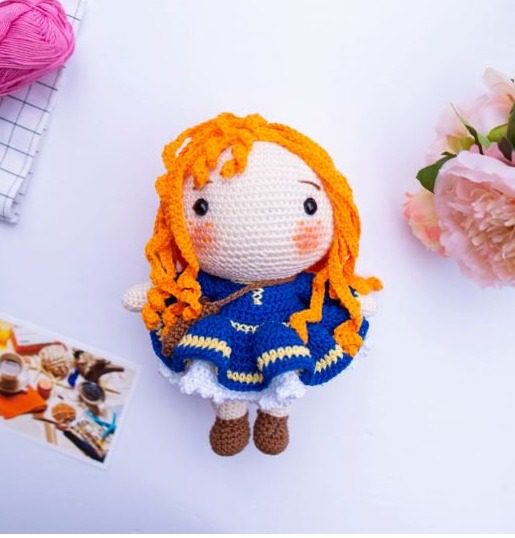
Creating Princess Doll a charming princess doll amigurumi allows you to craft a royal companion with personality and style. This comprehensive pattern guides you through making an adorable princess with vibrant orange hair, a beautiful blue and yellow dress, and even a matching handbag. Perfect for both beginners looking to expand their skills and experienced crocheters seeking a delightful project, this princess doll stands as a wonderful handmade gift or charming decoration.
Essential Materials for Your Princess Doll
Before embarking on your royal crochet journey, gather these supplies:
- Scheepjes Catona yarn in the following colors:
- Color 130 Oldlace for skin (60 grams)
- Color 201 Electric Blue for dress (30 grams)
- Color 522 Primrose (yellow) for dress accents (20 grams)
- Color 157 Root Beer (brown) for shoes and bag (15 grams)
- Color 106 Snow White for petticoat (30 grams)
- Color 390 Poppy Rose (orange) for hair (50 grams)
- 3mm crochet hook
- One pair of 9mm safety eyes
- Polyester fiberfill for stuffing
- Yarn needle for assembly
- Stitch markers
- Scissors
- Small button for dress
- Optional: fabric-safe pink blush for cheeks
Understanding Princess Doll Terminology
For clarity throughout this pattern, familiarize yourself with these crochet terms:
- Chain: The foundation of crochet work, abbreviated as ch
- Stitch/Stitches: Individual crochet units, abbreviated as st(s)
- Slip stitch: Used for joining or creating flat seams, abbreviated as slst
- Single crochet: The main stitch used in amigurumi, abbreviated as sc
- Increase: Working two stitches in one stitch to add width, abbreviated as inc
- Decrease: Combining two stitches into one to reduce width, abbreviated as dec
- Double crochet: A taller stitch used for texture, abbreviated as dc
- Half double crochet: A medium-height stitch, abbreviated as hdc
- Front loop only: Working through only the front loop of a stitch, abbreviated as FLO
- Back loop only: Working through only the back loop of a stitch, abbreviated as BLO
- Magic ring: The starting technique for working in rounds, abbreviated as MR
- Fasten off: Securing and ending your work, abbreviated as FO
Creating Your Princess Doll Step by Step
Head Construction
The head forms the expressive focal point of your amigurumi:
Round 1: Using oldlace (skin) yarn, create 6 single crochets in a magic ring (6 stitches total) Round 2: Increase in each stitch around (12 stitches total) Round 3: Work a pattern of 1 single crochet, 1 increase, repeated 6 times (18 stitches total) Round 4: Work a pattern of 2 single crochets, 1 increase, repeated 6 times (24 stitches total) Round 5: Work a pattern of 3 single crochets, 1 increase, repeated 6 times (30 stitches total) Round 6: Work a pattern of 4 single crochets, 1 increase, repeated 6 times (36 stitches total) Round 7: Work a pattern of 5 single crochets, 1 increase, repeated 6 times (42 stitches total) Round 8: Work a pattern of 6 single crochets, 1 increase, repeated 6 times (48 stitches total) Round 9: Work a pattern of 7 single crochets, 1 increase, repeated 6 times (54 stitches total) Round 10: Work a pattern of 8 single crochets, 1 increase, repeated 6 times (60 stitches total) Round 11: Work a pattern of 9 single crochets, 1 increase, repeated 6 times (66 stitches total) Round 12: Work a pattern of 10 single crochets, 1 increase, repeated 6 times (72 stitches total) Round 13: Work a pattern of 11 single crochets, 1 increase, repeated 6 times (78 stitches total) Rounds 14-23: Work 78 single crochets around for ten rounds (78 stitches total)
Begin shaping the face: Round 24: Work a pattern of 11 single crochets, 1 decrease, repeated 6 times (72 stitches total) Round 25: Work a pattern of 5 single crochets, 1 decrease, 5 single crochets, repeated 6 times (66 stitches total) Round 26: Work a pattern of 9 single crochets, 1 decrease, repeated 6 times (60 stitches total) Round 27: Work a pattern of 4 single crochets, 1 decrease, 4 single crochets, repeated 6 times (54 stitches total) Round 28: Work a pattern of 7 single crochets, 1 decrease, repeated 6 times (48 stitches total) Round 29: Work a pattern of 3 single crochets, 1 decrease, 3 single crochets, repeated 6 times (42 stitches total) Round 30: Work a pattern of 5 single crochets, 1 decrease, repeated 6 times (36 stitches total) Round 31: Work a pattern of 2 single crochets, 1 decrease, 2 single crochets, repeated 6 times (30 stitches total) Round 32: Work a pattern of 3 single crochets, 1 decrease, repeated 6 times (24 stitches total)
Fasten off, leaving a long tail for sewing components together later. Stuff the head firmly with fiberfill. Create eye indentations if desired. Place the safety eyes between rounds 19 and 20, approximately 18 stitches apart. Embroider eyebrows with your chosen color.
Princess Doll Facial Details
Use orange yarn to add small freckles across the cheeks and nose area. Apply a light dusting of pink blush to give your princess rosy cheeks for a lively appearance.
Princess Doll Leg Creation
Make two identical legs:
Round 1: Using brown yarn, create 6 single crochets in a magic ring (6 stitches total) Round 2: Increase in each stitch around (12 stitches total) Round 3: Work a pattern of 1 single crochet, 1 increase, repeated 6 times (18 stitches total) Rounds 4-6: Work 18 single crochets around for three rounds (18 stitches total) Round 7: Work 6 single crochets, 3 decreases, 6 single crochets (15 stitches total) Round 8: Work 4 single crochets, 3 decreases, 5 single crochets (12 stitches total)
Switch to oldlace (skin) yarn: Round 9: Working in back loops only, create 12 single crochets around (12 stitches total) Round 10: Work a pattern of 3 single crochets, 1 increase, repeated 3 times (15 stitches total) Rounds 11-16: Work 15 single crochets around for six rounds (15 stitches total)
For decorative detail: Using brown yarn, insert single crochet in round 8, then work in front loops only with 12 single crochets to create a shoe appearance.
Complete the first leg by fastening off. Create the second leg following the same instructions, but do not fasten off as you’ll continue to form the body.
Princess Doll Body Formation
Using the connected leg as your starting point:
Round 1: Work 14 single crochets along the second leg, chain 3 and join with the first leg, work single crochet in the 6th stitch of the first leg, work 14 more single crochets around the first leg, 3 single crochets in the chain-3 space, work 1 single crochet on the second leg (36 stitches total) Round 2: Work a pattern of 5 single crochets, 1 increase, repeated 6 times (42 stitches total) Round 3: Work a pattern of 6 single crochets, 1 increase, repeated 6 times (48 stitches total) Rounds 4-11: Work 48 single crochets around for eight rounds (48 stitches total) Round 12: Work a pattern of 3 single crochets, 1 decrease, 3 single crochets, repeated 6 times (42 stitches total) Round 13: Work 42 single crochets around (42 stitches total) Round 14: Work a pattern of 5 single crochets, 1 decrease, repeated 6 times (36 stitches total) Round 15: Work 36 single crochets around (36 stitches total) Round 16: Work a pattern of 2 single crochets, 1 decrease, 2 single crochets, repeated 6 times (30 stitches total) Round 17: Work 30 single crochets around (30 stitches total) Round 18: Work a pattern of 3 single crochets, 1 decrease, repeated 6 times (24 stitches total) Rounds 19-20: Work 24 single crochets around for two rounds (24 stitches total)
Fasten off. Stuff the legs and body firmly with fiberfill. Attach the body to the head with secure stitches.
Princess Doll Arm Construction
Make two identical arms:
Round 1: Using oldlace (skin) yarn, create 5 single crochets in a magic ring (5 stitches total) Round 2: Increase in each stitch around (10 stitches total) Rounds 3-15: Work 10 single crochets around for thirteen rounds (10 stitches total) Round 16: Work 8 single crochets, 1 decrease (9 stitches total) Round 17: Work 9 single crochets around (9 stitches total)
Stuff each arm lightly with fiberfill. Fasten off, leaving enough yarn to attach the arms to the body between rounds 18 and 19.
Princess Doll Creating the Princess Hair
The vibrant orange hair adds character and royal flair:
Round 1: Using orange yarn, create 6 single crochets in a magic ring (6 stitches total) Round 2: Increase in each stitch around (12 stitches total) Round 3: Working in back loops only, work 1 slip stitch, then (chain 60, starting from second chain from hook, work [4 single crochets, 1 increase] 3 times, then 44 single crochets, working in back loops only, slip stitch to next stitch) repeated 12 times (this creates your first layer of hair with 12 strands)
Fasten off. Then, using orange yarn, insert single crochet in the front loops only of round 2.
For the second layer of hair: Round 4: Work (chain 30, starting from second chain from hook, work [4 single crochets, 1 increase] 5 times, then 4 single crochets, working in front loops only, slip stitch to next stitch), then repeat once more, then (chain 60, starting from second chain from hook, work [4 single crochets, 1 increase] 3 times, then 44 single crochets, working in front loops only, slip stitch to next stitch) repeated 9 times (creating 12 more strands of hair)
Fasten off. In total, you’ll have created 24 strands of hair.
Princess Doll Additional Hair Strands
Create six extra strands of varying lengths:
Long Hair (Make 2): Chain 60, starting from second chain from hook, work (4 single crochets, 1 increase) 3 times, then 44 single crochets. Fasten off.
Medium Hair (Make 2): Chain 55, starting from second chain from hook, work (4 single crochets, 1 increase) 3 times, then 39 single crochets. Fasten off.
Short Hair (Make 2): Chain 50, starting from second chain from hook, work (4 single crochets, 1 increase) 3 times, then 34 single crochets. Fasten off.
Princess Doll Hair Assembly
Use pins to position each strand of hair on the head, covering all spaces except for 3 short strands at the front. Gradually secure each strand with fabric-safe glue. Once the glue has dried, sew the tops of the 6 extra strands to the head for additional fullness and dimension.
Princess Doll Princess Dress Creation
The elegant dress combines blue and yellow for royal appeal:
Using electric blue yarn: Row 1: Chain 37, starting from the second chain from the hook, work 36 single crochets, turn (36 stitches) Row 2: Chain 1, work a pattern of 5 single crochets, 1 increase, repeated 6 times, turn (42 stitches) Row 3: Chain 1, work 5 single crochets, chain 4, skip 9 stitches, work 14 single crochets, chain 4, skip 9 stitches, work 5 single crochets, turn (32 stitches plus chains) Row 4: Chain 1, work 32 single crochets (working across the chains as well), turn (32 stitches) Row 5: Chain 1, work 1 single crochet, then (4 single crochets, 1 increase) repeated 6 times, work 1 single crochet, turn (38 stitches) Row 6: Chain 1, work 38 single crochets, turn (38 stitches) Row 7: Chain 1, work 1 single crochet, then (5 single crochets, 1 increase) repeated 6 times, work 1 single crochet, turn (44 stitches)
Switch to yellow yarn: Row 8: Chain 1, work 1 single crochet, then (6 single crochets, 1 increase) repeated 6 times, work 1 single crochet, turn (50 stitches)
Switch back to blue yarn: Row 9: Working in front loops only, chain 2, work 2 half double crochets in each stitch, join with 1 slip stitch (100 stitches) Row 10: Chain 2, work (1 half double crochet, 2 half double crochets in same stitch) repeated 50 times, join with 1 slip stitch (150 stitches) Rows 11-12: Chain 2, work 150 half double crochets, join with 1 slip stitch (150 stitches)
Switch to yellow yarn: Row 13: Chain 2, work 150 half double crochets, join with 1 slip stitch (150 stitches)
Switch back to blue yarn: Row 14: Chain 2, work 150 half double crochets, join with 1 slip stitch (150 stitches)
Fasten off.
Petticoat Construction
Return to row 9 of the dress, and using snow white yarn, insert 1 single crochet: Row 1: Working in back loops only, chain 2, work 2 half double crochets in each stitch, join with 1 slip stitch (100 stitches) Rows 2-8: Chain 2, work 100 half double crochets, join with 1 slip stitch (100 stitches) Row 9: Chain 3, work 1 single crochet, (chain 3, work 1 single crochet) repeated to the end
Fasten off.
Collar Addition
Using yellow yarn and a 3mm hook, go to row 1 of the dress: Row 1: Insert 1 single crochet in row 1 of the dress, work 36 slip stitches (36 stitches) Fasten off.
Sleeve Creation
Make two identical sleeves:
Using electric blue yarn, insert 1 single crochet (counts as first stitch), pick up 12 stitches around the armhole (13 stitches total) Rounds 1-11: Work 13 single crochets around for eleven rounds (13 stitches total)
Switch to yellow yarn: Round 12: Work 13 single crochets around (13 stitches total) Fasten off.
Using the remaining tail, chain 6 stitches (or long enough for your button). Join back to the starting point with a slip stitch to form a small loop. Weave in the end. Sew a tiny button on the opposite side from the loop to secure the sleeve.
Handbag Creation
Using brown yarn: Round 1: Create 6 single crochets in a magic ring (6 stitches total) Round 2: Work a pattern of 1 single crochet, 1 increase, repeated 3 times (9 stitches total) Round 3: Working in back loops only, work 9 single crochets around (9 stitches total) Rounds 4-10: Work 9 single crochets around for seven rounds (9 stitches total) Round 11: Chain 40, attach on the opposite side to create a strap
Fasten off.
Assembly and Finishing Touches
Now that you’ve created all the components, bring your princess doll to life:
- Ensure the head is securely attached to the body
- Position the arms at the sides of the body, attaching between rounds 18 and 19
- Dress your doll by slipping the dress over the head and adjusting for proper fit
- Add the sleeves, securing the loop and button closures
- Arrange the hair strands for the desired style
- Place the handbag strap over one shoulder
- Make any final adjustments to the facial features and hair placement
The Enchanting Appeal of Princess Amigurumi Dolls
Princess dolls hold universal appeal with their regal appearance and storybook charm. This amigurumi creation captures the essence of a fairy tale princess through thoughtful details—from the flowing orange hair to the elegant blue and yellow gown with its full skirt. The addition of accessories like the matching handbag enhances the play value and visual interest.
Creating this princess doll develops various crochet skills, including color changes, working in specific loops, and constructing three-dimensional garments. Each element—from the expressive face to the layered dress—contributes to a character full of personality and royal bearing.
Customization Ideas for Your Princess
While following the pattern creates a charming princess with orange hair and a blue dress, consider these variations:
- Change the hair color to blonde, brown, or black for different princess personas
- Alter the dress colors to match favorite fairy tale characters
- Add a small crown using metallic yarn for extra royal flair
- Create miniature accessories like wands or books
- Embroider different facial expressions for unique personality
The Joy of Amigurumi Doll Crafting
Completing your princess amigurumi brings the satisfaction of creating a character with dimension and personality. Each stitch contributes to bringing this royal figure to life, from the detailed face to the layered dress. The meditative quality of crochet work provides a peaceful creative outlet while resulting in a cherished finished piece.
Whether you’re making this princess for yourself, as a special gift, or to practice new techniques, the process is as rewarding as the finished creation. Your completed amigurumi represents hours of focused creativity and carries the unique imprint of its maker—something no mass-produced toy can match.

Check this out: Crochet Rocking Horse Amigurumi Pattern
Conclusion: Your Royal Handcrafted Creation
As you put the finishing touches on your princess doll, take a moment to appreciate the magical transformation from simple yarn to royal character. This project combines multiple techniques and elements—facial features, clothing construction, hair styling—into a cohesive creation with undeniable charm and personality.
For beginners, completing this princess marks a significant achievement in your crochet journey. You’ve mastered various techniques including color changes, three-dimensional construction, and detailed garment creation. These skills form the foundation for countless future projects.
For experienced crocheters, this princess offers the opportunity to refine your techniques and perhaps add your own creative flourishes. The satisfaction of seeing a complex project through from start to finish never diminishes, regardless of how many amigurumi you’ve created before.
Your princess doll carries something special that store-bought toys cannot—the care, creativity, and personal touch that went into every stitch. Whether displayed on a shelf, given as a heartfelt gift, or becoming a child’s treasured playmate, your handcrafted royal companion will continue to bring joy long after the final stitch is complete.
Happy crocheting!


Leave a Reply