Table of Contents
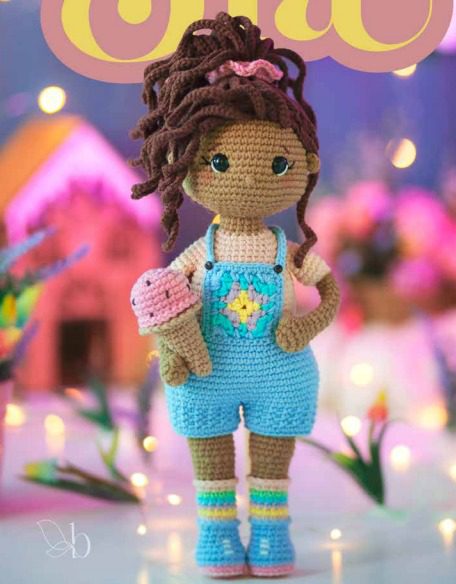
Creating your own Bia amigurumi doll is a rewarding project that combines various crochet techniques to craft a charming character with distinctive features. At approximately 32cm tall when finished, this intermediate-level project showcases colorful overalls, curly hair, and even comes with a cute ice cream accessory. This comprehensive guide will walk you through each step of creating this delightful handmade doll.
Materials Needed
Yarn
- Amigurumi Soft in multiple colors:
- 3116, 2137, 3112 (skin tones)
- 1317 (for details)
- 6042, 2218, 5069 (overalls and accessories)
- 7625, 7569, 7096 (hair and embellishments)
- 8990, 8001 (additional colors for accessories)
Tools
- 2.5mm crochet hook
- Tapestry needle for assembly
- 11mm safety eyes with locks
- Hair elastic for the scrunchie
- Polyester stuffing
- Small buttons for decorations
- Neck support (thin PVC tube or hot glue stick)
Understanding the Bia Pattern
This Bia pattern uses standard amigurumi techniques worked in continuous spiral rounds. Familiarize yourself with these abbreviations:
- AM: Magic ring
- Pb: Single crochet
- Pbx: Slip stitch
- Pa: Double crochet
- Pad: Treble crochet
- Aum: Increase (2 single crochets in same stitch)
- Dim: Decrease (2 single crochets worked together)
- Corr: Chain stitch
- Aum Triplo: 3 single crochets in same stitch
Head Construction
- Begin with a magic ring of 6 single crochets
- Increase in each stitch (12 stitches)
- Work 1sc, 1inc around (18 stitches)
- Work 2sc, 1inc around (24 stitches)
- Continue increasing evenly through round 9, reaching 54 stitches
- Work even rounds from 10-17
- Increase to 60 stitches in round 18
- After round 20, begin decreasing gradually to shape the head
- Insert 11mm safety eyes between rounds 15-16, leaving 7 visible stitches between them
Ears
Create simple ears with 5 single crochets in a magic ring, then attach them at the head’s sides around rows 14-16.
Creating the Hair
- Begin with a magic ring of 6 single crochets
- Increase steadily through round 9 to achieve 54 stitches
- Work even rounds from 10-16
- For the curly hair strands, create multiple chains of varying lengths:
- 9 strands of 60 chains each, with slip stitches back up
- 8 strands in front loop only of 60 chains each
- 10 additional strands of 60 chains
- Several shorter strands (35 and 30 chains) in back loop only for fuller coverage
Arms Construction
- Start with a magic ring of 6 single crochets
- Increase to 12 stitches in round 2
- Work even rounds until round 16
- Change color at round 17, working in back loop only
- Increase to 16 stitches for the hands
Legs and Body Assembly
- Create each foot starting with a magic ring of 8 single crochets
- Shape the feet with strategic increases and decreases
- Add colorful stripes to the socks by changing colors every few rounds
- For the body, join the legs in round 32 by working across both legs
- Increase the body to 60 stitches at the widest point
- Include openings for attaching the arms
- Gradually decrease to shape the neck and upper body
Overalls
- Create two circles of 30 chains each with 4 rounds of single crochets
- Join the circles in round 5, working 27 stitches in each circle
- Shape the overalls with increases and decreases
- Create a decorative square for the front pocket using multiple color changes
Accessories
Ice Cream Cone
- Create the scoop with a magic ring of 6 single crochets
- Increase to 24 stitches by round 4
- Create textured edges in round 9
- Decrease to close the top of the scoop
Ice Cream Cone
- Start with a magic ring of 6 single crochets
- Gradually increase to 21 stitches by round 11
- Create a decorative edge in front loop only for round 12
Scrunchie
Make a simple scrunchie using as many half double crochets as needed to fit the hair.
Assembly
- Attach the head to the body at the neck opening
- Insert neck support if using
- Sew the arms to the body at the openings created for them
- Attach the hair to the head, arranging the curls evenly
- Sew on the ears
- Attach the overalls to the body
- Add the ice cream cone to the hand
- Embroider any facial features and details
Final Touches
For the final touches, make sure all parts are securely attached and positioned correctly. Add any embellishments like buttons to the overalls and adjust the hair curls for the desired look. Your Bia amigurumi doll is now complete and ready to display or give as a treasured gift.
Remember that this Bia pattern is protected by copyright and is for personal use only. While you can sell finished dolls made from this Bia pattern, you must credit the original designer (Luana Telles from Bubalu Crochê) and cannot redistribute or sell the Bia pattern itself.
With patience and attention to detail, your Bia doll will become a charming handcrafted creation with personality and style that reflects your crochet skills.Réessayer
Check this out :Prince Perry the Frog Amigurumi
Conclusion
Creating the Bia amigurumi doll brings together multiple crochet techniques to produce a charming character with personality and style. While this intermediate-level project requires patience and attention to detail, the result is well worth the effort – a beautiful 32cm doll with distinctive curly hair, colorful overalls, and cute accessories that showcase your crochet skills.
The magic of this project lies in the assembly process, when separate crocheted pieces transform into a cohesive character with expression and charm. From the carefully crafted curly hair to the detailed overalls with decorative square pocket, each element contributes to Bia’s unique appearance and appeal.
Whether you’re making this doll as a special gift or for your personal collection, Bia represents not just a toy but a handcrafted work of art. Take your time with each section, follow the pattern carefully, and soon you’ll have a delightful companion that reflects your creativity and dedication to the craft of amigurumi.
Remember that while you can sell finished dolls made from this pattern (with proper credit to Luana Telles from Bubalu Crochê), the pattern itself is protected by copyright. Happy crocheting, and enjoy bringing Bia to life through your handiwork!


Leave a Reply