Table of Contents
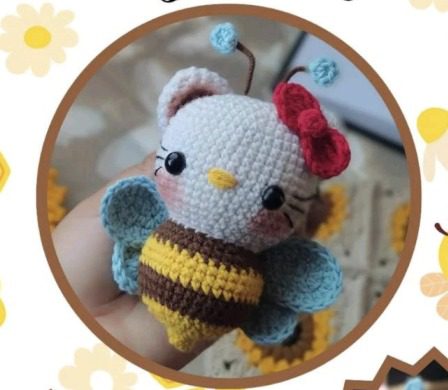
Looking for an irresistibly cute crochet project that combines two beloved characters in one? This Hello Kitty Bee (Kitty Abeja) amigurumi pattern from @Artesanias.Alim creates an adorable mashup featuring the iconic Sanrio character dressed in a sweet bee costume. With its detailed design, including blue wings, striped bee body, and signature red bow, this miniature plush is perfect for Hello Kitty fans, bee lovers, and amigurumi enthusiasts alike.
Materials Needed for Your Hello Kitty Bee Amigurumi
Before beginning your Hello Kitty Bee crochet project, gather these materials:
- Cotton yarn in the following colors:
- White (for Kitty’s head and ears)
- Yellow (for the bee body and accents)
- Brown (for the bee stripes)
- Light Blue (for the wings)
- Red (for Kitty’s bow)
- Black (for embroidery details)
- Crochet hook appropriate for your yarn weight (typically 2.5-3.5mm)
- Fiberfill stuffing
- Safety eyes (6-9mm) or black yarn for embroidered eyes
- Yellow felt or yarn for the nose
- Pink blush or yarn for cheeks
- Tapestry needle
- Scissors
- Stitch markers
Understanding the Hello Kitty Bee Crochet Pattern Terminology
This Hello Kitty Bee Crochet pattern uses standard Spanish crochet abbreviations, which I’ve translated and explained below:
- AM – Anillo mágico (Magic ring)
- Cad/Cadenas – Chain stitch
- Pb – Punto bajo (Single crochet)
- Aum – Aumento (Increase – two single crochet in one stitch)
- Dis – Disminución (Decrease – two stitches worked together)
- P.alt – Punto alto (Double crochet)
- MP – Medio punto (Half double crochet)
- Alt.tri – Alto triple (Triple crochet)
- Pds – Punto deslizado (Slip stitch)
The Hello Kitty Bee Crochet pattern is worked in continuous spirals without joining rounds, unless otherwise specified. Numbers in parentheses at the end of each round indicate the total stitch count for that round.
Step-by-Step Hello Kitty Bee Crochet Pattern
Head (Cabeza) – White Yarn
- Chain + 4 single crochet + (3 single crochet) + 3 single crochet + increase = 12 stitches
- (1 single crochet + increase) 6 times = 18 stitches
- (2 single crochet + increase) 6 times = 24 stitches
- (3 single crochet + increase) 6 times = 30 stitches
- (4 single crochet + increase) 6 times = 36 stitches
- (5 single crochet + increase) 6 times = 42 stitches
- (6 single crochet + increase) 6 times = 48 stitches
- to 16. 48 single crochet for 9 rounds = 48 stitches
- (6 single crochet + decrease) 6 times = 42 stitches
- (5 single crochet + decrease) 6 times = 36 stitches
- (4 single crochet + decrease) 6 times = 30 stitches
- (3 single crochet + decrease) 6 times = 24 stitches
At this point, begin stuffing the head firmly.
Leave a long strand of yarn for attaching to the body later.
Ears (Orejas) – White Yarn (Make 2)
- 6 single crochet in magic ring = 6 stitches
- 6 increases = 12 stitches
- (1 single crochet + increase) 6 times = 18 stitches
- (2 single crochet + increase) 6 times = 24 stitches
- 24 single crochet = 24 stitches
- (2 single crochet + decrease) 6 times = 18 stitches
- Fold the ear in half and join with 9 single crochet through both layers
Leave enough yarn to sew the ears to the head.
Hello Kitty Bee Crochet Bee Body (Cuerpo) – Start with Yellow Yarn
- 6 single crochet in magic ring = 6 stitches
- 6 single crochet = 6 stitches
- 6 increases = 12 stitches
- (1 single crochet + increase) 6 times = 18 stitches
- (2 single crochet + increase) 6 times = 24 stitches
- (3 single crochet + increase) 6 times = 30 stitches
Switch to Brown Yarn: 7. (4 single crochet + increase) 6 times = 36 stitches 8. to 9. 36 single crochet for 2 rounds = 36 stitches
Switch back to Yellow Yarn: 10. to 12. 36 single crochet for 3 rounds = 36 stitches
Switch to Brown Yarn: 13. (4 single crochet + decrease) 6 times = 30 stitches 14. 30 single crochet = 30 stitches 15. (3 single crochet + decrease) 6 times = 24 stitches
Stuff the body firmly as you work.
Large Wings (Alas Grandes) – Light Blue Yarn (Make 2)
- Chain 10, single crochet + half double crochet + double crochet + (3 double crochet) + double crochet + half double crochet + single crochet = 7 stitches
- Single crochet + half double crochet + (6 double crochet) + half double crochet + single crochet
Small Wings (Alas Pequeñas) – Light Blue Yarn (Make 2)
- Chain 8, 5 single crochet + half double crochet + (3 double crochet) + half double crochet + 5 single crochet = 7 stitches
- 5 single crochet + half double crochet + 3 double crochet + half double crochet + 5 single crochet
Bow (Lazo) – Red Yarn
- In a magic ring: Chain 4 + double triple crochet + chain 4 + slip stitch + chain 4 + double triple crochet + chain 4 + slip stitch (pompom style)
- In a second magic ring: 6 single crochet
Antennae (Antena) – Brown Yarn (Make 2)
Cut two pieces of brown yarn, each 8cm long.
Nose (Nariz) – Yellow Yarn
Embroider a small yellow nose on the face, skipping 1 stitch from the eye, with 4 stitches of separation between eyes.
Eyes (Ojos) – Black Yarn
Embroider or place safety eyes around row 12-13, with 7 stitches of separation.
Whiskers (Bigote) – Black Yarn
Starting 1 stitch from the eye, with 4 stitches of separation, embroider the whiskers with black yarn.
Hello Kitty Bee Crochet Assembly Instructions
- Attach the ears to the head: Position the ears on top of the head, slightly angled outward. Sew securely.
- Connect the head to the body: Use the long yarn tail left from the head to attach it to the body. Make sure it’s positioned centered and facing slightly forward.
- Attach the wings: Sew the large wings to the upper sides of the body. Attach the small wings slightly below and behind the large wings.
- Add the bow: Position the red bow on the left side of Kitty’s head (from the front view) and sew in place.
- Attach the antennae: Insert the brown yarn pieces into the top of the head and secure, leaving some length visible for the antennae effect.
- Final details: Add any remaining embroidery, such as the whiskers and any additional facial details.
Customization Ideas for Your Hello Kitty Bee
While the traditional Hello Kitty Bee follows the color scheme shown in the pattern, you can personalize your creation in several ways:
- Color Variations:
- Create a bumble bee with black and yellow stripes
- Try pastel colors for a softer look
- Make a rainbow bee with multicolored stripes
- Use glow-in-the-dark yarn for night-time charm
- Size Adjustments:
- Use thicker yarn and a larger hook for a bigger plush
- Try thread and a tiny hook for a miniature version
- Make a family of different-sized bee Kitties
- Additional Accessories:
- Add a tiny crochet honey pot
- Create a mini flower for Kitty to hold
- Craft a small beehive as a companion piece
Display and Gift Ideas
Your finished Hello Kitty Bee amigurumi makes a wonderful:
- Keychain (add a keyring to the top)
- Bag charm or purse accessory
- Rearview mirror decoration
- Ornament for seasonal displays
- Desk buddy for work or school
- Gift for Hello Kitty collectors
- Nursery decoration for a bee-themed room
- Part of a mobile for a child’s room
Hello Kitty Bee Crochet Troubleshooting Tips
- Uneven stitches: Maintain consistent tension throughout your work
- Gaps in the fabric: Work your stitches tightly for amigurumi to prevent stuffing from showing
- Wobbly head: Make sure to sew the head securely to prevent it from flopping
- Wing positioning: Pin the wings in place before sewing to ensure proper placement
- Stuffing issues: Use small amounts of stuffing at a time and distribute evenly
Caring for Your Hello Kitty Bee Amigurumi
- Spot clean with a damp cloth as needed
- Allow to air dry completely if it becomes wet
- Display away from direct sunlight to prevent color fading
- Store in a dust-free environment when not in use
- If giving as a gift to a child, ensure all parts are securely attached
Check this out : Alberto Scorfano Crochet Pattern
Conclusion
This Hello Kitty Bee amigurumi combines the charm of two beloved characters into one irresistibly cute creation. The detailed design creates a recognizable Hello Kitty face with an adorable bee costume that’s perfect for spring, summer, or any time you need a dose of handmade cuteness.
Remember to tag @Artesanias.Alim on social media if you share your finished creation, as the designer would love to see your version of this sweet Hello Kitty Bee amigurumi!
Happy crocheting!


1 Comment