Table of Contents
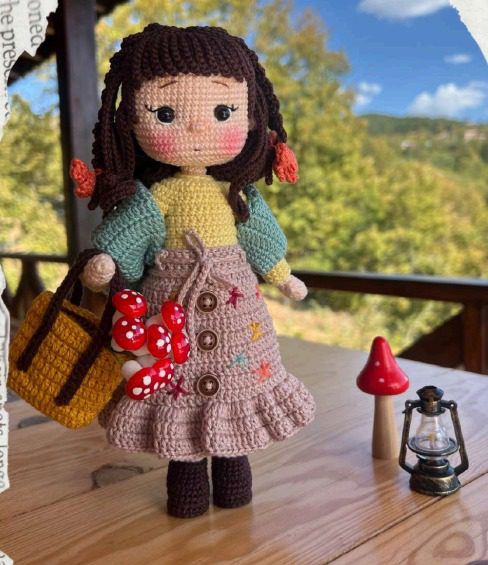
Crocheting amigurumi dolls has become increasingly popular among craft enthusiasts worldwide. The intricate details and personalized touches make these handmade dolls special gifts and treasured keepsakes. This comprehensive tutorial will guide you through creating a beautiful amigurumi doll with detailed clothing and accessories that will delight crafters of all skill levels.
Amigurumi Materials You Will Need
Before starting your amigurumi doll project, gather these essential materials:
- Catania yarn in skin tone (Tr263)
- Catania yarn in light yellow (403) for the blouse
- Catania yarn in milky coffee (257) for the skirt
- Catania yarn in dark brown (162) for hair, shoes, and bag strap
- Catania yarn in green (507) for cardigan and skirt embroidery
- Catania yarn in dark yellow (249) for bag and skirt embroidery
- Catania yarn in orange (439) for hair ties and skirt embroidery
- Catania yarn in burgundy (192) for skirt embroidery details
- Catania yarn in white (106) for undergarments
- 8mm black safety eyes
- 1.5mm electrical wire for limb structure
- 2.00mm crochet hook
- Buttons: one green (cardigan), one milky coffee (skirt), three dark brown (skirt), two yellow (blouse)
- Polyester fiberfill
- Embroidery needle for sewing
- Scissors
- Electrical tape
- Fine black, white, and brown thread for facial features
Understanding Crochet Terminology
Throughout this tutorial, we’ll use these abbreviations:
- MR: Magic Ring
- SC: Single crochet
- INC: Increase (two single crochets in one stitch)
- 3SC: Three single crochets in one stitch
- DEC: Decrease (two stitches crocheted together)
- SL ST: Slip stitch
- CH: Chain
- HDC: Half double crochet
- DC: Double crochet
- TR: Triple crochet
- HDC-INC: Half double crochet increase
- DC-INC: Double crochet increase
- TR-INC: Triple crochet increase
- 3DC: Three double crochets in same stitch
- HDC-DEC: Half double crochet decrease
- DC-DEC: Double crochet decrease
- BLO: Back loops only
- FLO: Front loops only
- (…)*n: Repeat instructions in parentheses n times
- […]: Instructions within brackets worked into the same stitch
Creating the Doll’s Head
The head forms the foundation of your amigurumi doll’s character. Follow these steps carefully:
- Create a magic ring with 6 SC (6)
- Increase in each stitch around (12)
- 1 SC, 1 INC repeat 6 times (18)
- 1 SC, 1 INC, 2 SC, 1 INC repeat 5 times, 1 SC (24)
- 3 SC, 1 INC repeat 6 times (30)
- 2 SC, 1 INC, 4 SC, 1 INC repeat 5 times, 2 SC (36)
- 5 SC, 1 INC repeat 6 times (42)
- 3 SC, 1 INC, 6 SC, 1 INC repeat 5 times, 3 SC (48)
- 7 SC, 1 INC repeat 6 times (54) 10-17. SC around for 8 rows (54)
- 24 SC, 1 CH, skip 1 stitch, 8 SC, 1 CH, skip 1 stitch, 20 SC (54)
- 24 SC, 1 SC in CH space, 8 SC, 1 SC in CH space, 20 SC (54)
- 22 SC, 4 INC, 6 SC, 4 INC, 18 SC (62) 21-24. SC around for 4 rows (62)
At this point, insert the safety eyes into the spaces created in row 18.
- 22 SC, 4 DEC, 6 SC, 4 DEC, 18 SC (54)
- 7 SC, 1 DEC repeat 6 times (48)
- 2 SC, 1 DEC, 4 SC, 1 DEC repeat 7 times, 2 SC (40)
- 3 SC, 1 DEC repeat 8 times (32)
- 1 SC, 1 DEC, 2 SC, 1 DEC repeat 7 times, 1 SC (24)
- 1 SC, 1 DEC, 2 SC, 1 DEC repeat 5 times, 1 SC (18)
- 1 SC, 1 DEC repeat 6 times (12)
Finish off, leaving a tail for closing. Use the red marked points shown in the pattern images to gently pull the eyes inward slightly for a more expressive look.
Amigurumi Adding Facial Features and Ears
For the ears (make 2):
- Create a magic ring with 6 SC
- Leave long tails at beginning and end for sewing
Embroider the eyes, mouth, eyebrows, and nose following the pattern images. Sew the ears to the head, positioning them 7 stitches away from the eyes and 1 stitch below.
Amigurumi Creating the Arms
Make 2 arms using skin tone yarn:
- Magic ring with 6 SC (6)
- 1 SC, 1 INC repeat 3 times (9)
- 2 SC, 1 INC repeat 3 times (12)
- 12 SC (12)
- 5 SC, 1 popcorn stitch (3 stitches), 6 SC (12)
- 2 SC, 1 DEC repeat 3 times (9)
- 3 SC, 1 DEC, 4 SC (8) 8-24. SC around for 17 rows (8)
Do not stuff the arms yet, as you’ll insert wire later when attaching them to the body.
Amigurumi Making the Legs and Feet
Make 2 using skin tone yarn:
- CH 6, starting from second chain: INC, 3 SC, 4 SC in last chain, 3 SC on opposite side of chain, INC (14)
- 2 INC, 3 SC, 4 INC, 3 SC, 2 INC (22) 3-4. SC around for 2 rows (22)
- 6 SC, 5 DEC, 6 SC (17)
- 4 SC, 4 DEC, 5 SC (13)
- 4 SC, 1 DEC, 1 SC, 1 DEC, 2 SC, 1 DEC (10) 8-9. SC around for 2 rows (10)
- 1 INC, 9 SC (11) 11-12. SC around for 2 rows (11)
- 1 SC, 1 INC, 9 SC (12) 14-15. SC around for 2 rows (12)
- 2 SC, 1 INC, 9 SC (13)
- 13 SC (13)
- 2 SC, 1 INC, 10 SC (14)
- 14 SC (14)
- 1 SC, 1 INC, 3 SC, 1 INC, 8 SC (16)
- 16 SC (16)
- 4 SC, 1 DEC, 10 SC (15)
- 4 SC, 1 DEC, 4 SC, 3 INC (for knee, positioned at front), 2 SC (17)
Continue with detailed instructions for completing the legs and creating the body, clothing items, hair, accessories, and assembly.
Creating the Body
After completing the left leg, for the right leg: 36. Work 6 SC and switch to white yarn. Work 4 SC with white yarn and CH 2. Don’t cut the yarn; we’ll join the legs together.
Joining the legs and creating the body:
- 19 SC (left leg), 2 SC on the 2 chains, 19 SC (right leg), 2 SC on the 2 chains = 42 SC (42) 2-9. SC around for 8 rows (42)
- 5 SC, 1 DEC repeat 6 times (36)
- 8 SC, 1 DEC, 16 SC, 1 DEC, 8 SC (34)
Switch to skin tone yarn: 12-13. SC around for 2 rows (34) 14. 4 SC, 1 DEC repeat 2 times, 9 SC, 1 DEC, 4 SC, 1 DEC, 5 SC (30) 15-23. SC around for 9 rows (30)
Join arms to body: 24. 7 SC, 2 SC joining left arm and body, 12 SC, 2 SC joining right arm and body, 7 SC (30) 25. 7 SC, 6 SC on remaining arm stitches, 12 SC, 6 SC on remaining arm stitches, 7 SC (38)
Insert wires into arms and neck, shaping as shown in the pattern images. Secure with electrical tape.
- 6 SC, 1 DEC, 4 SC, 1 DEC, 10 SC, 1 DEC, 4 SC, 1 DEC, 6 SC (34)
- 6 SC, 1 DEC, 2 SC, 1 DEC, 10 SC, 1 DEC, 2 SC, 1 DEC, 6 SC (30)
- 3 SC, 1 DEC repeat 6 times (24)
- 1 SC, 1 DEC, 2 SC, 1 DEC repeat 5 times, 1 SC (18)
- 1 SC, 1 DEC repeat 6 times (12) 31-33. SC around for 3 rows (12)
Leave a long tail for attaching the head to the neck.
The detailed tutorial continues with step-by-step instructions for creating the blouse, skirt, cardigan, hair, shoes, bag, and hair ties. Each section includes precise stitch counts, shaping techniques, and assembly guidance to help you complete your beautiful amigurumi doll.
Finishing Touches
Once all components are complete, follow the assembly instructions carefully to bring your doll to life. Add embellishments to the skirt using burgundy, dark yellow, orange, and green yarn in a random pattern as shown in the images.
With patience and attention to detail, you’ll create a charming amigurumi doll that showcases your crochet skills. Remember to work your stitches tightly and stuff firmly for the best results. Happy crocheting!
Check this out :Crochet a Yoko Winter Doll
Conclusion
Creating an amigurumi doll is a rewarding journey that combines creativity, patience, and attention to detail. By following this comprehensive tutorial, you’ve learned how to craft each component of your doll—from the expressive face and delicate fingers to the charming outfit and accessories. The techniques you’ve mastered, such as working with wire for posable limbs, creating detailed facial features, and constructing miniature clothing items, will serve you well in future amigurumi projects.
Remember that the magic of handmade dolls lies in their unique character and the love put into each stitch. Don’t worry if your doll doesn’t look exactly like the pattern photos—these small variations make your creation one-of-a-kind. As you gain experience, you’ll develop your


Leave a Reply